EN 39
Setting Up the Camera Using RM-P2580 (continued)
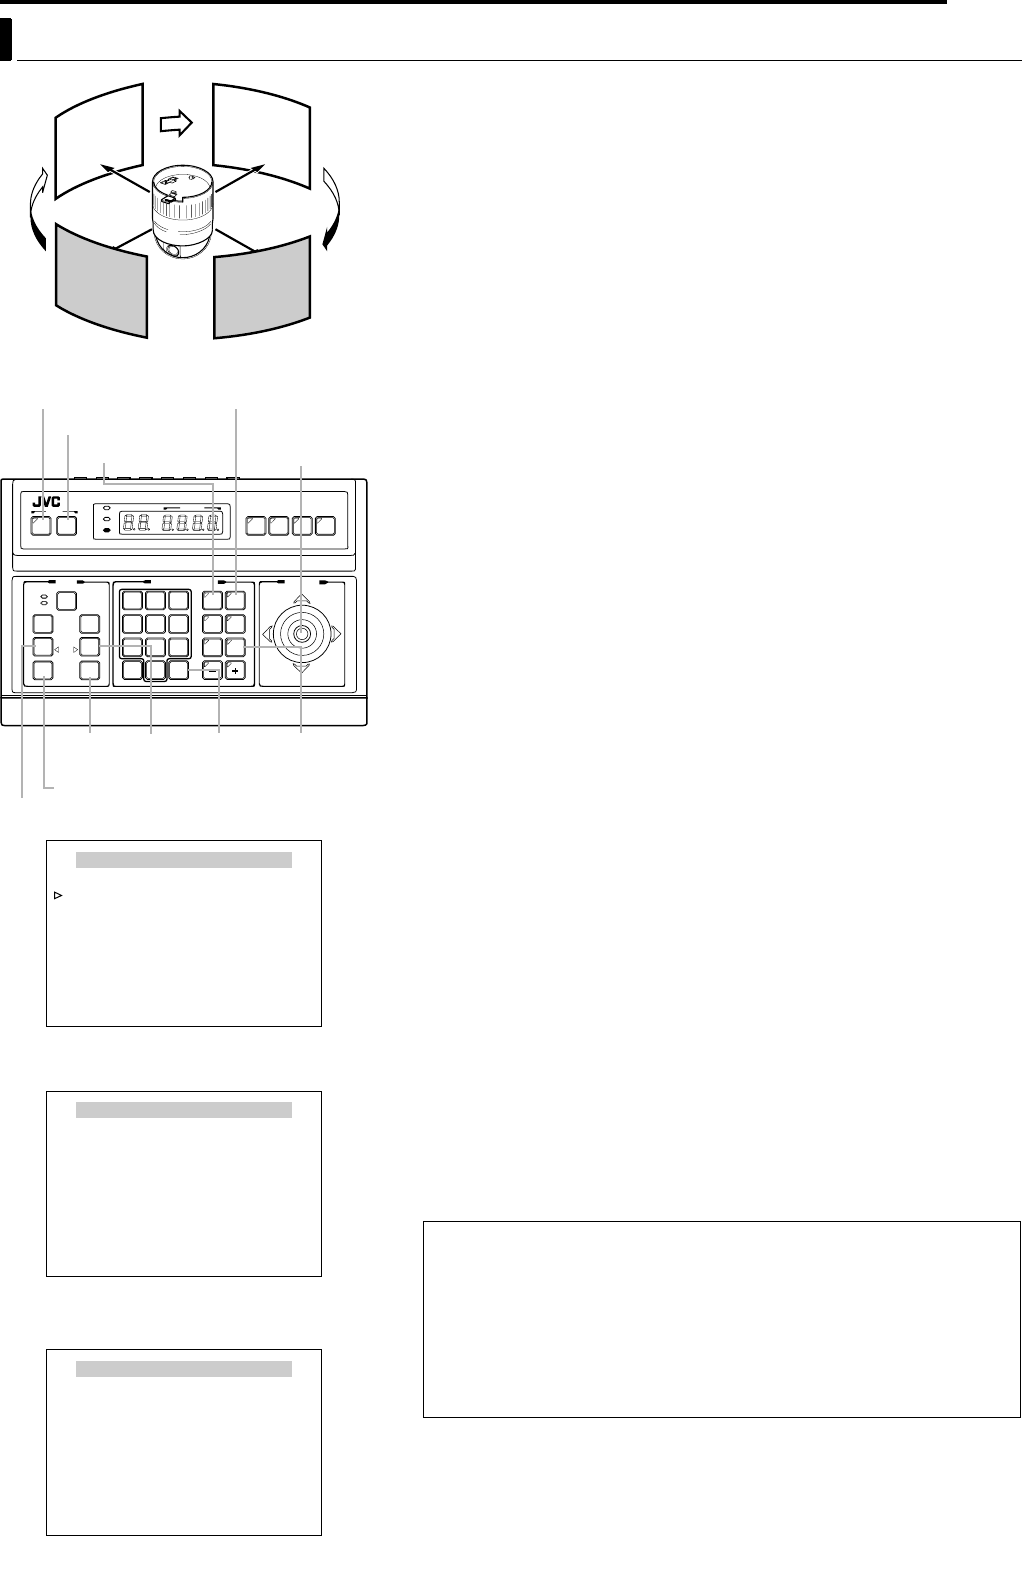
AUTO PATROL Setup
Use the AUTO PATROL screen to set the configuration of the
Auto Patrol function, which moves the camera between
several positions at a high speed. Patrol positions 1-100 can
be set in each of three modes (MODES 1 to 3). It is
recommended that these three modes be set according to the
day of the week or the time of day. For example: MODE 1 for
nighttime and MODE 2 for daytime.
1 Select the camera. (A RM-P2580 AINSTRUCTIONSB)
CAMERA buttonNNumeric key (Camera Number)NENTER button
●The picture of the selected camera is output.
2 Display the MENU screen. (A pg. 21, steps 2 to 4)
MENU button (3 sec.) N Select ACAMERA..B using the PAN lever NSET
button.
●The AMENUB screen will be displayed.
3 Tilt the PAN lever up or down to move the cursor (E) to
AAUTO PAN/PATROL/TRACE..B and press the SET button.
●The AAUTO PAN/PATROL/TRACE..B screen is displayed.
4 Move the cursor (E) to AAUTO PATROL SET..B and press the
SET button.
●The AAUTO PATROL SET MODE 1B screen is displayed.
5 Tilt the PAN lever to move the cursor (E) to the PATROL
position to be set.
●To display the next page (PATROL positions 9 to 19), press the TELE
button.
●To display the previous page, press the WIDE button.
6 Set a patroll position.
POSITION buttonNNumeric key (position number) N ENTER button
●Positions from PATROL 1 to 100 are set in the order of HOME, followed
by POS 1 to POS 99.
7 Set the length of time a camera will stay in each position.
●Use the PAN lever to the left or right to set the time period.
●Available set values: SKIP, 10s, 20s, 30s, 45s, 1min, 2min. (Selecting
ASKIPB skips that position and moves to the next position.)
●The factory setting is 10s for all positions.
8 Repeat steps 5 to 7 for each patrol position.
●Set the patrol positions and time periods of all patrol numbers in the
same way.
9 Change the Auto Patrol mode.
●Press the FAR button or NEAR button to change the mode.
●After changing to a new mode, repeat steps 5 to 8.
10 Press the MENU button.
●The screen returns to the previous menu.
●After the above setup, Auto Patrol of the camera can be started by
pressing the AUTO PATROL button on the RM-P2580.
●To change the Auto Patrol mode after the above setup, display the
AUTO PATROL SET MODE screen and press the FAR button or NEAR
button.
●The Auto Patrol function can only be set from an RM-P2580. Note that it
differs to auto sequence operations available with other remote control
units.
SETUP
MENU SET
SPEED
IRIS
AF
FOCUS
ZOOM
OPEN
FAR
TELE CLEAR
/HOME
7
4
1
8
0
5
2
9
6
3
ENTER
AUTO
PAN
OPTION
1
OPTION
2
CAMERA
POSI-
TION
AUTO
PATROL
CLOSE
NEAR
WIDE
AUTO F-1 F-2 F-3
PAN/TILTLENS
CAMERA/POSITION
CAMERA POSITION
REMOTECONTROLUNIT
RM-P2580
ALARM
POWER
KEYLOCK
TELE
button
MENU button
CAMERA button
SET button
PAN lever
WIDE button
ENTER
button
NEAR button
FAR
button
POSITION button
AUTO
PATR OL
button
POSITION
1
POSITION
3
POSITION
2
POSITION
4
High speedHigh speed
High
speed
High
speed
AUTO PAN/ PATROL / TRACE
AUTO PAN SET..
AUTO PATROL SET..
AUTO TRACE SET..
AUTO PAN/ TRACE VIDEO ..
RM.A.PAN KEY A.PAN
RM.A.PATROL KEY A . PATROL
<
MENU
>
RETURN
<
SET
>
SUB MENU
AUTO PAN/PATROL/TRACE Screen
AUTO PATROLSET MODE 1
PATROL 1 HOME 10s
PATROL 2 POS 1 10s
PATROL 3 POS 2 10s
PATROL 4 POS 3 10s
PATROL 5 POS 4 10s
PATROL 6 POS 5 10s
PATROL 7 POS 6 10s
PATROL 8 POS 7 10s
<
FOCUS
>
MODE
<
ZOOM
>
PAGE
<
MENU
>
RETURN
AUTO PATROL SET MODE 1 Screen
(Example showing PATROL Nos.1 to 8)
AUTO PATROLSET MODE 1
PATROL 9 POS 8 10s
PATROL 10 POS9 10s
PATROL 11 POS10 10s
PATROL 12 POS11 10s
PATROL 13 POS12 10s
PATROL 14 POS13 10s
PATROL 15 POS14 10s
PATROL 16 POS15 10s
<
FOCUS
>
MODE
<
ZOOM
>
PAGE
<
MENU
>
RETURN
AUTO PATROL SET MODE 1 Screen
(Example showing PATROL Nos. 9 to 16)
TK-C625.book Page 39 Thursday, March 31, 2005 4:20 PM


