36
TV Connection and Camera Start:
For best results, you should attach the Camera to a TV with the TV Video Cable (included). This will allow
you to see what the camera sees!
1. Attach the black plug of the TV cable to the Video Out Jack of the Camera. (Fig. 5)
2. Attach the opposite end of the TV cable to the yellow RCA video in Jack on the front or back of your
TV, (the Jack is usually yellow, like the plug of the TV cable) (Fig. 5).
VIDEO OUT
VIDEO IN
AUDIO
L R
TV
Fig. 5
4. Set the “ANIMATE/CAPTURE” Switch on the side of the
camera to “CAPTURE”.
5. Set the “ON/OFF” switch to “ON”.
6. Press & hold the “START/WAKE UP” button for about 2
seconds; you should hear an audible “chirp”.
7. The Camera Frame (everything that the camera sees through
the lens) will appear on the TV screen.
8. The TV screen also shows the following Icons:
a. “Capture” Mode Icon – This indicates that the camera is set to
Capture Image mode.
b. Battery Power – This icon shows the power level of the
batteries. When they are almost exhausted the icon will turn
red.
c. SD Card Detected – This icon shows that there is an SD Memory
Card in the camera slot.
d. Frames Available – This number shows the number of empty
frames available. Internal camera memory will give you around
40 frames. Adding a 256MB SD Card (not included) will give you
around 5,000 frames.
NOTE: Camera supports SD cards up to 1GB in size.
9. If the Camera Frame is blurry or not clear, adjust the Focus
Knob underneath the camera lens until your subject is clear.
10. The camera is now ready to record your brilliant masterpiece!
Fig. 6
XXXX
a.
b.
c.
d.
NOTE: Make sure that you have sufficient light to see your subject clearly. If it appears too dark on the
TV screen, add more light until the subject is clear.
NOTE: The camera is able to capture images without a TV, but you will not be able to see what the camera
sees as whole captured images cannot be seen through “Viewfinder”. This makes animation much
more difficult!
3. Power ON the TV and set the channel to Video Input.
NOTE: The correct Video Input channel name may vary from TV to TV. Some examples are: Aux 1 or 2,
Input 1 or 2, Line 1 or 2. Consult your television manual for the appropriate channel to use.
Movie Playback:
Now we will watch the movie that you have just created:
1. With the camera still on, change the “ANIMATE”/CAPTURE” Switch to “ANIMATE”.
2. The TV screen icons will disappear and a new Frame Counter will appear in the lower left hand corner. This
counter shows the number of total captured images and the current frame that is displayed on screen.
3. Watch the TV screen as the first frame of your animation comes up. If it is not at the first frame. Use
the Previous Image Button “ ” and Next Image Button “ ” (Please refer to Fig. 3) to scroll to the correct
image.
4. Press the “PLAY” button to see your Bratz™ doll raise her arm and wave at you!
5. Press the “PLAY” button continuously to watch the movie over and over.
Deleting Images:
If you ever “mess up” while re-posing your Bratz™ doll, or you capture an image that you don‛t like, you can
easily delete the image. To do so:
1. With the camera in “ANIMATE” mode, use the Previous Image Button “ ” and Next Image Button ” “ to
scroll to the first image you want to delete.
2. Press the “DELETE” Button once. Scroll to the or icon on TV screen and press the “Shutter Release”
button.
3. Repeat Step 2 for any other frames you want to delete.
4. Scroll back to the first frame of your movie and press the “PLAY” Button to watch it without the unwanted
image(s).
5. If you want to delete all of the frames, press the “DELETE” Button twice and confirm deletion with the
“Shutter Release” button.
SAVING IMAGES
If you want to save your images to a computer for printing, emailing to friends or other purposes, have an
adult help you with these steps:
1. Press the “START/WAKE UP” Button on the Camera and hold for about 2 seconds to put it in sleep mode.
2. Disconnect the Camera from the TV Cable.
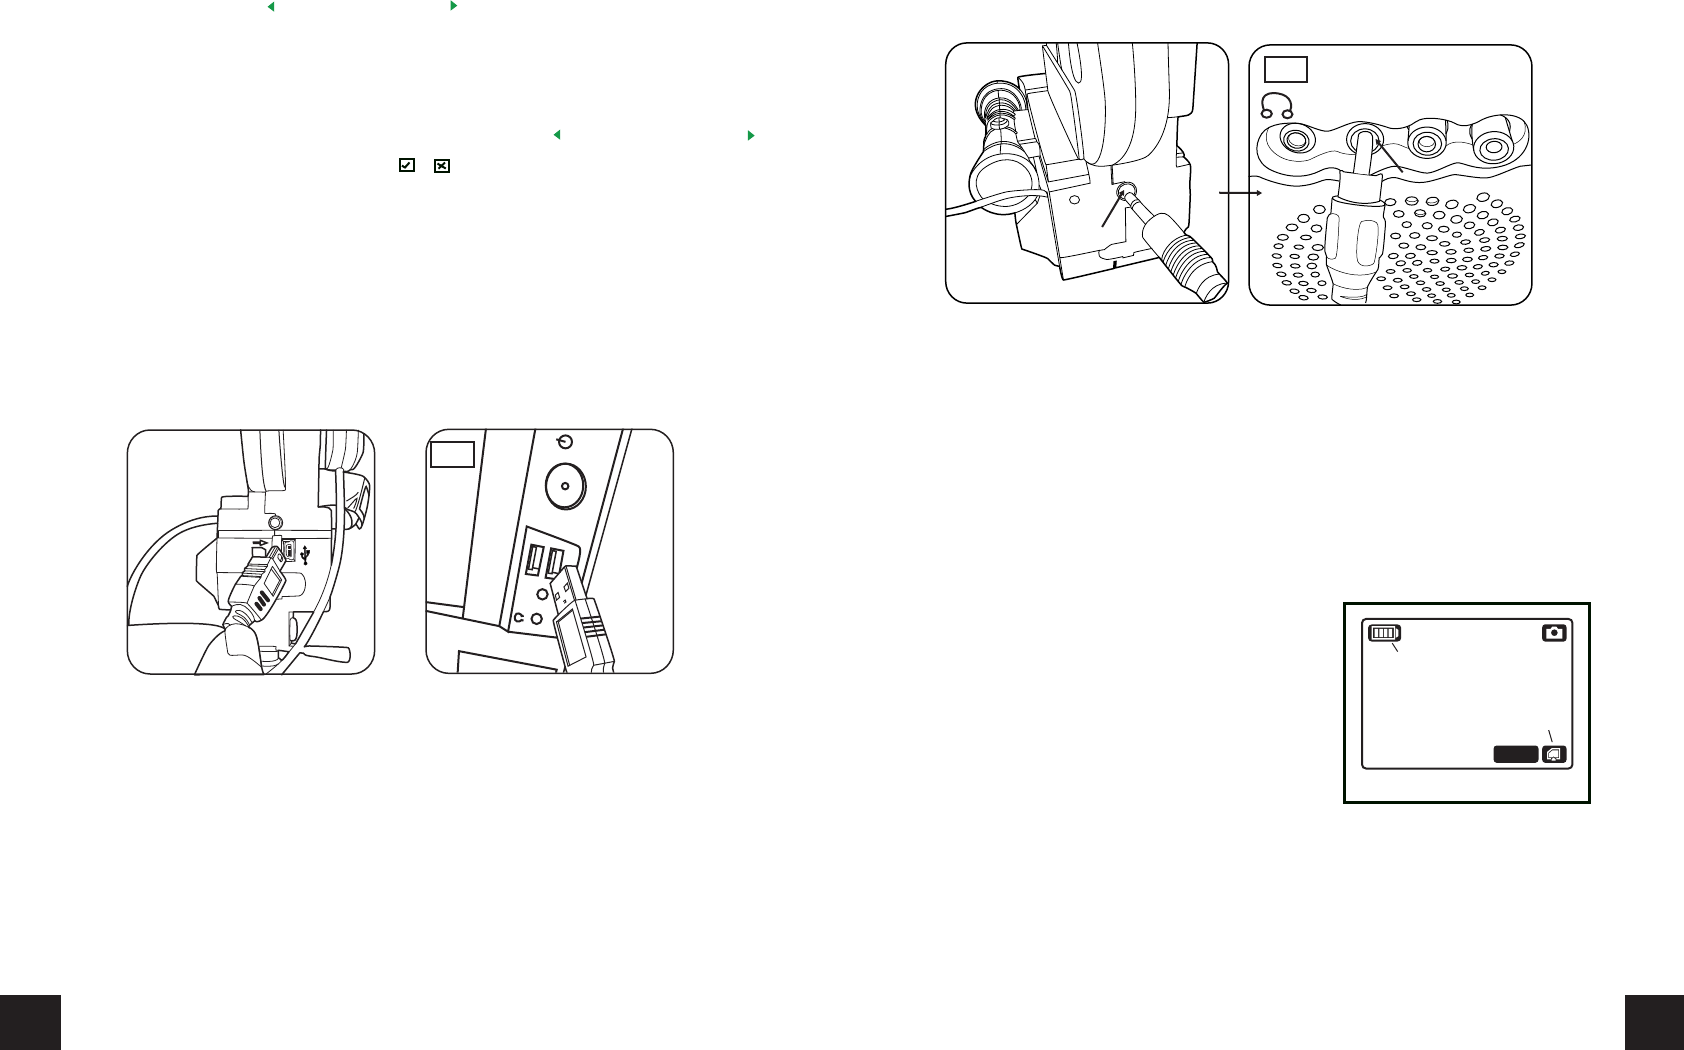
3. Attach the USB Cable to the back of the camera. (See Fig. 8).
4. Attach the other end of the USB Cable to the USB port of a PC that is running Windows®
98 SE/ME/2000/XP, or a Macintosh® computer that is running up to OS 10.2.8.
5. Navigate to the folder on the External Storage device and copy all of the .jpg files to a folder on your PC
or Mac®.
6. Once you have the image files on your computer, you can:
• Print out copies and share them with your friends.
• Email copies of the images to friends and family.
• Use a video editing or “flipbook” program to make a video sequence.
o NOTE: Use a program that is able to import files as “JPEG Sequences”.
Fig. 8
PC
a e a e a e
Animation Notes:
1. Your Camera plays movies back around 3 to 4 frames per second. This means that around 3 to 4 images
make up one second of movie time. Think about the kinds of actions you want your Bratz™ doll to do and
act them out yourself. Time them and see how many seconds each action takes. This will give you an idea
of the number of images to capture.
2. The more images you capture for an action, the slower the action will look on screen. Take a look at the
images below:
