


www.midlandusa.com
5
English
François Español
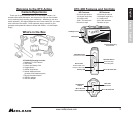
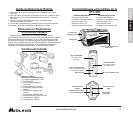
Camera Mounting and Aiming
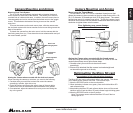
Mount on Dual Track System
The XTC-200 was innovatively designed with an identical dual track
mount system on either side of the camera. This allows you to mount it
on either side of a helmet with ease. In addition, the main mount piece is
interchangeable and can be moved from the helmet mount to the goggle
mount. This eliminates the hassle of having to remount the camera
every time.
To mount the camera on the main mount piece, slide the camera onto
the dual track system with the two notches on the mount facing toward the
back of the camera.
To detach the camera from the main mount, hold the camera with the
lens facing away from you. Press down the mount release switch and pull
the mount toward yourself.
Dual Track
Mounting System
Mount Release
Switch
Interchangeable
Mount
Aiming the Camera when mounted with the dual track mount:
When mounting the camera on a helmet, you must do the following:
1. Consider what you would like to shoot and mount the camera
accordingly- left side, right side or top.
2. Find a at surface and ensure the area is clean of dirt and debris.
Remove the cover of the adhesive pad and adhere to the helmet.
3. Once attached, adjust the camera to be sure you are not lming the
sky or the ground.
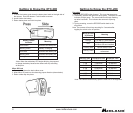
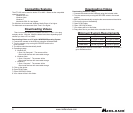
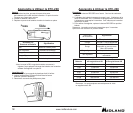
Mount using the Thread Mount
On the bottom of the XTC-200 is a standard thread mount that
allows the camera to be mounted to a tripod or other xture with a 1/4-
20 (1/4” diameter, 20 threads per inch) 5/16 deep thread. The vented
helmet strap mount is a screw type mount. To afx the camera, insert
the screw on the mount into the camera thread and rotate the camera
clockwise to tighten down onto the screw.
Thread Mount
Screw Mount
Aiming the Camera when mounted with the thread mount:
When mounting the camera on the handlebars of a bike or with the
vented helmet strap mount follow these steps:
1. Consider what you would like to shoot and mount
accordingly.
2. Ensure once attached that the camera is aimed straight and
not toward the ground or at the sky.
Reformatting the Micro SD card
The Micro SD card can be reformatted while in the camera. This allows
you to delete all the videos at one time. Follow these steps:
1. Move the RECORD switch to the record position.
2. When the battery indicator turns green, press and hold the Micro SD
card reformat button.
3. Keep holding the Micro SD card reformat button down until the record
indicator turns off and the Micro SD card indicator begins blinking green.
4. Move the RECORD switch to the off position.
Camera Mounting and Aiming
Over tightening may cause damage
to the mount and/or camera
Note: The camera cannot reformat the Micro SD card if the low
battery light is on.
Ensure battery is fully charged before formatting