


5
The operating instructions are described in six steps. Please read
and understand these instructions before using this equipment.
Do not omit any steps.
1 Fluid Head Set-up
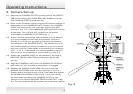
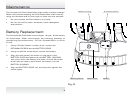
1.1 Loosen the PAN HANDLE CLAMP fully then rotate the
PAN HANDLE until it is approximately perpendicular to the
THREADED STUD (g. 4) and tighten the PAN HANDLE
CLAMP - avoid contact wear between the serrations on
the Fluid Head and the PAN HANDLE CLAMP, if this occurs
then unwind the PAN HANDLE CLAMP further.
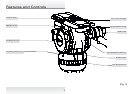
1.2 Ensure that the TRIPOD BOWL is approximately horizontal.
Place the Fluid Head into the TRIPOD BOWL, adjust the
BUBBLE LEVEL (g. 4) such that the bubble is inside the
black circle and tighten the CLAMP NUT.
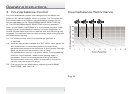
1.3 Set the initial control settings as follows – see Figure 1 & 2:
• Select Counterbalance to position 4 (top setting).
• Select Pan & Tilt Drag to position 0.
• Tighten the PAN LOCK, TILT LOCK and the SLIDING
PLATFORM LOCK.
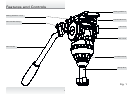
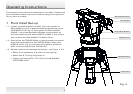
Fig. 4
Operating Instructions
Pan Handle Clamp
Pan Handle
Illumination Button
Bubble Level
Threaded Stud
Clamp Nut