


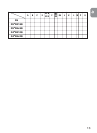


21
En
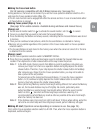
■Notes on using vibration reduction
•Wait until the image in the viewfinder stops vibrating before fully depressing the shutter release
button after you have lightly pressed the shutter release button.
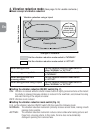
•When taking panning shots, be sure to set the vibration reduction mode switch to NORMAL. If
you move the camera in a wide arc when panning, vibration in the direction of that movement is
not affected. For example, if you pan the camera horizontally, only vibration in the vertical
direction is reduced, making smooth pans much easier.
•Due to the characteristics of the vibration reduction mechanism, the image in the viewfinder may
become blurred after releasing the shutter.
•Do not turn the camera power OFF or remove the lens from the camera while the vibration
reduction mode is in operation. Otherwise, the lens may emit a chattering noise if the camera is
shaken. This is not a malfunction. Turn the camera power ON again to correct this.
•With F80-Series/N80-Series, F75-Series/N75-Series, F65-Series/N65-Series, D100 and D70
cameras, vibration reduction does not work while the flash is recycling.
•Set the vibration reduction ON/OFF switch to ON when the lens is mounted on a tripod. The
switch should be set to ON when using a tripod without tightening the tripod head, or when using
a monopod.
•If you set the AF start (AF-ON) button to ON on the camera or the Focus operation button on the
lens, vibration reduction will not operate.
5. Focusing, zooming, and depth of field
First turn the zoom ring until the desired composition is framed in the viewfinder before
focusing. If your camera has a depth of field preview (stop-down) button or lever, depth
of field can be observed while looking through the camera viewfinder.
6. Setting the aperture
Because this lens does not have an aperture ring, you must set the aperture on the camera.
7. Built-in rotating tripod collar
When shooting vertical pictures, loosen the tripod collar lock screw by turning it counterclockwise,
rotate the lens to an appropriate position, then tighten the screw clockwise.
•When holding the camera by its handgrip and rotating the camera with the lens in its tripod collar,
your hand may bump into the tripod, depending on the tripod in use.
Note: It’s possible to detach the tripod collar by removing the tripod collar lock screw. For details
on this procedure, contact your nearest Nikon service center or representative office.
8. Lens hood HK-30
Tighten the lens hood screw securely when using the lens hood. To store the hood, place it in the
reverse position and tighten the screw securely.
9. Lens protective glass
This lens is available with a lens protective glass attached. Keeping this glass on the lens is
recommended at all times. If the picture you want to take includes a bright light source, removing
this glass may reduce ghost images. To detach the glass, unscrew by rotating the rubber ring
around the glass. Store the glass in the case provided.
•Meniscus glass, unlike existing flat glass, is used for the lens protective glass.