


Turn the computer on and insert the PictureProject installer CD into the CD-ROM drive. The
Install Center program will launch automatically. A language-selection dialog will be displayed.
Select a language and click Next.
If the “Select Language” Dialog Is Not Displayed
Open “My Computer” by selecting My Computer from the Start menu (Windows XP)
or by double-clicking the My Computer icon on the desktop (Windows 2000) and then
double-click the CD (PictureProject) icon.
This section describes how to install PictureProject and copy photographs to a computer.
PictureProject can also be used to view, edit, and organize photographs. See the PictureProject
Reference Manual (on CD) for more information.
Installing PictureProject
PictureProject
PictureProject
Before Installing PictureProject
PictureProject requires Mac OS X
(ver-
sion 10.3.9 or later, PowerPC G4/G5) or
a pre-installed version of Windows XP
Home Edition, Windows XP Professional,
Windows 2000 Professional.
Im
p
ortant
Turn off any virus-protection software and exit all other applications
before beginning installation.
Log on to an account with administrator privileges when installing,
using, or uninstalling PictureProject.
Before connecting the camera, be sure that PictureProject is
installed. If the Windows hardware wizard is displayed when the
camera is connected, click Cancel to exit the wizard.
Installing PictureProject (Windows)
Installing PictureProject (Windows)
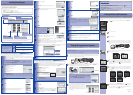
The illustrations in this section are intended as a guide only. The dialogs and messages displayed dur-
ing installation may diff er in some respects from those shown here.
Group photos into collections
and collections into folders.
Collection list
Retouch photos using a variety of tools, including
cropping and brightness and hue adjustment.
Edit
Design
Arrange photos in a variety of
layouts.
Other tasks that can be performed with PictureProject include printing photographs, sending
photos by e-mail, viewing slide shows, and copying photographs to CD or DVD.
Organize
View and organize photographs.
Follow the on-screen instructions to install the drivers for D1-se-
ries cameras.
Click Yes.
The Nikon FotoShare setup program will start (Europe only). Fol-
low the on-screen instructions to install Nikon FotoShare.
View the photos in the current collection or
folder.
Picture list
Click Easy Install to begin installation of:
• Drivers for D1-series cameras
• Apple QuickTime 7
• Nikon FotoShare (Europe only)
• PictureProject
• Camera Control Pro Updater
• Microsoft DirectX 9
Capture NX Free Trial
Click Capture NX Free Trial in the Install Center window to open your web browser to a
site where you can download a trial version of Capture NX (Internet connection required).
Installing PictureProject (Macintosh)
Installing PictureProject (Macintosh)
The illustrations in this section are intended as a guide only. The dialogs and messages displayed dur-
ing installation may diff er in some respects from those shown here.
Turn the computer on and insert the PictureProject installer CD into the CD-ROM drive. Double-
click the PictureProject installer CD icon on the desktop, then double-click the Welcome icon. A
language-selection dialog will be displayed. Select a language and click Next.
Read the license agreement…
…and click Yes to accept and proceed with installation.
Remove the PictureProject installer CD from the CD-ROM drive.
This completes installation of PictureProject. Proceed to “Viewing Photographs on a Computer.”
Click Next to install PictureProject to the location shown, or click
Browse… to choose a diff erent folder.
Click Yes.
Click Yes.
Click Finish.
DirectX 9
If DirectX 9 is not already in-
stalled, the dialog shown at
right will be displayed. Follow
the on-screen instructions to
install DirectX 9.
Click Yes. If a dialog is displayed directing you to restart the
computer, follow the on-screen instructions.
The PictureProject Import Assistant will be displayed. The Import Assistant is used to catalog
existing images for display in PictureProject.
1 Click Import to catalog the images in the “Import from” folder in PictureProject. The time
needed to catalog the images is proportional to the number of images in the folder.
2 Click OK to close the Import Assistant when import is complete.
To proceed without cataloging existing images, click Close. Existing images can be cataloged
manually at any time; see the PictureProject Reference Manual (on CD) for details.
“Import from”
folder
Close buttonImport button
Enter the administrator name and password…
…and click OK.
Click Easy Install to begin installation of:
• Nikon Fotoshare (Europe only)
• PictureProject
• Camera Control Pro Updater
• Apple QuickTime
The CD for use in Europe includes Nikon
FotoShare. Selecting Easy Install dis-
plays the dialog shown at right; click OK.
Capture NX Free Trial
Click Capture NX Free Trial in the Install Center window to open your web browser to a
site where you can download a trial version of Capture NX (Internet connection required).
The photographs will be displayed in PictureProject when transfer is complete.
PictureProject periodically checks for updates when
the computer is connected to the Internet. If an
update is detected when PictureProject starts, an
update dialog will be displayed. Follow the on-
screen instructions to update to the latest version of
PictureProject.
The illustrations in this section are from Windows XP.
Viewing Photographs on a Computer
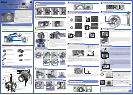
Turn the camera off and connect the supplied UC-E4 USB cable as shown below. Do not use force
or attempt to insert the connectors at an angle. Connect the camera directly to the computer; do
not connect the cable via a USB hub or keyboard.
If the computer restarts, log in to the account used to install PictureProject. To install Nikon
FotoShare (Europe only), open the “FotoShare” folder on the PictureProject installer CD and drag
the Nikon FotoShare icon to the “Applications” folder on the hard disk.
Windows XP
The dialog shown at right will be displayed when the camera is
turned on. Select Copy pictures to a folder on my computer
using PictureProject and click OK. To bypass this dialog in
future, check Always do the selected action.
Turn the camera on. PictureProject will automatically detect the camera and the
PictureProject Transfer window will be displayed in the computer monitor. Click Transfer to copy
all photographs from the camera memory card to the computer.
Transfer button
Use a Reliable Power Source
Nikon recommends using the optional EH-5 AC adapter to power the camera for extended periods.
Do not use another make or model of AC adapter.
The PictureProject Import Assistant will be displayed (see step 12 of Installing PictureProject
(Windows) for details).
Disconnecting the Camera
Before turning the camera off and disconnecting the USB cable, remove the camera from the sys-
tem as described below.
• Windows XP Home Edition/Professional: Click the “Safely Remove Hardware” (
) icon in the taskbar
and select Safely remove USB Mass Storage Device from the menu that appears.
• Windows 2000 Professional: Click the “Unplug or Eject Hardware” (
) icon in the taskbar and select
Stop USB Mass Storage Device from the menu that appears.
• Macintosh: Drag the camera volume (“NIKON D80”) into the Trash.
Printing Via Direct USB Connection
JPEG photographs can be printed directly from a camera connected to a PictBridge printer (RAW /NEF
photographs can not be printed by direct USB connection). See page 69 of Guide to Digital Photography
for details.
Click Install.
Click Yes.
Click Yes.
Click Quit.
Apple QuickTime
If an earlier version of QuickTime is installed, the
QuickTime installer will start. Follow the on-screen in-
structions to complete installation. On some systems,
the QuickTime installer may require considerable time to
complete installation.
Click OK. If a dialog is displayed directing you to restart the com-
puter, follow the on-screen instructions.
Read the license agreement…
…and click Accept to accept and view the ReadMe fi le. Take a few
moments to read this fi le, which may contain important informa-
tion that could not be included in this guide. Click Continue… to
proceed with installation.
Remove the PictureProject installer CD from the CD-ROM drive.
This completes installation of PictureProject. Proceed to “Viewing Photographs on a Computer.”
Press button to set USB in the SETUP MENU. Set the
USB
option
to
PTP
.
Turn the printer on.
Turn the camera off .
Connect the UC-E4 USB supplied cable as shown. Do not use force
or attempt to insert the connectors at an angle. Connect the camera
directly to the printer; do not connect the cable via a USB hub or key-
board.
Turn the camera on. A welcome screen will be displayed, followed by
the PictBridge playback display.
Press the multi selector left or right to view additional photographs,
or press the button to zoom in on the current photo. To view six
photographs at a time, press the button. Use the multi selector to
highlight photographs, or press to display the highlighted photo-
graph full frame.
To print the picture currently selected in the PictBridge playback dis-
play, press button. The menu shown at left will be displayed. Press
the multi selector up or down to highlight an option and press to the
right to select.
Page Size No. of copies Border
Time stamp Cropping
Press to return to
print menu.
To start printing, highlight Start Printing and press button. The
PictBridge playback display will be displayed when printing is complete.
To cancel and return to the PictBridge playback display before all im-
ages have been printed, press button again.
ᕄ
ᕃ
See page 67 of Guide to Digital Photography for details.
Viewing the
Viewing the
PictureProject Reference Manual
PictureProject Reference Manual
1
1
Start the computer and insert the silver reference CD.
2 Double-click the CD icon.
• Windows: Double-click the CD (Nikon) icon in My Computer.
• Macintosh: Double-click the CD (Nikon) icon on the desktop.
3 Double-click the INDEX or INDEX.pdf icon to display a language selection screen. Click a language to display an
index of the documentation available for PictureProject and click a title to view.
Printed in Belgium
6MBA7211-01