


15
í
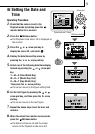
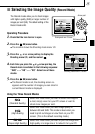
Selecting the Image Quality (Record Mode)
Operating Procedure
1. Check that the lens barrier is open.
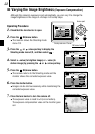
2. Press the OK/menu button.
¼ The monitor shows the Shooting mode menu 1/3.
3. Press the or arrow pad key to display the
Shooting menu 2/3, and then select .
4. Each time you press the or arrow pad key, the
Record mode is switched in the following sequence:
“SHQ”p[“HQ”p[“SQ”. Select one of these
modes.
5. Press the OK/menu button.
¼ The Record mode is set, the shooting screen re-
appears and the number of images you can shoot in
current Record mode is displayed.
The Record modes allow you to shoot images
with higher quality (SHQ) or larger number of
images per card (SQ). The default setting of the
Record mode is HQ.
2/3
END
OK
SELECT
HQ
AUTO
ON
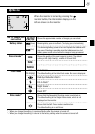
Shooting mode menu 2/3 screen
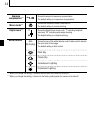
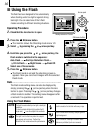
Using the Three Record Modes
Select this mode when you want to attach the image to
e-mail, simply view it on your PC screen or want to
shoot more images per card.
Select this mode when you need image quality in
between SQ and SHQ. This mode is ideal when you
need to print out images or view them on your PC
screen. (This is the default recording mode.)
Select this mode when you want to print the image with
high quality or a large size or to retouch it on your PC.
Arrow pad
Shooting mode menu 1/3 screen
1/3
AUTO
OFF
OFF
DIGITAL ZOOM
END
OK
SELECT
OK/menu button
SQ
(Standard Quality)
HQ
(High Quality)
SHQ
(Super-High Quality)