


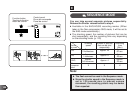


112
E
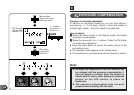
PANORAMA MODE
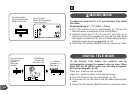
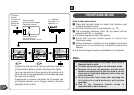
How to take panoramas
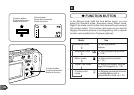
1 Press the Function button to select the Function card
mode (Panorama mode).
● The LCD monitor turns on automatically. (p. 76)
2 The connecting direction (right, left, up, down) can be
selected with the +/– buttons.
● The boxes appear on the LCD monitor.
3 Press the Function button again to cancel the
Panorama mode.
4 Follow directions carefully for the supplied panorama
application to successfully assemble panorama
images.
● Panorama images must be assembled on a computer.
◆ The Panorama mode is available only when a
Standard card is used.
◆ The flash cannot be used in the Panorama mode.
◆ Because the focus, the exposure, and the white
balance are determined by the first picture, do not
shoot overly bright/dark subjects such as the sun
in the first frame.
◆ Do not move the Zoom lever after shooting the
first picture to avoid problems with picture
assembly.
◆ Use of the Standard Quality mode is
recommended to save memory.
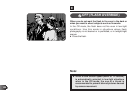
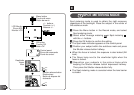
Note:
Overlap the left end of the picture with the right end
of the previous picture (when shooting to the right).
Faire se chevaucher le bord gauche de la photo et le
bord droit de la vue précédente (chronologie de prise
de vues vers la droite).
Superponga el extremo izquierdo de la imagen con
el extremo derecho de la imagen anterior (cuando
fotografíe hacia arriba).
Control panel
Écran de commande
Panel de control
Function
button
Touche de
fonction
Botón de
función
+/– buttons
Touches (+/–)
Botones +/–
Function card mode
Carte de fonction
Modo de tarjeta de función