


9
9
13
14
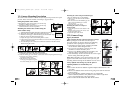
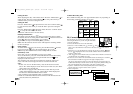
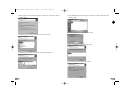
Setting the Date
When adjusting the date, “DD” will be shown. Press the “Menu button” to
adjust the date. Press the 'Confirm' button to verify, after which you
would be able to proceed to setting the time.
Setting the Time
Press the “Menu button” to adjust the hour. Press the “Confirm” button
to verify the hour, after which you would be able to proceed to setting the
minute.
Press the “Menu button” to adjust the minute. Press the “Confirm” button
to verify the time and exit this mode.
Note: Time will be shown in 24 hour format.
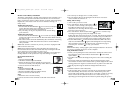
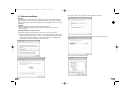
Deleting individual files
The Delete icon looks like this . Once inside the delete menu to delete
the last file that was recorded, press the Menu button until the LCD screen
shows . Press the Confirm button to confirm.
Repeat these two steps to individually delete your files.
Note: After file deletion, the LCD screen will adjust the remaining number
of files accordingly.
Delete All files
To delete all files stored in your camera, press the Menu button until the
LCD screen shows . Press the Confirm button to verify.
Note: It may take a few minutes to delete multiple files at one time.
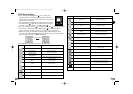
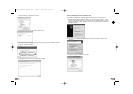
SD Memory Card
In this unit, you can use SD Memory Cards of up to 4GB.
To use an SD memory card, turn off the ATC5K and insert the SD memory
card. When the camera is turned on again the SD card icon will be
displayed on the LCD screen.
The remaining time on the SD card will also be displayed on the LCD
screen. All of the video footage will now be saved onto the SD card.
Note:
1. If there is an error on the SD memory card, the SD card icon and the
letters “Err” will be displayed on the LCD screen. In this case, turn off the
camera and remove the SD card.
2. The SD card is equipped with a Write-Protect switch that can prevent
writing and formatting to the card. “Card Locked” will be displayed if
the SD card is locked with Write-Protect switch.
3. We recommend using SanDisk regular or AData SD cards.
4. With use on Windows 2000 users must format to FAT otherwise the SD
card and camera may malfunction.
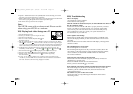
Available Recording Time
The available recording time is an approximation (these vary depending on
the recording conditions and the type of card).
SD
Memory
Card
Picture quality
setting
VGA
30 fps
Internal
Memory
32 MB
1 GB
2 GB
4 GB
47 s
30 min
60 min
120 min
QVGA
30 fps
1 min 36 s
57 min
114 min
216 min
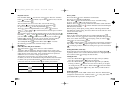
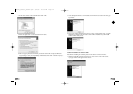
IX) Connecting to a computer
You can upload your recorded video footage to a PC by
connecting the ATC5K to your PC using the USB cable.
1. Turn the ATC5K on.
2. Connect the ATC5K to a PC via the USB cable.
3. There are 2 modes available, File and Cam . File
allows you to check the files in the camera or SD card. Cam is the webcam
function.
4. Select Cam to use the ATC5K as a webcam by pressing "Confirm" whilst
the icon is highlighted. Please note that the software must be installed before
using the webcam mode.
5. “File” appears on the ATC5K LCD screen, which means ATC5K is connected to
your PC and files are available for review.
6. To choose to review Files in the Camera/SD card the user should press “Confirm” .
Once selected the ATC5K drive appears in the [My Computer] folder.
*If you are connecting the camera to a PC for the first time, the required driver is
installed automatically so that the camera can be recognized by Windows Plug and
Play. The 100ATC5K drive then appears on the [My Computer] folder.
7. Open the “100ATC5K” folder in the [DCIM] folder to start selecting your
desired video files. Copy the desired video to your PC.
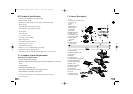
• Folder Composition:
Removable disk
• Internal Memory
• SD Memory Card
DCIM
100ATC5K
AVI_0001
AVI_0002
AVI_0003
SD
EN
ATC5K_manual_UK0827.qxd 9/2/08 10:09 AM Page 9