


Setting the Time
1) Press and hold MODE button for at least three seconds. The “Hour”
segment of the clock time will begin flashing
2) While the “Hour” segment is flashing press the [
] button to set the
desired hour time (Please note the AM/PM designation)
3) When the desired hour timeis reached press the MODE button again. The
“Minutes” segment of the clock time will begin flashing.
4) While the “Minutes” segment is flashing press the [
] button to set the
desired minutes time.
5) When the desired minutes time is reached, briefly press the MODE button
five more times to exit the clock time set mode.
IMPORTANT : As soon as any manual change in the clock time is mode, there
is a loss of the signal strength indicator from the display.
NOTE : The next sucessful reception of a radio signal will override a manually
set clock time showing the clock running manually.
Setting the Year
1) Press and hold MODE button for at least three seconds. The “Hour”
segment of the clock time will begin flashing
2) Briefly press the MODE button and the “Minutes” segment will begin flash-
ing.
3) Briefly press the MODE button once more. The clock time will disappear
and be replaced by a flashing year (Ex. 1995). This is the year set mode.
4) While the “Year” segment is flashing press the [
] button to set the de
sired year.
5) When the desired year is reached briefly press the MODE button four more
times to exit the year set mode.
IMPORTANT : As soon as any manual change in the clock time is mode, there
is a loss of the signal strength indicator from the displayshowing the clock run-
ning manually.
NOTE : The next sucessful reception of a radio signal will override a manually
set clock time showing the clock running manually.
Setting the Month
Press and hold MODE button until the hour segment of the time display flashes.
Press MODE button three more times until you see the month digit flash on the
display.
Press
button until the desired month appears on the display
Press Mode button three more times to exit the set mode and resume normal
time keeping.
Setting the Date
Press and hold MODE button until the hour segment of the time display flashes
Press MODE button four more times until you see the date flash on the display.
Press Dbutton until the desired date appears on the display.
Press MODE button two more times to exit the set mode and resume normal
time keeping
IMPORTANT : As soon as any manual setting changes are made, the display
will indicate a loss of signal strength (see SIGNAL STRENGTH INDICATOR)
to indicate that the clock is now running on manual settings instead of signals
received from the Atomic Clock.
Setting Language
Press and hold MODE button until the hour segment of the time display flashes.
Press MODE button five more times until you see a single letter (E, F or S)
appear on the display next to the time.
Press
button until the desired language indicator appears on the display (E
for English, F for French and S for Spanish).
Press MODE button one more time to exit the set mode and resume normal time
keeping
WARRANTY : Oregon Scientific warrants this product to be free of
manufacturing defects for 90 day after purchase. This warranty does
not cover product subjected to abuse, misuse or accidental damage.
Removal or modification of The Kids Projection Clock antenna cable
voids this warranty
Defective product returns should be directed to the place of retail
Purchase. For customer support call 800-853-8883 or reach us
Through the
Internet at helpme@oscientific.com.
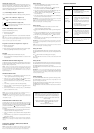
Problem Remedy
No Display
Did not
receive A
time signal
Loss of
Signal
Other
Problems
• Check battery compartment.
• Confirm that batteries are of good quality,
and are installed correctly
• If the units are new and just out of the box,
allow60- 72 hours cycle for the clock to au-
tomatically seek a signal between midnight
and 4 a.m.
• May be caused by too much interference.
Relocate the clock or the antenna to posi-
tion near a window.
• Be certain the antenna cord is fully extended
and look for low battery indicator.
• May be caused by interference.
• If the problem persists, move the clock or
antenna to a new location. The ExactSet™
is equipped with a high quality clock
mechanism, which insures accuracy be-
tween signals.
• Call Oregon Scientific at 800-853-8883
or through the internet at
helpme@oscientific.com
Month/ Date (Figure A.11)
The Second line of the display shows the Mouth and the Date. Pressing the ((
•
))
button once will switch the “ month and date ” to show the “alarm time ” The
Alarm time is displayed in hours and minutes (AM / PM). NOTE: The ((
•
))
Clock will continue to display the selected function (Month /Date or Alarm Time)
Until the ((
•
)) button is pressed again.
((
•
)) Alarm Display indicator (Figure A.12)
This ((
•
)) icon indicates the second line of the display is showing Alarm Time.
[ ] Alarm “ ON ” Indicator (Figure A.13)
This Bell [ ] icon indicates that the alarm function is activated.
[ ] Low Battery Indicator (Figure A.14)
This [ ] icon indicates that it is time to change batteries. Please refer to the
Battery Replacement Section of this manual.
USING THE PROJECTION CLOCK
Projection Clock with Battery Power Only
To activate the projection feature:
• Press the Snooze button
The projection light will illuminate for five seconds and then turn off automati-
cally.
Note: There is no option for continual display of the red projection beam with
battery only power. If the projection light ON switch is in the “on” position in
battery only mode, the projection beam is disabled.
Projection Clock with A/C Adapter Power (Figure C)
To activate the projection feature
• Press the Snooze button
To activate continuous projection beam (available only with A/C power adapter).
• Slide the projection light ON switch out to the “on” position
Backlight
To activate the backlight which will illuminate the LCD panel:
• Press the Snooze button - the backlight will activate for 5 seconds, and turn
off automatically
BATTERY INSTALLATION (Figure B)
To activate the unit simply slide the battery compartment door in the direction of
the arrow. Insert the batteries strictly according to the polarities shown therein.
Replace the battery compartment door.
NOTE : Please do not become alarmed if the unit does mot receive signal
directly from the box. The unit will receive most dependable and interference
free signal automatically between Midnight and 4 a.m. If you have any
questions please give us a call at 800-853-8883 or reach us by email to
helpme@osiientific.com.
SETTING THE ALARM
1) Press and hold the ((
•
)) / 24hOFF button for at least three seconds. The
“ Hour ” Segment of the alarm time will begin flashing.
2) While the “ Hour ” segment is flashing press the [
] button to set the
desired hour time (please note the AM /PM designation).
3) When the desired hour time is reached, press the ((
•
)) / 24hOFF button
again.
4) The “ Minutes ” segment of the alarm time will begin flashing.
5) While the “ Minutes ” segment is flashing press the [
] button to set the
desired minute time.
6) When the desired minute time is reached press the ((
•
)) / 24hOFF button
again to exit the alarm time set mode.
NOTE : As soon as any change in the alarm time is made the alarm icon (
(
•
))
will automatically appear indicating that the alarm is activated.
IMPORTANT : The Kids ProjtctionClock will continue to display the
“ ALARM ” time until the ((
•
)) button is pressed once to return to the
“ Month/Date ” display.
TURNING THE ALARM ON or OFF
To turn the alarm on or off simply press the ON/ OFF key in any mode. When
the ON /OFF button is pressed once the alarm is activated (the bell icon [
]
will appear on the display). The alarm is deactivated when the ON/OFF button is
pressed once and the bell icon [
] disappears from the display.
When the crescendo alarm sounds, it may be turned off using one of the follow-
ing methods.
1) If the SNOOZE /LIGHT key is pressed within two minutes the Snooze is
activated and the alarm will sound again in 8 minutes.
2) If the ((
•
)) / 24hOFF key is pressed, the alarm will not sound again until the
next day.
3) If the ON/ OFF key is pressed, the alarm is deactivated and will not sound
again until it is activated
IMFORTANT : If none of the above actions are taken, the alarm will automati-
cally snooze once, sound again in 8 minutes, and will not sound again until the
next day.
MANUALLY SETTING: TIME,YEAR, MONTH
DATE & LANGUAGE
NOTE : It is highly unlikely you should ever have the desire (or need ) to manu-
ally set the clock time, year, month or date of The Kids Projection Clock.
However, in the event this becomes necessary please review the following.
TROUBLE SHOOTING