45 (E)
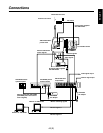
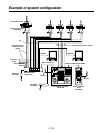
Connections
≥ Turn off the power of all the equipment before proceeding with the connections.
≥ Use the AW-PS505 as the AC adaptor for the AW-RP400 pan/tilt head controller. Use the DC cable supplied
with the AW-PS505 to connect the DC 12V IN socket on the AW-RP400 with the DC 12V OUT socket on the
AW-PS505.
≥ Connect the AC power cable supplied with the AW-PH400 for the AW-PH400 indoor pan/tilt head.
≥ Use the AC adaptor supplied with the AW-RC400 for the AW-RC400 cable compensator.
≥ Use 10BASE-T straight cables to connect the IP/RP connectors on the pan/tilt heads with the CONTROL OUT
TO PAN/TILT HEAD (1 to 5) connectors on the AW-RP400. The maximum extension distance is 500 meters
when using UTP category 5 cables or their equivalent.
≥ Use the camera cables supplied with the pan/tilt head to connect the AW-PH400 to the convertible camera.
Supplied with the pan/tilt head are a cable for the composite/component signals, a cable for IEEE1394 cards
and a cable for WEB cards. Select the camera cable that matches the intended application.
≥ Connect the iris control cable of the motorized zoom lens to the IRIS connector on the camera, and connect the
zoom/focus cable to the LENS I/F connector on the pan/tilt head.
≥ Use either the AW-CB400 remote operation panel or WV-CB700A remote control box for camera control.
The AW-CB400 and WV-CB700A cannot be used together.
≥ When using the AW-CB400, use the cable (10 m) supplied with the AW-CB400 to connect the CAMERA
CONTROL IN FROM RCP connector on the AW-RP400 with the I/F CONNECTOR on the AW-CB400.
Five cameras can be controlled from the AW-CB400.
Power is supplied through this cable from the AW-RP400 to the AW-CB400 so the AC adaptor need not be
connected to the AW-CB400.
≥ When using the WV-CB700A, use the RCB cables (2 m) supplied with the WV-CB700A to connect the
CAMERA CONTROL IN FROM RCB (1 to 5) connectors on the AW-RP400 with the RCB connectors on the
WV-CB700A.
Only one camera can be controlled from the WV-CB700A. If there is a multiple number of cameras, one
AW-CB700A will be required for each camera. It is also necessary to align the number of the CONTROL OUT
TO PAN/TILT HEAD connectors connected to the cameras to be controlled with the CAMERA CONTROL IN
FROM RCB connectors used to connect the WV-CB700A.
≥ Use the 10BASE-T straight cable to connect the MONI SEL OUT connector on the AW-RP400 with the MONI
SEL IN connector on the AW-RC400. The maximum extension distance is 50 meters when using a UTP
category 5 cable or its equivalent.
By connecting these MONI SEL connectors, the video signals of the camera selected by the AW-RP400 can be
output from the MONITOR1 connector and the video signals of the camera selected by the AW-CB400 can be
output from the MONITOR2 connector.
When the WV-CB700A is used, MONITOR2 cannot be switched.
≥ Use a coaxial cable to connect the AW-RC400 and AW-PH400.
≥ Supply the genlock signals from a unit such as a signal generator to the G/L IN connector on the AW-RC400,
and connect the G/L OUT (1 to 5) connectors on the AW-RC400 with the G/L IN connectors on the pan/tilt
heads.
≥ When using composite signals, connect the VIDEO connectors on the pan/tilt heads and Y/VIDEO connectors
(1 to 5) on the AW-RC400.
≥ Also connect the Y/VIDEO OUT connectors on the AW-RC400 to switchers or monitors.
≥ When using Y/C signals, connect the Y connectors and Pr/C connectors on the pan/tilt heads to the Y/VIDEO
connectors and Pr/C connectors, respectively, on the AW-RC400.
Also connect the Y/VIDEO OUT connectors and Pr/C connectors on the AW-RC400 to switchers or monitors.
≥ When using component signals, connect the Y connector, Pr/C connector and Pb connector on the pan/tilt head
to the Y/VIDEO connector, Pr/C connector and Pb connector, respectively, on the cable compensator.
Also connect the Y/VIDEO OUT connectors, Pr/C connectors and Pb connectors on the AW-RC400 to
switchers or monitors.


