


-6-
PREPARATIONS
Caution: Keep the Power ON/OFF Switch of the camera in
the OFF position through the installation.
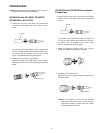
GP-KS162H with GP-LM3TA, GP-LM7TA,
GP-LM15TA or GP-LP12TA
1. Remove the front cap of the camera and confirm that
the surface of the optical filter of the camera head is
clean.
If the surface of the optical filter is dirty or dusts are on
it, clean it up with a blower brush which is for film cam-
era lenses (may be available at your local camera
store) or supplied lens cleaning tissue paper.
2. Rotate the focus lock ring fully clockwise.
Mount the Pinhole Lens, Wide-angle Lens or Super
Wide-angle Lens to the camera by rotating it clockwise
slowly.
GP-KS162H with GP-AD22TA and optional
C-mount lens
1. Remove the front cap of the camera head and confirm
that the surface of the optical filter of the camera head
is clean.
If the surface of the optical filter is dirty or dusts are on
it, clean it up with a blower brush which is for film cam-
era lenses (may be available at your local camera
store) or supplied lens cleaning paper.
2. Attach the optional C-mount lens to the C-mount
Adaptor GP-AD22TA by rotating it clockwise.
3. Rotate the focus lock ring fully
Mount the lens and C-mount adaptor by rotating them
clockwise slowly.
Caution: If the optional C-mount lens size exceeds
2”(50.8 mm) in diameter, 2-3/4” (70 mm) in length
and 0.66 lbs (300g) in weight, both the camera
and lens should be secured.
Front Cap
Front Cap
Focus Lock Ring
Focus Lock Ring