C2947M-D (6/08)
MOUNT
The C10CH Series camera can be mounted from either the top or bottom, depending on the type of
camera mount used in your installation. Use a standard 1/4-20 screw. The maximum thread depth is
0.25 inches (6.4 mm).
POWER
Connect 12 VDC or 24 VAC power to the back of the camera using the supplied terminal block. Use a
Class 2 isolated power source for the C10CH camera that can supply 12 VDC ±15% or 24 VAC ±15%,
50/60 Hz. Maximum power consumption is approximately 3.5 watts.
C10CH-7X Camera Only
The C10CH-7X camera uses a power main supply of 220 to 240 VAC, 50 Hz. This main supply must also
have a minimum rating of 50 mA.
CAUTION: Unplug the power cord during installation.
VIDEO
Connect a coaxial video cable to the BNC connector on the back of the camera.
DC IRIS LEVEL ADJUSTMENT
Select this option to adjust the electronic properties of the DC drive auto iris lens to the auto iris
electronic properties of the camera. Perform this procedure before using the camera or each time you
change the lens.
To perform this procedure:
1. Focus the camera (refer to Lens Focus).
2. Aim the camera at a bright, flickerless scene.
3. Select DC IRIS LEVEL from the MAIN MENU.
4. Adjust the DC IRIS LEVEL value (for the best image). The range is -20 to 20. The default setting
is -8.
5. Press the center of the button to save the value.
6. Exit the MAIN MENU.
LENS FOCUS
After mounting the lens, you must focus
your C10CH Series camera. Adjust both
the back focus (on the camera) and the fine
focus (on the lens).
NOTE: The back focus has already been
adjusted using a standard CS mount lens.
However, you might need to adjust it again
to match the mounted lens.
1. Auto iris only: Cover the auto iris
lens with a suitable neutral density
(ND) filter. This opens the iris
completely. For best results, use a
ND3 filter.
2. Manual iris only: Open the iris
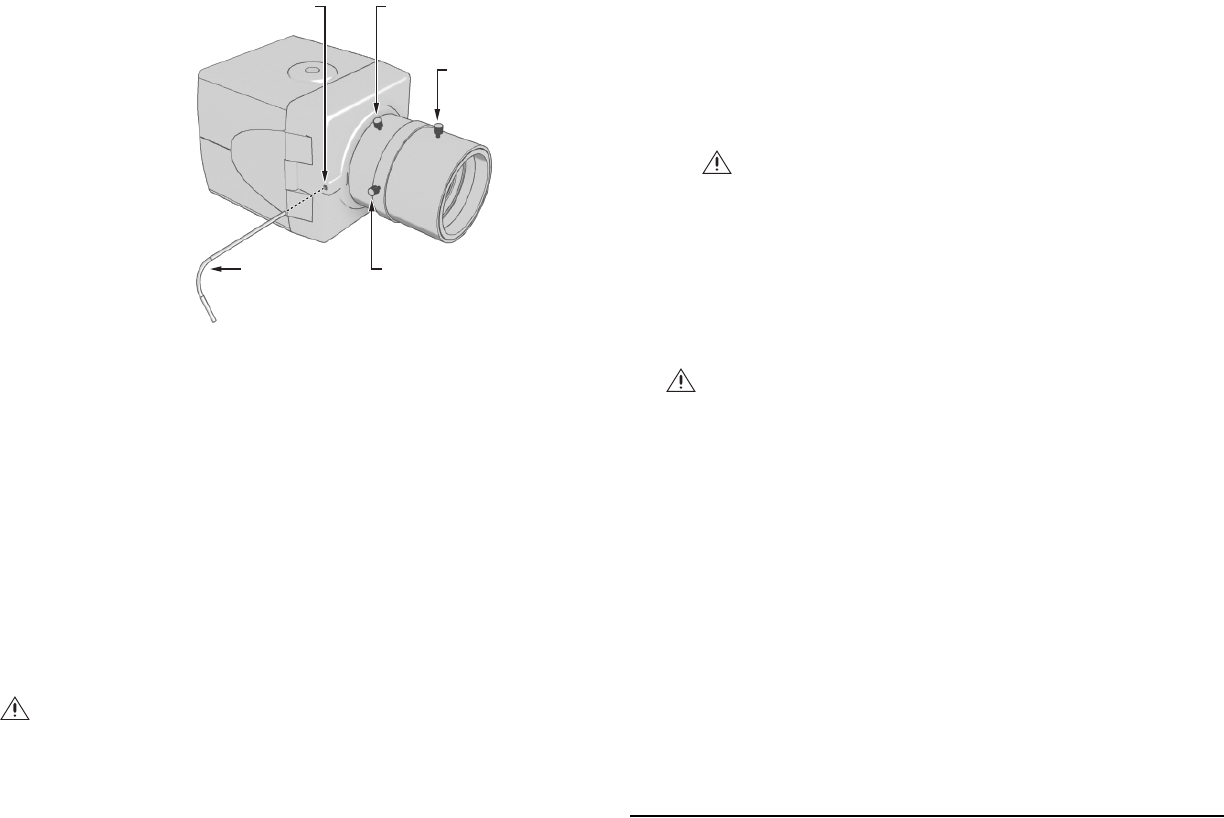
completely. The figure (right) shows
the manual iris, varifocal, and lens focus locking screws for a sample lens. Refer to your lens
documentation for more information.
3. If automatic gain control (AGC) is set to OFF, set it to LOW or HIGH on the FUNCTION SETTINGS
menu. AGC is set to LOW by default.
a. Display the FUNCTION SETTINGS menu.
b. Change AGC to either LOW or HIGH.
c. Select EXIT to save the AGC setting.
4. Aim the camera at the farthest object in the field of view. Make sure it is at least 6.5 ft (2 m)
away.
5. Fixed focal length lens only:
a. Set the lens focal length to far (
∞
).
b. Adjust the back focus:
(1) Use a 1.5-mm Allen wrench to loosen the back focus locking screw.
(2) Turn the lens until the image is focused.
(3) Tighten the back focus locking screw clockwise.
(Back focus is a coarse adjustment. You will make the fine focus adjustment in the next step.)
c. Adjust the lens focus to achieve the best fine focus.
WARNING: Do not overtighten the back focus locking screw because you may
damage the camera.
VARIFOCAL
LOCKING SCREW
BACK FOCUS
LOCKING SCREW
LENS FOCUS
LOCKING SCREW
MANUAL IRIS
LOCKING SCREW
1.5 MM ALLEN WRENCH
6. Varifocal lens only:
a. Set the varifocal to wide (W) and the lens focal length to far (
∞).
b. Adjust the back focus:
(1) Use a 1.5-mm Allen wrench to loosen the back focus locking screw.
(2) Turn the lens until the image is focused.
(3) Tighten the back focus locking screw clockwise.
(Back focus is a coarse adjustment. You will make the fine focus adjustment in steps c and d.)
c. Move the varifocal locking screw up or down to set the field of view.
d. Adjust the lens focus to achieve the best fine focus.
e. Repeat steps c and d until the focus is correct.
7. Manual iris only: Adjust the iris for the best picture quality. The largest aperture gives the best
light sensitivity; the smallest aperture gives the greatest depth of field.
8. Tighten all lens locking screws.
9. Auto iris only: Remove the ND filter.
10. If necessary, reset the AGC setting to its previous value.
a. Display the FUNCTION SETTINGS menu.
b. Change AGC to OFF, LOW, or HIGH.
c. Select EXIT to save the AGC setting.
11. Auto iris only: Perform the auto iris lens adjustment procedure (refer to DC Iris Level
Adjustment ).
WARNING: Do not overtighten the back focus locking screw because you may
damage the camera.
WARNING: When tightening the lens locking screws, do not overtighten or force any
screw.
Worldwide Headquarters • 3500 Pelco Way • Clovis, California 93612 USA • www.pelco.com
USA & Canada • Tel: (800) 289-9100 • Fax: (800) 289-9150
International • Tel: +1 (559) 292-1981 • Fax: +1 (559) 348-1120
R
EVISION HISTORY
M
anual # Date Comments
C
2947M 11/07 Original version.
C
2947M-A 1/08 Revised setup menus.
C
2947M-B 3/08 Made references to manual numbers generic to simplify for future updates.
C
2947M-C 4/08 Added power connection information for model C10CH-7X.
C
2947M-D 6/08 Revised power requirements for model C10CH-7X.
P
elco and the Pelco logo are registered trademarks of Pelco, Inc. ©Copyright 2008, Pelco, Inc. All rights reserve
d.


