


Hard Ceiling Installation
To mount the EH2020 directly into a hard ceiling, perform the following steps:
1. Determine the location and direction of the enclosure to be mounted. Cut a hole in the
ceiling for the enclosure back box. Avoid cutting into any ceiling structural member.
2. Remove the two tamper-proof screws and open the enclosure lid to expose the mounting
holes in the back box flange. The enclosure lid is retained by a leash.
3. Remove the appropriate wiring knockouts from the back box.
4. Route the appropriate electrical cables into the back box and insert the back box into the
opening in the ceiling. Attach the back box to the ceiling with appropriate screws (not
supplied).
5. Remove the camera tilt table base and side brackets in order to install the camera.
6. Mount the camera and lens onto the tilt table base.
7. Make all the necessary electrical connections to the camera and lens.
8. Reinstall the camera, tilt table base, and side brackets. Do not tighten the nuts.
9. Adjust the position of the camera and lens to clear the enclosure lid when closed. Tighten
all nuts.
10. Reattach the enclosure lid to the back box with the two tamper-proof screws.
Suspended (Soft) Ceiling Installation
To mount the EH2020 directly into a suspended or soft ceiling, perform the following steps:
1. Determine the location and direction of the enclosure to be mounted. Remove the ceiling
tile and cut a hole in it for the enclosure back box.
2. Remove the two tamper-proof screws and open the enclosure lid to expose the mounting
holes in the back box flange. The enclosure lid is retained by a leash.
3. Remove the appropriate wiring knockouts from the back box.
4. Attach the back box to the ceiling tile with two soft-ceiling mounting brackets (supplied)
and appropriate screws (not supplied).
5. Remove an adjacent ceiling tile.
6. Reinstall the ceiling tile with the enclosure attached and route the appropriate electrical
cables into the back box.
7. Remove the camera tilt table base and side brackets in order to install the camera.
8. Mount the camera and lens onto the tilt table base.
9. Make all the necessary electrical connections to the camera and lens.
10. Reinstall the camera, tilt table base, and side brackets. Do not tighten the nuts.
11. Adjust the position of the camera and lens to clear the enclosure lid when closed. Tighten
all nuts.
12. Reattach the enclosure lid to the back box with the two tamper-proof screws.
13. Reinstall the adjacent ceiling tile.
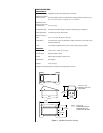
MAINTENANCE
Regularly scheduled maintenance will prolong the operational life and appearance of the
enclosure.
Clean the outer surface of the enclosure and the viewing window with a nonabrasive cleaning
cloth and antistatic cleaner that is safe for use on acrylic plastic. Do not use solvents or any
abrasive substance that can scratch the surface.