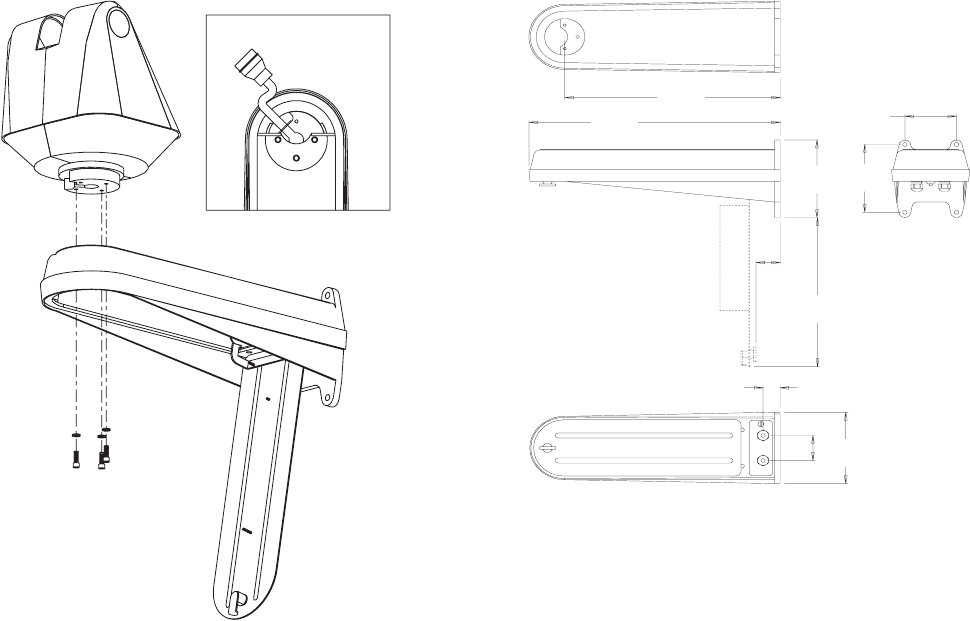
To install any Legacy Series pan/tilt with the LWM41 mount:
1. Route the pan/tilt pigtail wire connector through the hole of the mount.
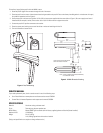
2. Place the pan/tilt on the mount, without the enclosure being attached to the pan/tilt. Be sure the factory-installed gasket is on the bottom of the pan/
tilt spindle for protection (refer to Figure 1).
3. Secure the pan/tilt to the mount using three 1/4-20 x 5/8-inch cap screws supplied with the mount (refer to Figure 1). Be sure to apply some form of
thread locker (for example, Loctite
®
) to the screws. Use a 3/16-inch Allen wrench to tighten the screws.
4. Connect the pan/tilt 37-position connector to the receiver.
5. Close the access panel, making sure none of the cables or wires are interfering with the lid.
6. Turn the lid fastener to secure the lid.
SERVICE MANUAL
If you need replacement parts, obtain a service manual in one of the following ways:
• Go to Pelco’s Web site at www.pelco.com and locate service manual C283SM.
• Contact Pelco’s Literature Department and request service manual C283SM.
SPECIFICATIONS
Material Aluminum casting and sheet metal
Finish Textured gray, polyester powder coat
NEMA Rating Meets NEMA Type 4 standards (with all factory-supplied gaskets and block-off plates installed)
Maximum Load 150 lb (68 kg)
Weight 9.51 lb (4.31 kg)
14 lb (6.35 kg) approximate with receiver installed
(Design and specifications are subject to change without notice.)
VIEW FROM BOTTOM
Figure 1. Pan/Tilt Mounting
18.75
(47.6)
21.87
(55.5)
4.50
(11.4)
6.50
(16.5)
7.42
(18.8)
2.10
(5.3)
14.30
(36.3)
1.49
(3.8)
2.40
(6.1)
6.83
(17.3)
NOTE: SHOWN WITH ACCESS PANEL
OPEN AND RX BOX ATTACHED.
NOTE: VALUES IN PARENTHESES ARE CENTIMETERS;
ALL OTHERS ARE INCHES
Figure 2. LWM41 Dimension Drawing


