


2 C218M-C (11/05)
Important Safety Instructions
1. Installation and servicing should be done only by qualified service personnel and conform to all local codes.
2. Installation shall be done in accordance with all local and national electrical and mechanical codes utilizing only approved materials.
3. Use only installation methods and materials capable of supporting four times the maximum specified load.
The product and/or manual may bear the following marks:
This symbol indicates that dangerous voltage constituting a risk of electric shock is present
within this unit.
This symbol indicates that there are important operating and maintenance instructions in the
literature accompanying this unit.
Please thoroughly familiarize yourself with the information in this manual prior to installation and operation.
Description
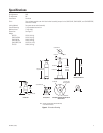
The camera mounts are universal mounts for installing cameras weighing up to 7 pounds (3.18 kg). All the mounts have a swivel head for 360-
degree pan adjustment and 90-degree tilt adjustment of the camera. These mounts are not recommended for use with enclosures.
The CM1750/CM1750-BK and CM1750S/CM1750S-BK are designed for mounting a camera to a wall, ceiling, or pedestal. The difference
between the mounts is that the CM1750 and CM1750-BK are 5.47 inches (13.89 cm) long and the CM1750S and CM1750S-BK are 3.31 inches
(8.41cm) long.
The TB1750 and the BS1750 have a T-bar mount and are used for installing a camera in a false ceiling. The difference between the mounts is that
the TB1750 is 5.09 inches (12.93 cm) long and the BS1750 is 2.93 inches (7.44 cm) long.
The CM1750-PVM is designed for installing a camera on a PMCL Series flat panel, TFT LCD monitor.
Installation
1. To mount the CM1750/CM1750-BK or CM1750S/CM1750S-BK, place the base of the mount against the mounting surface and scribe marks
for drilling a minimum of two mounting holes. Drill the holes and fasten the mount to the surface with 1/4-20 hardware (not supplied).
To mount the BS1750 or TB1750, twist the clamp onto the T-bar.
To mount the CM1750-PVM, remove the hole plug in the top of the monitor and screw the mount into the monitor.
NOTE:
If it is necessary to extend the length of the mount – except for the BS1750 and CM1750-PVM – use the optional CM1750EXT or
CM1750EXT-BK extension tube.
2. Attach the camera to the 1/4-20 threaded stud on the swivel head, and tighten the nut against the camera.
3. Loosen the set screw on the swivel assembly, if necessary, with the hex wrench that is provided. Position the camera in the desired
position, and tighten the set screw.
CAUTION:
RISK OF ELECTRIC SHOCK.
DO NOT OPEN.