


4 Pelco Manual C405M-B (8/99)
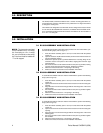
2.0 DESCRIPTION
The E1003, E2020, and E2100 indexers have a circular mounting plate which ac-
commodates the enclosure and allows it to be positioned in 10-degree increments
to change the viewing area.
The indexers are designed for use with fixed camera ceiling enclosures; the E1003
for use with the EH1000/ED1000 enclosures, the E2020 with the EH2020 enclo-
sure, and the E2100 with the EH2100 enclosure. All indexers can be mounted in a
2' x 2' or 2' x 4' ceiling tile.
3.0 INSTALLATION
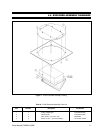
3.1 E1003 ASSEMBLY AND INSTALLATION
To assemble the EH1000 or ED1000 ceiling enclosure in the E1003 indexer, per-
form the following steps (refer to Figure 1):
1. Place the indexer assembly (items 1 and 2) on a flat surface with the painted
surface up.
2. Open the enclosure lid (EH1000 or ED1000) and insert the enclosure back box
into the rectangular opening.
3. Position the spacers (item 3) provided between the mounting flange of the
enclosure and the round plate of the indexer, aligning them with the eight
mounting holes.
4. Secure the enclosure to the indexer with the screws (item 4) provided, making
sure the screws pass through the spacers. Tighten the hardware.
5. Mount the enclosure into the 2' x 2' opening in the ceiling.
6. Refer to the enclosure manual for final installation instructions.
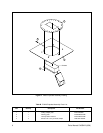
3.2 E2020 ASSEMBLY AND INSTALLATION
To assemble the EH2020 enclosure into the E2020 indexer, perform the following
steps (refer to Figure 2):
1. Place the indexer assembly (items 1 and 2) on a flat surface with the painted
surface up.
2. Open the enclosure lid and insert the enclosure back box into the rectangular
opening.
3. Align the holes in the enclosure flanges with the mounting holes of the round
indexing plate.
4. Secure the enclosure to the indexer with the screws (item 4) provided. Tighten
the hardware.
5. Mount the enclosure into the 2' x 2' opening in the ceiling.
6. Refer to the enclosure manual for final installation instructions.
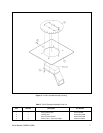
3.3 E2100 ASSEMBLY AND INSTALLATION
To assemble the EH2100 enclosure into the E2100 indexer, perform the following
steps (refer to Figure 3):
1. Place the indexer assembly (items 1 and 2) on a flat surface with the painted
surface up.
2. Open the enclosure lid and insert the enclosure back box into the rectangular
opening.
3. Align the holes in the enclosure flanges with the mounting holes of the round
indexing plate.
4. Secure the enclosure to the indexer with the screws (item 4) provided. Tighten
the hardware.
5. Mount the enclosure into the 2' x 2' opening in the ceiling.
6. Refer to the enclosure manual for final installation instructions.
NOTE:
The instructions provided
are for installation in a 2' x 2' ceiling
tile. If mounting in a 2' x 4' ceiling
tile, you will need to cut the ceiling
tile in half and install an additional
“T” rail for support.