


EH4007 Installation
1. Remove the two Phillips screws from the rear cap and remove the rear cap from the enclosure.
2. Loosen the hex screw securing the camera sled in place, pull out the sled assembly, and
remove it from the rail.
3. Attach the mounting bracket to the mounting surface.
You may want to remove the mounting bracket from the enclosure body so that you have
enough room to mount the bracket. If you remove the mounting bracket from the enclosure
body, mount the bracket and reattach the enclosure body to the bracket.
Partially tighten the mounting-bracket screw and the screws that attach the mounting
bracket to the enclosure body. Leave enough movement so that you can later adjust the pan
and tilt of the enclosure.
4. If the camera lens is adjustable, extend the lens to its maximum length.
5. Attach the camera and lens to the L-shaped bracket with the screw provided.
6. Reinstall the camera sled in the enclosure.
7. Verify that the camera is adjusted with the lens a minimum of 1/2 inch from the enclosure
window. If necessary, remove the sled, reposition the L-shaped bracket on the sled to adjust
the distance between the camera and enclosure window, and replace the sled. Do not
tighten the screw that secures the sled to the enclosure yet.
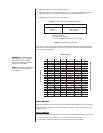
8. Pull the video and power cables through the glands on the rear cap. Refer to Table A for the
type of video coaxial cable to use. For 24 VAC power, refer to Table B to determine the size
of wire to use.
9. Attach the cables to the camera.
10. Readjust the camera and lens so they are a minimum of 1/2 inch from the enclosure win-
dow and tighten the hex screw that holds the sled in place.
11. Reinstall the rear cap.
12. Replace the two Phillips screws and tighten.
13. Adjust the glands for a tight fit around the cables.
14. If necessary, adjust the camera focus and iris. If you need to adjust the focus and iris manu-
ally, remove the front cover, adjust the focus and iris, and replace the front cover.
15. Adjust the pan and tilt of the enclosure and completely tighten the mounting-bracket screw
and the screws that attach the mounting bracket to the enclosure body.
EH4010/EH4014/EH4018 Installation
1. Remove the two Phillips screws from the rear cap, and remove the rear cap and attached
camera sled from the enclosure.
2. Attach the enclosure body to the appropriate mount (if applicable) using the instructions
provided with the mount.
For installations where no additional mount is used, attach the enclosure to the mounting
surface with the recommended hardware.
3. Attach the glands to the rear cap.
4. Pull the video and power cables through the glands. Refer to Table A for the type of video
coaxial cable to use. For 24 VAC power, refer to Table B to determine the size of wire to use.
5. Attach the cables to the camera.
6. If the camera lens is adjustable, extend the lens to its maximum length.
7. With the screw provided, attach the camera and lens to the sled so that the fully-extended
lens is aligned with the front edge of the sled.
8. Reinstall the rear cap and sled, and replace the two Phillips screws and tighten.