6 Pelco Manual C1441M-D (1/98)
➤ Auto Iris
Level is adjusted using a video meter to provide a video signal output of be-
tween 130 and 142 IRE (Institute of Radio Engineers; 1V p–p = 100 IRE’s)
when lighting from skylights, low pressure sodium lights and fluorescent lights
are present. ALC is adjusted to the midpoint between Peak and Average.
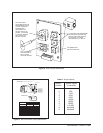
The location for the controls of the above features, except for back focusing, are
shown in Figures 2 and 3. Back focusing is addressed in Figure 1. The following
sections will define the above features and specify how to adjust them to gain the
best system performance in your environment.
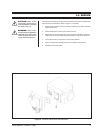
3.1.1 Back Focus
Back focusing involves controlling the distance between the focal point of the lens
and the image head. If the lens is focused on the imaging head properly, a clear
picture is maintained through the entire zoom range. The optics package has been
back focused at the factory. In some cases, additional back focusing may be re-
quired. Should this be the case, back focus is adjusted by moving the lens positions
to zoom wide and focus far. Once this is done, the camera is positioned on an
object with clean lines such as a window seal, shelf, etc., at a minimum distance of
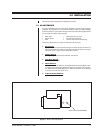
55 feet (16.76 m). The back focus adjustment screw location is shown in Figure 1. It
can be adjusted with a small standard straight slotted screwdriver. The screw itself
is recessed a bit from the camera housing as indicated in the figure. The mechani-
cal movement of the screw as the screwdriver is turned is about three “clicks” or
indents in either direction. As you move the back focus set screw back and forth, the
distance between the lens and image head moves in and out. You will be able to see
the clean line come in and out of focus. Continue to adjust the screw back and forth
until the optimum focus is obtained.
3.1.2 Shutter Speed
This optics package is provided with adjustable shutter speeds. This feature allows
minimal streaking when a very fast moving object passes in front of the non-moving
optics package. The shutter speed is factory set to 1/60 second. Shutter speed
selection does not affect the auto iris video feedback loop. It only changes the imag-
ing head sampling rate. You can select one of eight shutter speeds (refer to Table
A).
3.1.3 Auto Gain Control
Set the AGC control in the “ON” position.
3.1.4 White Balance (ATW/AWB Switch)
White balance is a feature available on the color optics packages. In the ATW (Au-
tomatic Tracing White Balance) position, the white balance is continuously adjusted
to take into account variations in the incident light conditions. In the AWB (Auto-
matic White Balance) position, when the “LOCK” button is pressed, the white bal-
ance is automatically adjusted, and the setting is stored in memory. When the switch
is set to this position the white balance always takes the previously stored value.
White balance is factory set to the AWB position and it is recommended that the
optics package be used in the mode just described.


