


4 Pelco Manual C263M (7/97)
3.0 INSTALLATION
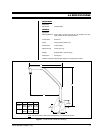
1. Drill holes in the roof for mounting the base, using the base as a template. It is
recommended that you use a minimum of any three of the five possible holes
on each side of the base.
2. Attach the mount to the roof with a minimum of eight (8) 3/8-16 type hardware
(not supplied).
Rain water could leak through the holes for the mounting bolts and damage
the roof.
To prevent water damage, seal the bolt holes with an appropriate sealant.
Apply the sealant around the bolt holes between the mount and the roof.
3. Loosen the four 1/4-20 nuts that hold the U-shaped clamp bracket to the mount-
ing base. It is not necesasry to remove the two 3/8-16 bolts on the outside of
the clamp bracket, but the bolts should be backed out enough so that they do
not interfere with the arm when it is installed in the base.
4. Lower the arm down through the guide hoops in the mounting base until the
arm stops at the bottom of mounting base.
5. Feed the wiring for the dome through the mount. Refer to the manual that
comes with the dome for wiring requirements.
6. Attach the dome to the end of the mount.
7. Make all electrical connections. Refer to the manual that comes with the dome.
8. Swing the dome away from the roof into the position desired. Cinch down the
four 1/4-20 nuts to tighten the clamp bracket against the arm.
9. Tighten the two 3/8-16 bolts on the outside of the clamp to index the pole, or
drill into the pipe at the 3/8-16 locations to index the pole using the 3/8-16
bolts.
CAUTION:
Make sure that
the installation method and
fasteners can support up to
four times the weight of the
mount, dome, and camera.
NOTE:
The cap in the end of the arm
is removable to allow access to the
pipe during installation.