


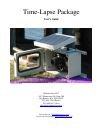

Time-Lapse Package
Revision D
Harbortronics LLC 4 1/5/2007
Configuring the DigiSnap
Now that you’ve verified that things are working, you may want to configure the DigiSnap for your particular application. The first
time you do this can be trying, but once you’ve gone through the process once, it’ll be easy the next time. If you get stuck, give us a
call!
If we shipped the housing with a camera installed, or if you told us the camera you are planning to use, the DigiSnap should already
be configured properly for that camera model. All you should need to configure are the time-lapse settings.
Take a look at the DigiSnap 2000 manual, which is on the CD Rom supplied with the equipment. This should help you to understand
how the DigiSnap works with a terminal window, and what sort of operations the DigiSnap can perform.
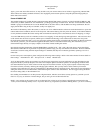
Connecting to a terminal
If you have a desktop PC, you probably have a serial port on the back of your computer. This is most likely COM1, which is ideal.
Use the supplied beige cable (labeled Null-Modem), to connect the DigiSnap to your serial port.
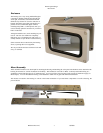
If you have a newer laptop or a Mac, you may need to buy a USB to Serial converter, and get it working first. These are available at
any computer store from $15 and up. When you connect it, and install any required drivers, your computer will assign some number
COM port. Most of the time, it will use some higher number, like COM5. This can be frustrating, as your computer may not even tell
you which port it’s using. It’s really nice to switch this to COM1, using your computer’s operating system, but not essential.
You now need to run a program to open up a terminal window. If you are running Linux, you already know how to do this! If you
have a windows PC and are using COM1, you can use the DigiSnap_Terminal.exe program supplied on the CD Rom.
If you are using a windows PC and something other than COM1, you can use HyperTerminal that is supplied with windows. Double
click the DigiSnap.ht file on the CD Rom, and it will set up the HyperTerminal program for you… you may have to select the correct
COM port however. If you don’t know which COM port your computer is using, you may have to ‘disconnect’, select a different port
number, ‘reconnect’, and then cycle the DigiSnap power each time.
If you are using a Mac, you can use a program called ZTerm, or you may already have a terminal program installed with your
particular OS. The particular COM settings needed are listed in the DigiSnap 2000 manual.
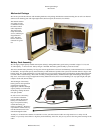
Once you have your terminal program running, and ‘connected’, cycle the power on the DigiSnap, and you should see it present a
menu on the screen. You can select the different menus or particular commands. Once you have configured the DigiSnap via a
terminal, the settings are saved forever, or until the next time you change them using this same procedure.
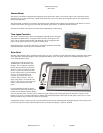
Configuring for Advanced Time-Lapse
The majority of outdoor monitoring applications will use the Advanced Time-Lapse (ATL) feature of the DigiSnap controller. With
ATL, the camera can be made to take pictures only during daylight hours, or take pictures only at specific times of the day.
Please note that the DigiSnap controller does not have an internal clock. When used with a Nikon Coolpix camera, it can get the time
of day directly from the camera, but when used with an SLR camera, such as the Pentax K110D which is standard with the Time-
Lapse Package, the DigiSnap does not know what time it is; when you power it up, it will presume that it’s midnight. This doesn’t
mean you can’t use ATL, it just means you have to be a bit more clever. You can set up the ATL start times with an offset,
anticipating what time of day you are going to start the system, or you can simply have configure the DigiSnap to start taking pictures
at 00:01 (1 minute after midnight), and power up the system when you want it to start taking pictures. The DigiSnap will then start
keeping time, and taking pictures on a daily schedule.
We would be happy to pre-configure the DigiSnap for your particular application, to ease your project by one more step.