


3 Select [New reminder], and then
press OK to confi rm.
A keypad is displayed.»
4 To enter the new name (up to 24
characters), select an alphabet/
number and then press OK to
confi rm.
To switch between uppercase
•
and lowercase, select [abc] on
the displayed keypad and then
press OK to confi rm.
5 When the name is complete, select
[Enter] and then press OK to
confi rm.
Set event time and date
Note
Ensure that you set the current time •
and date of the PhotoFrame before you
set time and date for an event reminder.
1 In the main menu, select [Setup] and
then press OK to confi rm.
2 Select [Event Reminder], and then
press OK to confi rm.
3 Select a reminder, and then press
OK to confi rm.
4 Select [Set time] / [Set date] , and
then press OK to confi rm.
Set time and date
1 In the main menu, select [Setup] and
then press OK to confi rm.
2 Select [Time and Date], and then
press OK to confi rm.
3 Select [Set time] / [Set date], and
then press OK to confi rm.
4 Press / / / and OK to enter
the current time/date, and then
press OK to confi rm.
Set an event reminder
You can create a reminder for a special
event, and you can also select a photo to
be displayed at a selected time.
Tip
Ensure that you set the current time •
and date of the PhotoFrame before
you set an event reminder.
Create an event reminder
1 In the main menu, select [Setup] and
press OK to confi rm.
2 Select [Event Reminder] , and then
press OK to confi rm.
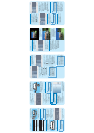
If you select [Auto fi t], »
the PhotoFrame extends a photo
to fi ll the screen with picture
distortion.
If you select [RadiantColor], the »
PhotoFrame extends the color
on the edges of a photo that is
smaller than the full screen to fi ll
the screen without black bars or
aspect ratio distortion.
3 Setup
Select on-screen language
1 In the main menu, select [Setup] and
then press OK to confi rm.
2 Select [Language] , and then press
OK to confi rm.
3 Select [Language Setting] , and then
press OK to confi rm.
4 Select a language, and then press
OK to confi rm.
Select photo background
You can select a background border
color for photos that are smaller than the
screen of the PhotoFrame.
1 In the main menu, select [Slideshow]
and then press OK to confi rm.
2 Select [Background Color] , and then
press OK to confi rm.
3 Select a background color / [Auto
fi t ] / [RadiantColor] , and then press
OK to confi rm.
If you select a background color, the »
PhotoFrame displays a photo with a
background color or black bar.
Display collage photos
1 In the main menu, select [Slideshow]
and then press OK to confi rm.
2 Select [Collage] , and then press OK
to confi rm.
3 Select [Multi] , and then press OK to
confi rm.
4 Select a layout.
5 Press (Right) to select [Photo 1] .
6 Press (Right) again to access the
photo source options.
7 Select a photo from a photo source.
8 Repeat steps 5 to 7 until all photos
are selected for the format.
9 Press to start collage display.
To stop collage display, select
•
[Slideshow] >[Collage] >
[Single] and then press OK to
confi rm.
Tip
If you select a collage layout,
•
the PhotoFrame displays a static
collage and the slideshow mode is
deactivated.
If you select [Random] format, the
•
PhotoFrame automatically does the
random collage base on the optimal
layout of photos and displays the
collages in slideshow mode.
3 Select an album, and then press OK
to confi rm.
Photos in the album are »
displayed in thumbnail mode.
4 Press to start slideshow play.
In slideshow mode, press
•
/ to display the next/previous
photo.
In slideshow mode, press
•
to toggle between slideshow,
browse, and calendar mode.
Tip
In slideshow mode, the PhotoFrame
•
displays all photos automatically.
In browse mode, the PhotoFrame
•
displays the current photo and you
can press
/ to display the next/
previous photo.
In calendar mode, the PhotoFrame
•
displays photos with the calendar.
However, we do not guarantee the
operations for all types of memory
card media.
1 Insert a storage device fi rmly.
Photos in the storage device are displayed
in slideshow mode.
To remove a storage device, pull
•
it out from the PhotoFrame.
2 Play
Display photos
Note
You can play only JPEG photos on •
the PhotoFrame.
1 In the main menu, select [Photos]
and then press OK to confi rm.
Available photo sources are displayed.»
2 Select a photo source, and then
press OK to confi rm.
Photos are displayed in slideshow »
mode.
For other times :
1 Press and hold for more than 1
second.
Help message for control keys is »
displayed.
2 Press any button to exit the help
message.
Photos are displayed in slideshow »
mode.
To turn off the PhotoFrame,
•
press and hold .
Connect a storage device
Caution
Do not remove a storage device
•
from the PhotoFrame when fi les are
transferring from or to the storage
device.
You can play JPEG photos in one of the
following storage device which is
connected to the PhotoFrame:
Secure Digital (SD)
•
Secure Digital (SDHC)•
Multimedia Card•
xD card•
Memory Stick•
Memory Stick Pro (with adaptor)•
USB memory drive•
1 Connect the power cord to the DC
socket of the PhotoFrame.
a
b
2 Connect the power cord to a power
supply socket.
Turn on the PhotoFrame
Note
You can only turn off the PhotoFrame
•
after all copy and save actions are
complete.
For the fi rst time use :
1 Press and hold for more than 1
second.
The language setting menu is »
displayed.
2 Select a language, and press OK to
confi rm.
Help message for control keys is »
displayed.
3 Press any button to exit the help
message.
1 Get started
Control buttons
Button Function
Turn on/off the PhotoF-
rame
Play slideshow
Toggle between slideshow
mode, browse mode, and
calendar mode
/ / /
Select the previous/next/
right/left item
OK Confi rm a selection
Enter the main menu
Enter/Exit photo menu
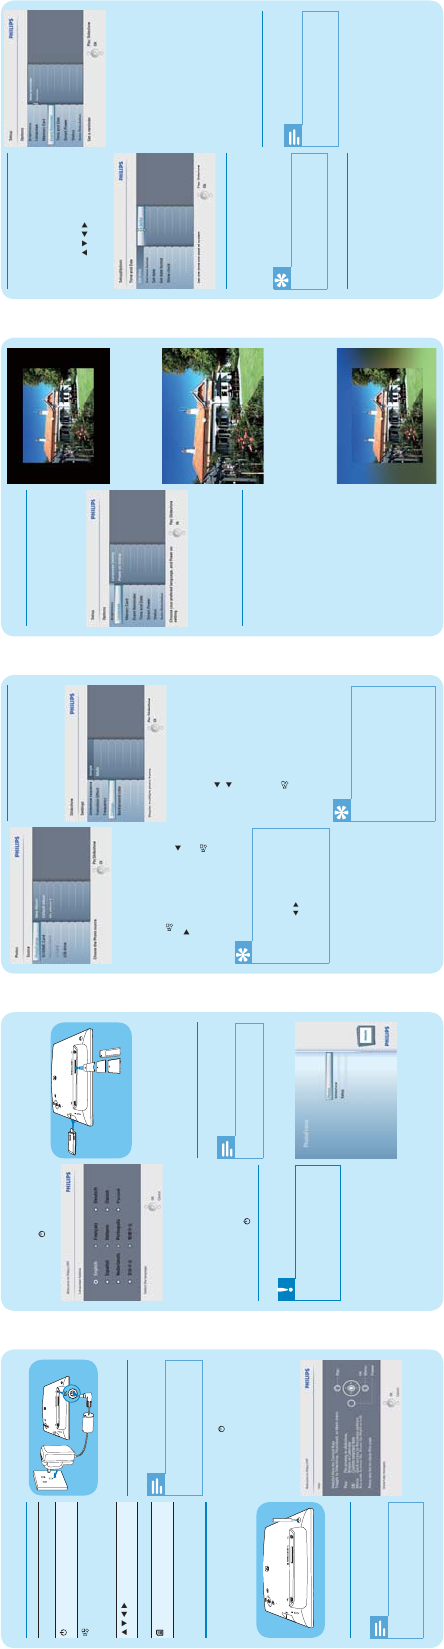
Install the stand
To place the PhotoFrame on a fl at surface,
you need install the supplied stand at the
back of the PhotoFrame.
1 Insert the stand into the PhotoFrame.
2 Screw the stand into the stand hole
fi rmly.
Connect power
Note
When you position the PhotoFrame, •
ensure that the power plug and outlet
are easily accessible.