


Miniportrait 203/403 Camera User Guide
8
3. Start the timer. The correct
processing time should already be set.
Press the START button once; the timer
will count down to zero. At the end of
the processing time, a series of short
tones will sound. The timer will reset for
thenext picture.
4. Process the picture for the full time
recommended in the film instructions.
Then separate the print from the
negative, starting at the end nearest the
yellow tab (31). Information on handling
of prints and negatives is in the
film instructions. See Caution notice.
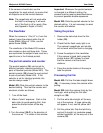
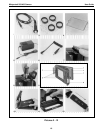
No yellow tab?
Do not pull another white tab. Instead,
carefully open the holder far enough to get
a finger on top of the film pack to hold it
down (32). Grasp the top most yellow tab,
and gently pull it all the way out and dis-
card it (33). Inspect the rollers and clean
them if necessary (see Clean the
developer rollers). Close and latch the
holder, with the next white tab sticking out.
(You will have to reshoot the portraits that
were on that piece of film.)
Clean the developer rollers
Dirt on the developer rollers can cause a
variety of problems such as repeated spots
on pictures and jammed film. Inspect the
rollers when loading film, and clean them
as follows.
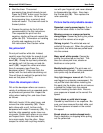
With both hands, lift the steel loops, and
remove the roller assembly (34). Clean
both rollers with a soft, lint-free cloth,
dampened with water if necessary (35). Or,
hold the roller assembly under clean run-
ning water. Rotate both rollers as you clean
and inspect them. Note that one roller
turns more easily than the other. Never
scrape the rollers with anything metallic,
nor with your fingernail, and never attempt
to disassemble the rollers. Also clean
the film tab slot (36). Then replace the
roller assembly.
Picture faults and probable causes
Repeated, evenly-spaced spots: Due to
dirt on the steel rollers in the film holder.
Missing corners or orange-red marks
along edges: Caused by pulling the yellow
tab out of the camera at an angle.
Oblong in print: The white tab was not
pulled all the way out. When the yellow tab
was pulled, that white tab was pulled back
into the camera.
Many small white specks: Caused by
pulling the yellow tab out too fast. This
also can cause pink lines, streaks or
blotches on color prints.
Muddy-looking print: The print was not
processed long enough. Under processed
color prints may be brownish pink.
Very light image or none at all: The film
was fogged or extremely overexposed. Do
not pull the black tab before inserting the
film pack into the holder, and do not remove
a loaded film holder from the camera
without inserting the dark slide. Be sure
your exposure is based on the correct film
speed.
Nearly black or solid black image:
Caused by insufficient or no exposure. Be
sure you have removed the dark slide, and
that the exposure is based on the correct
film speed.
Broad streak or curtain-shaped mark:
Due to hesitation or stopping while pulling
out the yellow tab.