


Sonar/Autofocus
SX-70 Sonar/Autofocus models focus auto-
matically using sound wave technology.
Simply aim the camera at your subject,
press the shutter button and hold the camera steady until the picture
ejects.
These Sonar/Autofocus models let you preview your picture.
Lightly press the shutter button part way down to see what your
picture will look like. Then either press the button all the way down
to take the picture, or release it and change your position or the
camera angle and preview again.
CAUTION: If there’s a window pane, glass display case, wall hang-
ing, etc. in front of your subject, the sonar may be fooled and reflect
an incorrect focus distance. Preview your picture in the viewfinder to
be sure the sonar provides proper focus. If it doesn’t, disconnect the
sonar by pressing on the switch above the focus wheel until the red
line shows. Then use the focus wheel to set your camera manually to
the correct lens-to-subject distance until the image is clear. Don’t
forget to turn the automatic sonar focusing feature back on for later
pictures; just press the top of the switch or close the camera.
Minimum lens-subject distance
To produce clear pictures, do not place your subject closer than 10.4
inches to the camera.
Using FlashBars
Note that FlashBars are no longer manu-
factured. For information about third-
party vendors, call Americas Business
Center, 1-800-343-5000, or visit
www.polaroid.com.
Flash must be used for indoor pictures.
Effective FlashBar ranges are 10.4
inches to 20 feet.
Insert a FlashBar into the socket in the
camera and push in firmly. (On SX-70
Model 3 with socket on the top of the
viewfinder, depress viewfinder cap all
the way as FlashBar is inserted, then release it slowly.) On other
models, the FlashBar socket is on the top front of the camera body
above the lens or sonar.
When all five bulbs on one side are used, remove the FlashBar and
turn it around for the remaining five bulbs.
IMPORTANT FLASH REMINDERS
• Set the focus distance carefully—setting affects exposure.
• Place subject close to a colorful background, if possible.
• In group pictures, have everyone about the same distance from
the flash for even lighting.
• Avoid hot spots and reflections from mirrors, windows, artwork,
eyeglasses, etc. reflecting the flash. Shoot at an angle rather than
head-on.
Lighten/Darken control
If subject is too light or too dark in daylight pictures, compensate by
turning the Lighten/Darken control one mark and shoot again in
the same place with the same lighting. White area lightens picture,
dark area darkens.
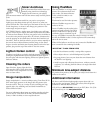
Cleaning the rollers
Open film door, depress light shield (A),
and rotate the rollers. Wipe rollers with a
moist cloth—never scrape them. Use only
water to clean rollers.
A
Image manipulation
Image manipulation is a creative technique using Time-Zero SX-70
film. Artists apply pressure to the images after the pictures eject
from the camera. They use a variety of tools, including pen caps,
popsicle sticks, clay modeling tools and dental instruments to
achieve different results.
For more information about image or emulsion transfer and other
creative uses for Time-Zero SX-70 film, call Americas Business
Center, 1-800-343-5000, or visit www.polaroid.com.
Additional information
We have a staff of Polaroid photography experts whose job is to
help you take good pictures. Direct your camera, film and picture
questions to Americas Business Center.
Call toll-free, 1-800-343-5000, 8am to 8 pm EST, Mon - Fri (USA
and Canada only) or visit www.polaroid.com.