


©2005 RadioShack Corporation.
All rights reserved. RadioShack and
RadioShack.com are trademarks
used by RadioShack Corporation.
49-1356
11A05
Printed in China
This equipment has been tested and found to comply with the limits for a Class B
digital device, pursuant to Part 15 of the FCC Rules. These limits are designed to
provide reasonable protection against harmful interference in a residential installation.
This equipment generates, uses, and can radiate radio frequency energy and, if not
installed and used in accordance with the instructions, may cause harmful interference
to radio communications. However, there is no guarantee that interference will not
occur in a particular installation. If this equipment does cause harmful interference to
radio or television reception, which can be determined by turning the equipment off
and on, the user is encouraged to try to correct the interference by one or more of the
following measures:
• Reorient or relocate the receiving antenna.
• Increase the separation between the equipment and receiver.
• Connect the equipment into an outlet on a circuit different from that to which the
receiver is connected.
Consult your local RadioShack store or an experienced radio/TV technician for help.
If you cannot eliminate the interference, the FCC requires that you stop using your
battery box. Changes or modifi cations not expressly approved by RadioShack may
cause interference and void the user’s authority to operate the equipment.
FCC Declaration of Conformity
This device complies with Part 15 of the FCC Rules. Operation is subject to the
following two conditions: (1) This device may not cause harmful interference, and (2)
This device must accept any interference received, including interference that may
cause undesired operation.
This Class B digital apparatus complies with Canadian ICES-003.
Cet appareil numérique de la classe B est conforme à la norme NMB-003 du Canada.
This product is warranted by RadioShack against manufacturing defects in material and
workmanship under normal use for ninety (90) days from the date of purchase from
RadioShack company-owned stores and authorized RadioShack franchisees and dealers.
For complete warranty details and exclusions, check with your local RadioShack store.
RadioShack Customer Relations
300 RadioShack Circle, Fort Worth, TX 76102
04/04
Imager .....................CMOS sensor, 250,000 pixel, 330 TV lines, 1/3 inch
Input Voltage ................................................................................ 12 V DC
Lens Angle ........................................................90° (viewing angle is 76°)
Audio Frequency Response ...........................................300 Hz to 17KHz
Minimum Illumination ........... 2 lux (without IR LED), 0 lux (with IR LED)
Operating Temperature ....................................-4° to 122°F (-20° to 50°C)
PIR Maximum Detection Range .........................................24 feet at 25°C
PIR Detection Angle (H/V) .............................Horizontal 70° / Vertical 45°
Dimensions (H x W x D) ..................................1
7
/8 x 2
1
/16 x 1
11
/16 inch
Weight (with wire) ......................................................4.8 oz (135+/-10 g)
Specifi cations are typical; individual units might vary. Specifi cations
are subject to change and improvement without notice. Actual product
may vary from the product images in this document.
Product
DIY Color Camera
Model 49-1356
Responsible Party
RadioShack Customer Relations
300 RadioShack Circle,
Fort Worth, TX 76102
Phone 817-415-3200
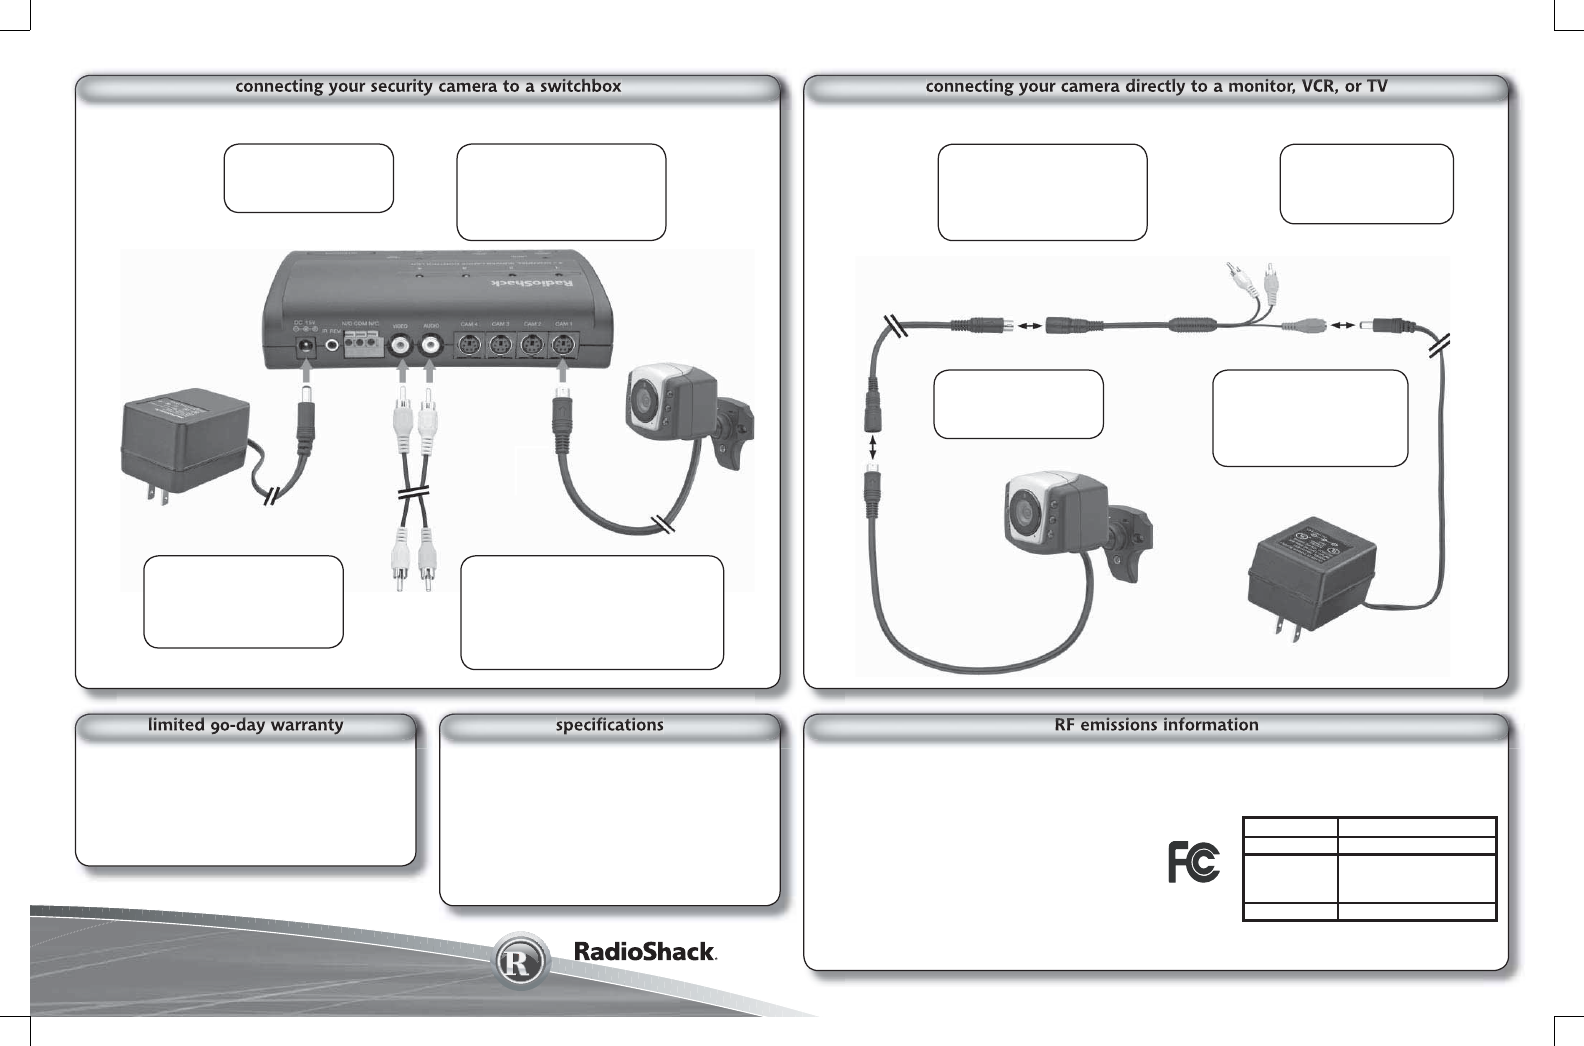
Connect the A/V
cable red connector to the
AC adapter barrel plug
and plug it into an AC
outlet.
Position the
camera for the desired
recording view.
Connect the camera
plug into the 59-foot cable
socket then connect the
59-foot cable plug into the
A/V cable socket.
Connect the AV
cable to the video and
audio jacks on your
monitor, VCR or TV.
Connect the barrel
plug of the switchbox AC
adapter to the switchbox
and plug the adapter into
an AC outlet.
Connect one end of your
switchbox A/V cable yellow (video)
and white (audio) connectors to
the video and audio jacks of your
monitor, VCR or TV and the other
ends to your switchbox.
Connect the camera
plug into the 59-foot cable
socket then connect the
59-foot cable plug into the
switchbox.
Position the
camera for the desired
recording view.