


COLOR CCD CAMERA User Guide
26
COLOR CCD CAMERA User Guide
27
Operating Your Camera
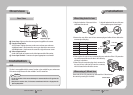
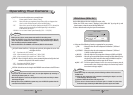
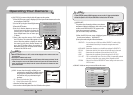
CAMTITLE:Ifyouenteratitle,thetitlewillappearonthemonitor.
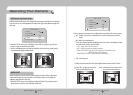
1)IftheSPECIALmenuscreenisdisplayed,usetheUpandDownbuttonssothatthe
arrowindicates‘CAMTITLE’.
2) Set it to ‘ON’ by using the Left and Right buttons.
5) Enter a title, move the cursor to ‘POS’ and press
the SET button. The entered title appears on the
screen. Select the position to display the title on
the screen by using the 4 direction buttons and
press the SET button. When the position is
determined, select ‘END’ and press the SET button
toreturntotheSPECIALmenu.
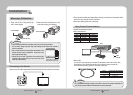
MOTION DET
:
This product has a feature that allows you to observe
movement of objects in 8 different areas on the screen,
and the words 'MOTION DETECTED' appear on the
screen when movement is detected.
you can monitor activity more efficient.
FRONT DOOR
1)WhentheSPECIALmenuscreenisdisplayed,presstheUpandDownbuttonsso
that the arrow indicatesMOTION DET.
2) Set up the mode using the 4 direction buttons.
- SENSITIVITY : You can select up to 8 MD areas. When SENSITIVITY number is high,
motion detection sensitivity is increased to recognize even small
movement.
- AREA MODE : Determines whether to use the MD area selected in SENSITIVITY.
- SEL POS : Determines which of the 4 vertices of each MD area is to be used.
- YPOS : Determines the coordinate of the vertical axis for SEL POS.
- XPOS : Determines the coordinate of the horizontal axis for SEL POS.
- FILLSET : Fills in a selected MD area. The color of filling is sequentially selected
as brown, orange, blue, cyan, green, yellow, magenta and red.
- RETURN : Select this to save the MOTION DET menu settings and return to the
SPECIAL menu.
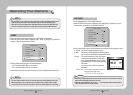
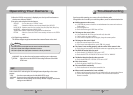
3) Press the SET button.
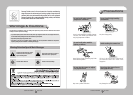
4) Use the 4 direction buttons to move to a
desired letter and select the letter by
pressing the SET button. Repeat this to
enter multiple letters. You can enter up to
15 letters.
CAMERA TITLE SETUP
ABCDEFGHIJKLM
NOPQRSTUVWXYZ
abcdefghijklm
nopqrstuvwxyz
-.0123456789
CLR POS END
•WhentheCAMTITLEmenuis‘OFF’,notitlewillbedisplayedonthemonitorscreeneven
if you enter one.
•OnlyEnglishisavailableinthismode.
•IfyoumovethecursortoCLRandpresstheSETbutton,allthelettersaredeleted.Toedit
aletter,changethecursortothebottomleftarrowandpresstheSETbutton.Movethe
cursor over the letter to be edited, move the cursor to the letter to be inserted and then
presstheSETbutton.
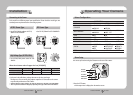
Notes
•
WhenusingACpowerat60Hzfrequency,youcanusetheL/Ltypesynchronization.
•WhenthepowerisDC12V,theSYNCmenuisfixedtothe‘INT’mode.
Notes
SYNC :
Inareaswherethesupplyisat60Hz,youcan
synchronize the output phase of multiple cameras
using the power synchronization function (Line-
Lock) without using a synchronization signal
generator.
- INT : Internal Synchronization Type
- L/L : Power Synchronization Type, Line-lock
•PresstheFunctionSetupswitch.
•Youcanselectadesiredphasefrom0to359whenselect'phase'.
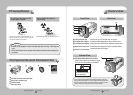
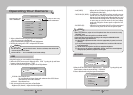
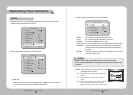
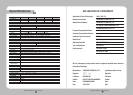
PRIVACY:Maskanareayouwanttohideonthescreen.
PRIVACY AREA SETUP
1. AREA AREA1
2. MODE OFF
3. MASK COLOR GREEN
4. MASK TONE 1
5. TOP 39
6. BOTTOM 79
7. LEFT 12
8. RIGHT 51
9. RETURN