


56
ENGLISH DEUTSCH
RS-232C Data Transfer (VP-D60/D63/D65 only)
Datenübertragung mit Schnittstelle RS-232C (nur VP-D60/D63/D65)
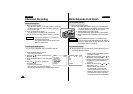
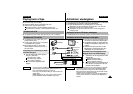
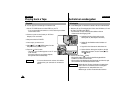
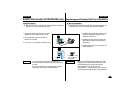
Transferring RS-232C (DV-CAPTURE) data and Connection
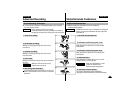
CPU : faster Intel
®
Pentium
TM
or AMD
TM
K6
TM
Processor
Operating system : Windows
®
95, Windows
®
98, NT, 2000
Main memory : minimum 16 MB RAM
FDD : 3.5˝ Floppy disk Drive
HDD : 10 MB free hard disk space
Graphic card : High Colour (over 65,535 colour) capable video card
Serial port : RS-232C compatible (9pin : COM port)
System Requirement
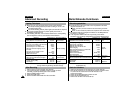
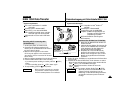
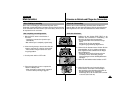
1. Insert the Photoland RS software diskette into FDD (3.5˝ Floppy
Disk Drive)
2. Click ˝Run˝ on the Windows ˝Start˝ menu.
3. Execute SETUP.EXE file to begin installation.
- When FDD is set to ˝A:˝ drive: type ˝A:\ setup.exe˝ and press Enter.
4. When you see the start window, click on ˝next˝ to continue
installation.
5. When you see the finish window, click on ˝Finish˝.
6. Now, you can use the Photoland RS.
✤ The RS-232C (DV-CAPTURE) function lets you easily transfer the
still image to PC without other optional add-on cards.
✤ If you want to transfer data to PC, you must install the software
(Photoland RS) supplied with the camcorder.
Program installation
Anschluß und Übertragung
✤ Über RS-232C können Sie Standbilder an den PC übertragen, ohne
daß Sie eine Zusatzkarte für den PC benötigen. Diese Funktion wird
als DV CAPTURE bezeichnet.
✤ Für die Datenübertragung zum PC installieren Sie die mit dem
Camcorder gelieferte Software Photoland RS auf dem PC.
Systemanforderungen
CPU: Intel
®
Pentium
TM
oder AMD
TM
K6
TM
Prozessor
Betriebssystem: Windows
®
95, Windows
®
98, NT, 2000
Hauptspeicher: mindestens 16 MB RAM
3,5Zoll-Diskettenlaufwerk
Festplatte: 10 MB freier Speicherplatz auf Festplatte
Grafikkarte: High Colour Videokarte (mehr als 65 535 Farben)
Serieller Port: kompatibel mit RS-232C (9poliger COM-Port)
Program installieren
1. Legen Sie die Diskette mit der Photoland RS-Software in das
Diskettenlaufwerk ein.
2. Klicken Sie auf “Start” und anschließend auf “Ausführen”.
3. Geben Sie den Buchstaben ein, mit dem das Diskettenlaufwerk
bezeichnet ist, gefolgt von “SETUP.EXE”. Klicken Sie auf “OK”.
- Beispiel: A:\setup.exe
4. Wenn das Startfenster erscheint, klicken Sie auf “Next” (Weiter), um
die Installation fortzusetzen.
5. Wenn das Abschlußfenster erscheint, klicken Sie auf “Finish”
(Fertigstellen).
6. Sie können die Photoland RS-Software nun verwenden.