


72
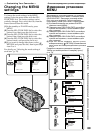
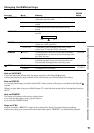
Changing the MENU settings
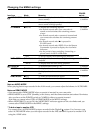
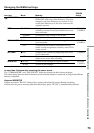
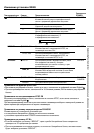
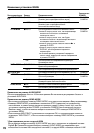
Icon/item
AUDIO MODE
Ò REMAIN
DATA CODE
CLOCK SET
LTR SIZE
DEMO MODE
Mode
r 12BIT
16BIT
r AUTO
ON
r DATE/CAM
DATE
r NORMAL
2×
r ON
OFF
Meaning
To record or play back in the 12-bit mode (two
stereo sounds)
To record or play back in the 16-bit mode (the one
stereo sound with high quality)
To display the remaining tape bar:
• for about 8 seconds after your camcorder is
turned on and calculates the remaining amount
of tape
• for about 8 seconds after a cassette is inserted and
your camcorder calculates the remaining amount
of tape
• for about 8 seconds after ( is pressed in
PLAYER mode
• for about 8 seconds after DISPLAY on the Remote
Commander is pressed to display the viewfinder
indicators
• for the period of tape rewinding, forwarding or
picture search in the PLAYER mode
To always display the remaining tape indicator
To display date, time and recording data during
playback
To display date and time during playback
To reset the date or time (p. 79)
To display selected menu items in normal size
To display selected menu items at twice the normal
size
To make the demonstration appear
To cancel the demonstration mode
POWER
switch
PLAYER*
CAMERA
PLAYER
CAMERA
PLAYER
CAMERA
PLAYER
CAMERA
CAMERA
Note on AUDIO MODE
When playing back a tape recorded in the 16-bit mode, you cannot adjust the balance in AUDIO MIX.
Notes on DEMO MODE
•You cannot select DEMO MODE when a cassette is inserted in your camcorder.
•DEMO MODE is set to STBY (Standby) at the factory and the demonstration starts about 10 minutes
after you have set the POWER switch to CAMERA without a cassette inserted.
Note that you cannot select STBY of DEMO MODE in the MENU settings.
•When NIGHTSHOT is set to ON, the NIGHTSHOT indicator appears in the viewfinder and you
cannot select DEMO MODE in the MENU settings.
*To dub a tape to another VCR
You cannot select AUDIO MODE for tapes recorded in the Digital8 system. You, however, can
select AUDIO MODE when you dub tapes recorded in the Hi8/standard 8 system to another VCR
using the i.LINK cable.