


57
Editing
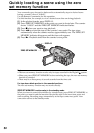
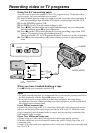
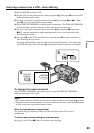
Using the A/V connecting cable
Connect your camcorder to the VCR using the A/V connecting cable supplied with
your camcorder.
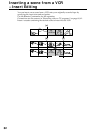
(1) Insert a blank tape (or a tape you want to record over) into the VCR, and insert
the recorded tape into your camcorder.
(2) Set the input selector on the VCR to LINE. Refer to the operating instructions
of your VCR for more information.
(3) Set the POWER switch to VTR.
(4) Play back the recorded tape on your camcorder.
(5) Start recording on the VCR.
Refer to the operating instructions of your VCR for more information.
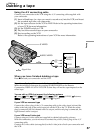
When you have finished dubbing a tape
Press x on both your camcorder and the VCR.
If you have displayed the screen indicators on the TV
Make the indicators disappear by pressing SEARCH MODE on the Remote
Commander, DISPLAY or DATA CODE so that they will not be superimposed on the
edited tape.
You can edit on VCRs that support the following systems:
8 mm, Hi8, VHS, S-VHS, VHSC, S-VHSC, Betamax,
ED Betamax, mini DV, DV or Digital8
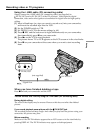
If your VCR is a monaural type
Connect the yellow plug of the A/V connecting cable to the video input jack and the
white or the red plug to the audio input jack on the VCR or the TV. When the white
plug is connected, the left channel audio is output, and the red plug is connected, the
right channel audio is output.
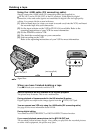
If your VCR has an S video jack
Connect using an S video cable (not supplied) to obtain high-quality pictures.
With this connection, you do not need to connect the yellow (video) plug of the A/V
connecting cable.
Connect an S video cable (not supplied) to the S video jacks of both your camcorder and
the VCR.
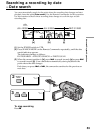
: Signal flow
— Editing —
Dubbing a tape
AUDIO
VIDEO
S VIDEO
IN
S VIDEO
AUDIO
/
VIDEO