


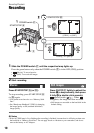


7
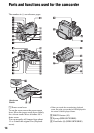
Getting Started
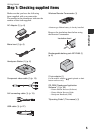
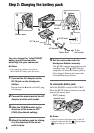
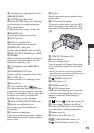
To charge the battery pack using only
the AC Adaptor
Slide the POWER switch to OFF (CHG),
then connect the AC Adaptor directly to the
DC IN jack on the camcorder.
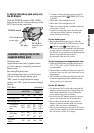
Charging time:
Approximate time (min.) required when
you fully charge a completely exhausted
battery pack.
Recording/Playback time:
Approximate time (min.) available when
you use a fully charged battery pack.
“HD” stands for high definition image
quality, and “SD” stands for standard image
quality.
NP-FH60:
(Unit:min.)
On the battery pack
• Before changing the battery pack, slide the
POWER switch to OFF (CHG) and turn off the
(Movie) lamp/ (Still) lamp (p. 8).
• The power will not be supplied from the battery
as long as the AC Adaptor is connected to the
DC IN jack of your camcorder or the Handycam
Station, even when the mains lead is
disconnected from the wall socket.
On the charging/recording/playback time
• Times measured when using the camcorder at
25°C (77°F) (10°C to 30°C (50°F to 86°F) is
recommended).
• The available recording and playback time will
be shorter when you use your camcorder in low
temperatures.
• The available recording and playback time will
be shorter depending on the conditions under
which you use your camcorder.
On the AC Adaptor
• Use the nearby wall socket when using the AC
Adaptor. Disconnect the AC Adaptor from the
wall socket immediately if any malfunction
occurs while using your camcorder.
• Do not use the AC Adaptor placed in a narrow
space, such as between a wall and furniture.
• Do not short-circuit the DC plug of the AC
Adaptor or battery terminal with any metallic
objects. This may cause a malfunction.
• Even if your camcorder is turned off, AC power
(mains) is still supplied to it while connected to
the wall socket via the AC Adaptor.
Available running time for the
supplied battery pack
HDR-SR5E
HDR-SR7E/
SR8E
HD SD HD SD
Charging time 135 135
Recording time*
1
Continuous
recording
time
105*
2
110*
3
120*
2
130*
3
90*
2
95*
3
95*
4
100*
2
105*
3
105*
4
Typical
recording
time*
5
50*
2
55*
3
60*
2
65*
3
45*
2
45*
3
45*
4
50*
2
50*
3
50*
4
Playback
time*
2
150 165 140 160
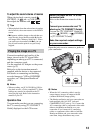
DC IN jack
Open the jack
cover.
DC plug
POWER switch
With the v mark
on the right
*
1
All times of image quality measured with SP
recording mode when [ INDEX SET] is set
to [OFF].
*
2
When the LCD backlight turns on.
*
3
When the LCD backlight turns off.
*
4
When recording with the viewfinder while the
LCD panel is closed.
*
5
Typical recording time shows the time when
you repeat recording start/stop, turning the
power on/off and zooming.