


9
Recording images from the camcorder to this unit
x Recording video simultaneously on this unit and
a camcorder
– Connecting to a camcorder with an “external REC
control” function (SYNCHRO mode)
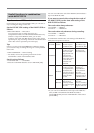
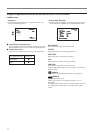
When connected to a camcorder that has an external REC
control function, this unit can be controlled by the
camcorder to record video data simultaneously to the
camcorder recording on tape.
• Clips recorded by this unit include several frames after
the recording stopping point on the tape.
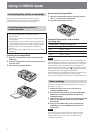
1 Press the CAM LINK button of this unit and set it to
ON.
2 Set the [CAM LINK SEL] setting of this unit to
[SYNCHRO].
3 Set the [EXT REC CTRL] setting of the camcorder to
[SYNCHRONOUS].
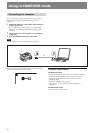
4 Connect the camcorder to this unit via an i.LINK cable.
5 Press the REC START/STOP button of the camcorder to
start recording.
• The above Step 3 is for the HVR-Z7/S270 series. For details
on another camcorder you want to connect to this unit,
refer to the operating instructions supplied with that
camcorder.
• For details on the types of camcorder that have an “external
REC control” function and on motion detection, refer to the
“Guide to supported models and their functions” supplied
with this unit.
– Connecting to a camcorder without an “external
REC control” function (FOLLOW mode)
When connected to a camcorder that has no external REC
control function, this unit regularly checks the status of
the camcorder and follows its recording operation.
1 Press the CAM LINK button of this unit and set it to
ON.
2 Set the [CAM LINK SEL] setting of this unit to
[FOLLOW].
3 Connect the camcorder to this unit via an i.LINK cable.
4 Press the REC START/STOP button of the camcorder to
start recording.
Notes
• This unit may lag up to two seconds behind the tape
recording/stopping point of the camcorder.
• For details on camcorders that have been tested in
FOLLOW mode, refer to “Guide to supported models
and their functions” supplied with this unit.
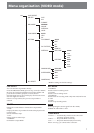
Camcorder
STANDBY REC STANDBY
This unit
STANDBY REC STANDBY
REC
Camcorder
STOP
STANDBY REC STANDBY
This unit
STANDBY REC STANDBY
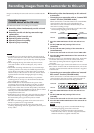
Images recorded by the camcorder can be recorded onto this
unit.
Recording images
(POWER switch at the ON side)
The different methods of recording are as follows:
x Recording video simultaneously on this unit and
a camcorder
x Recording on this unit during camcorder tape
replacement
x Recording video from this unit
x Operating cache recording
x Operating interval recording
x Operating loop recording
Notes
•A 0 KB file may be created, but the file cannot be opened
because it does not have video data. Do not delete the 0 KB
file on your computer. If you do, this clip cannot be played
back.
• When changing the tape, the audio may mute on some
camcorder models. At the recorded part, only video is
recorded.
• When HDV recording with this unit, if you start the tape
recording with the camcorder, the i.LINK output stream is
cut for about 0.5 seconds, so when that video is recorded
onto this unit, it is the cut form. In this case, the file will be
separated before and after changing the tape recording
started.
• The file will be separated automatically every time the
recording time of one clip over about 20 minutes but this
clip is operated as a same clip.
• If the i.LINK cable is disconnected or the power of the
connecting device turned off during recording, recording
stops but the data recorded until that point is recorded.
• If the power of this unit is turned off by battery exhaustion
or mistakenly sliding the POWER switch, the data recorded
until the power off is detected is recorded on a
CompactFlash in this unit.
• If the battery pack is removed or the jack of the AC adaptor
disconnected during recording, the folder information at
the moment the power goes off may not be written
correctly.
• The interval recording operation of the camcorder is not
timed, so operations are not guaranteed.
• Do not switch the audio mode of the camcorder while
recording. Depending on the PC application, there may not
be any audio.