


MRW62E-S1 2-694-866-14(2)
MRW62E-S1 2-694-866-14(2)
Solution
, Your computer and the reader/
writer may not be properly
connected. Disconnect the reader/
writer from the computer and
reconnect it.
, Your computer and the reader/
writer may not be properly
connected. See “Connecting the
Reader/Writer to a Computer” and
make sure the connection is correct.
, A USB device other than the reader/
writer is connected to the USB port
on the computer.
, No memory card is inserted. Insert a
memory card into the proper slot.
, The memory card is not fully
inserted. Insert the card completely.
, The memory card is not inserted
straight. Remove the card and insert
it again.
, The speed may vary depending on
the environment or the memory
card being used. This is not a
malfunction.
, Make sure that the “USB Mass
Storage Device” is not displayed as
in the “Device Manager.” If it is,
delete it, disconnect the USB cable
from your computer, and then
reconnect it.
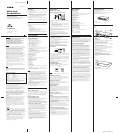
Connecting the Reader/Writer to
a Computer
Simply connect the reader/writer to a computer using the
supplied USB cable.
1 Start the computer.
2 Connect the smaller connector of the USB cable to
the USB port on the rear of the reader/writer.
3 Connect the larger connector of the USB cable to
the USB port on the computer.
The computer recognizes the reader/writer as a removable
disk, and the reader/writer is ready for use.
Notes
• Do not connect to the USB port on the computer via an
external USB hub.
• Depending on the computer and the status of its operating
system, the reader/writer may not operate or may become
unstable. If this occurs, refer to the “Troubleshooting” section.
• After disconnecting the USB cable, wait at least 5 seconds
before reconnecting it. (Otherwise, the reader/writer may not
be recognized.)
• When two or more USB devices are connected to one
computer, the reader/writer is not guaranteed to operate
simultaneously with some types of USB device.
• You cannot access two or more memory cards simultaneously
on a single computer by connecting additional memory card
devices. Remove any memory cards from the reader/writer or
turn off the other devices.
Notes for Windows
• On some computers, a message may appear asking you to
insert the operating system disc. When this happens, follow
the computer’s instructions.
• On some computers, the USB Mass Storage will function at
reduced speed message may appear, indicating that a hi-
speed USB device has been connected to a USB which does
not support hi-speed USB. If your computer has multiple USB
ports, try connecting to a different port. Otherwise, close the
message and continue using the reader/writer with the
current port.
Notes for Windows 2000 and Windows Me
• Follow the steps below to turn off the write cache
setting for removable disk drives. Leaving this
setting on may cause the reader/writer to
malfunction.
– On Windows 2000:
Open the following items in the following order: [Start] button
– [Settings] – [Control Panel] – [System] – [Hardware] tab –
[Device Manager] button – [Disk drives] – [Sony Card_R/W-
MS USB Device]. On the [Disk Properties] tab in the
properties dialog box that appears, make sure the [Write
Cache enabled] check box is not selected.
In the same way, clear the [Write Cache enabled] check box on
the [Disk Properties] tab of the [Sony Card_R/W -CF USB
Device], [Sony Card_R/W -SD USB Device], and [Sony
Card_R/W -SM/xD USB Device].
– On Windows Me:
Open the following items in the following order: [Start] button
– [Settings] – [Control Panel] – [System] – [Performance] tab –
[File System] button. On the [Removable Disk] tab in the
properties dialog box that appears, make sure the [Enable
write-behind caching on all removable disk drives.] check box
is not selected.
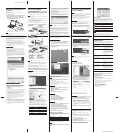
Using the Reader/Writer
Inserting a Memory Card
Insert a memory card into the corresponding slot on the reader/
writer.
When inserting a card, push it in as far as it can go.
Notes
• Each card slot is designed so a card can only be inserted in the
correct direction.
• Insert only one memory card into the corresponding slot. Do
not insert multiple cards at the same time.
• When inserting a “Memory Stick Micro” (“M2”), or a mini SD
Card, use an appropriate adaptor (not supplied).
• Do not insert a card upside down.
• Forcibly inserting the card may damage the card or the slot.
Notes
• If a memory card is inserted incorrectly, you may not be able
to remove it. In the unlikely event that a memory card
becomes stuck in the reader/writer, consult your local Sony
dealer.
• Do not remove a memory card from the reader/writer while
the access indicator is blinking. The data stored on the
memory card may be damaged.
Reading and Writing Data on a Memory Card
For Windows
The following explanation is illustrated with screens from
Windows XP.
The screens may differ for other versions of Windows.
1 Open [My Computer].
2 Make sure the removable disk icons appear in [My
Computer].
Drive letters for the removable disk icons are assigned in
alphabetical order to the CompactFlash / Mircodrive Slot,
SmartMedia / xD-Picture Card Slot, MultiMediaCard /
SD Memory Card Slot, and “Memory Stick” Slot.
For example, if the computer has an A:, C:, and D: drive
before connecting the reader/writer, the drive letters will be
assigned as follows when the reader/writer is connected:
Computer drive name Corresponding memory card
Removable Disk (E:) CompactFlash
MicroDrive
Removable Disk (F:) SmartMedia
xD-Picture Card
Removable Disk (G:) MultiMediaCard
SD Memory Card
Removable Disk (H:) “Memory Stick” media
Disconnecting the Reader/Writer
From the Computer
Notes
• Do not disconnect the reader/writer from the computer while
the access indicator is blinking. Doing so may cause damage
to the data stored on the memory card.
• Be sure to follow the steps described below.
Sony accepts no responsibility for any damage or loss that
results from disconnecting the reader/writer without
following the procedure described below.
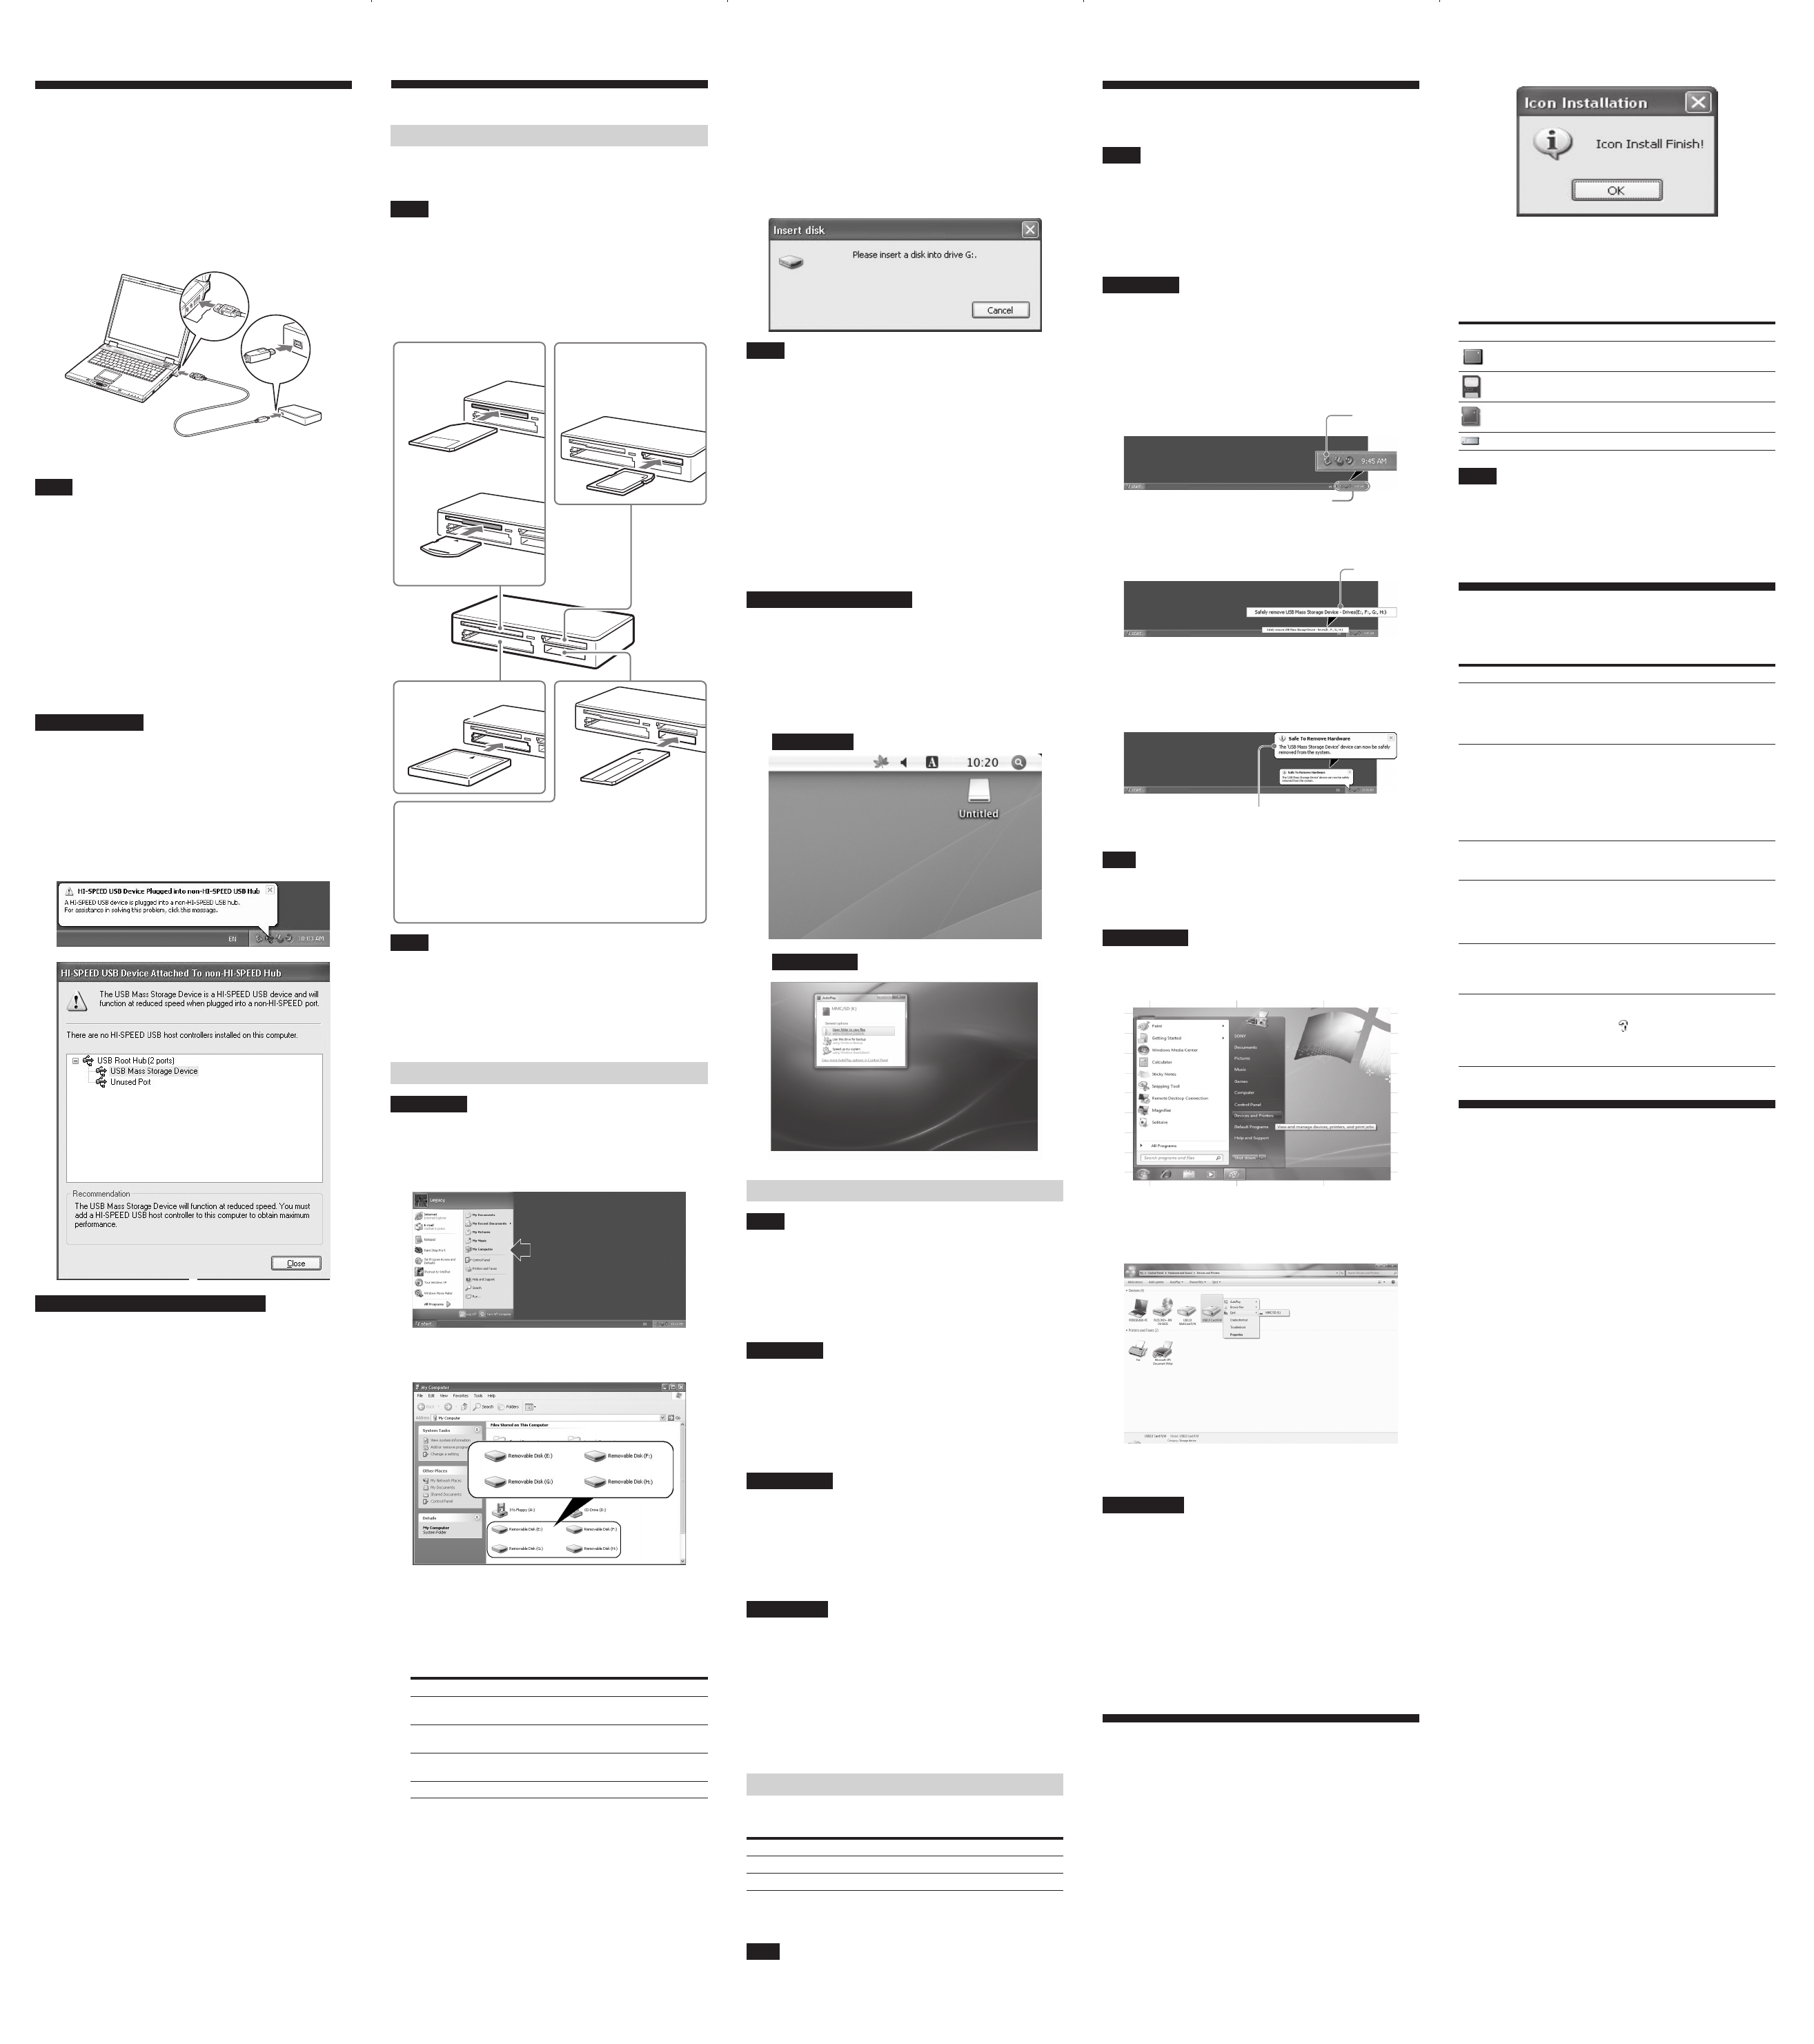
For Windows
The following explanation is illustrated with screens from
Windows XP, and assumes that drive names E:, F:, G:, and H:
are assigned to the four slots of the reader/writer.
The screens may differ for other versions of Windows.
1 Click [Safely Remove Hardware] on the task tray,
located at the lower right corner of the screen.
2 Click [Safely remove USB Mass Storage Device -
Drives (E:, F:, G:, H:)].
3 Make sure the message “The 'USB Mass Storage
Device' device can now be safely removed from
the system.” appears, and then disconnect the
reader/writer.
Note
The above steps are not required when removing a memory card
from the reader/writer.
For Windows 7
1 Click the Start Button.
2 Click Devices and Printers.
3 Right click [USB2.0 Card R/W] drive icon.
4 One by one ejects all removable disks or select
eject when all medias are inserted to drive.
5 Pull the USB Cable out from computer.
For Macintosh
1 Close the files saved on the memory card, and exit
any currently running applications.
2 Make sure the access indicator is not blinking.
3 Drag the removable disk icon to the [Trash].
Alternatively, select the removable disk icon, access the
[File] menu on the menu bar, and select [Eject “Untitled”]*.
* Depending on the memory card, a different label than “Untitled”
may be shown.
If no memory card is inserted into the reader/writer, skip
this step.
4 Disconnect the reader/writer from the computer.
Installing the Drive Letter
Recognition Software
(Windows Only)
Before starting installation, read the “End User License
Agreement.”
1 Download the installer file from the web site.
The installer file can be downloaded from the following
URL
http://sony.storagesupport.com/
2 Close all program that are still running.
3 Double-click the installer file.
(For windows Vista and Windows 7, User Account Control
window will appear, click on [Allow].)
4 When the following window appears, the
installing is completed, and click [OK].
3 Insert a memory card into the corresponding slot.
When a volume label has been assigned to the memory card,
the volume label will be displayed together with the
removable disk icon.
4 Use the removable disk icon to read or write data
on the memory card.
If the following message appears, the memory card has not
been recognized correctly, even though the access indicator
lights up. Remove the card and insert it again.
Notes
• Use the removable disk icon for the memory card you are
using.
• It may take a while for the removable disk icons to appear.
• If the removable disk icons do not appear, follow the steps
under “Disconnecting the Reader/Writer From the
Computer” in the Operating Instructions (this manual) to
disconnect the reader/writer, and then wait at least 5 seconds
before reconnecting it.
If the [Safely Remove Hardware] icon mentioned in step 1 of
“Disconnecting the Reader/Writer From the Computer” is not
displayed, skip the rest of the procedure and immediately
disconnect the reader/writer.
• Depending on your operating system and the type of memory
card you are using, the reader/writer drives may be
recognized as “Local Disks” instead of “Removable Disks,”
but this will not affect their operation.
For Windows 7 and Macintosh
1 Insert a memory card into the corresponding slot.
The removable disk icon appears on the desktop.
When a volume label is assigned to the memory card, the
volume label will be displayed together with the removable
disk icon.
2 Use the removable disk icon to read or write data
on the memory card.
For Macintosh
For Windows 7
Removing a Memory Card
Notes
• Do not remove a memory card while the access indicator is
blinking. Doing so may cause damage to the data stored on
the memory card.
• Be sure to follow the steps described below.
Sony accepts no responsibility for any damage or loss that
results from removing a memory card without following the
procedure described below.
For Windows
1 Make sure the access indicator is not blinking.
2 Open [My Computer].
3 Right-click the removable disk icon, and select
[Eject].
4 Pull the memory card straight out.
For Windows 7
1 Click the Start Button.
2 Click [Devices and Printers].
3 Right click [USB2.0 Card R/W] drive icon.
4 Go to [Eject] with selection option.
5 Pull the memory card straight out.
For Macintosh
1 Close the files saved on the memory card, and exit
any currently running applications.
2 Make sure the access indicator is not blinking.
3 Drag the removable disk icon to the [Trash].
Alternatively, select the removable disk icon, access the
[File] menu on the menu bar, and select [Eject “Untitled”]
*
.
* Depending on the memory card, a different label than “Untitled”
may be shown.
4 Pull the memory card straight out.
Reading the Access Indicator
The access indicator changes according to the status of the
reader/writer, as follows:
Reader/writer status Access indicator
Connected to a computer Lights up
Reading/writing data Blinks
*
* Depending on your operating environment and the memory card you
are using, the access indicator may blink so quickly it appears to be lit.
Be careful not to misread the access indicator.
Note
If data cannot be read from or written to the memory card while
the access indicator is lit, make sure the card is fully inserted
into the slot.
Notes on Icons
Once the Drive Letter Recognition Software is installed, the
Removable Disk icons and their descriptions change.
For example, if the computer has an A:, C:, and D: drive before
connecting the reader/writer, the drive letters will be assigned
as follows when the reader/writer is connected:
Computer drive name Corresponding memory card
CF/Microdrive (E:)
CompactFlash
MicroDrive
SM/xD (F:)
SmartMedia
xD-Picture Card
MMC/SD (G:)
MultiMediaCard
SD Memory Card
Memory Stick (H:) “Memory Stick” media
Notes
• The use of this software is intended only for this reader/
writer. Other readers/writers may not work with this
software.
• Uninstall any similar software before installation to ensure
that the software functions properly.
Troubleshooting
Before consulting your Sony representative, verify the following.
If the problem still persists, consult your local Sony dealer.
Problem
The computer does not
detect the reader/writer.
The removable disk icon
does not appear.
The memory card cannot be
accessed with Windows
Explorer or My Computer.
The computer does not
recognize the memory card
The read/write speed is
slow.
With Windows 2000 or
Windows Me, the drive icon
of the unit does not appear
in the “My Computer”
window.
Technical Support
Local technical support service is only available in the
following sales regions.
sFor customers in the USA (Sony Electronics Inc.)
Monday to Saturday,
8:00 a.m. - 8:00 p.m. Central Time
• Toll free: 1-800-588-3847
• Free telephone support is offered for 90 days after your first
call.
USA technical support only: Web- based technical support
is free and available 24 hours a day, 7 days a week.
• Web site:
http://sony.storagesupport.com/
1-YEAR LIMITED WARRANTY
For purchases in the U.S. see details at
www.mediabysony.com
•
“MagicGate Memory Stick Duo”
•
“Memory Stick Duo”
(with MagicGate)
•
“Memory Stick PRO”
•
“Memory Stick PRO Duo”
•
“Memory Stick PRO-HG Duo”
•
“Memory Stick Micro” (“M2”)
Insert one of the following
cards in this slot:
• MultiMediaCard
• RS-MMC
• SD/SDHC Memory Card
• mini SD Card
Insert one of the following
cards in this slot:
•
CompactFlash
• Microdrive
Insert one of the following “Memory Stick” media in this slot:
Insert one of the following
cards in this slot:
•SmartMedia
* Push at the right side.
• xD-Picture Card*
•
“Memory Stick”
(without MagicGate)
•
“MagicGate Memory Stick”
•
“Memory Stick”
(with MagicGate)
•
“Memory Stick Duo”
(without MagicGate)
Task tray
Click this icon.
Click here.
The 'USB Mass Storage Device'
device can now be safely removed
from the system.