11:25AM1999 7 4
DSC0XXXX
11/15
1600
VOL
11:25AM1999 7 4
10/15
DSC0XXXX
1600
1 Press the POWER switch to turn on the power.
2 Press v of the control button.
The menu bar appears on the LCD screen.
3 Select “SETUP” with the control button,
then press z.
Setting the date and time
When you use the digital photo frame first, set the date and time. If they are not set, the CLOCK SET
screen in step 4 appears whenever you turn the unit on.
7 Select “ENTER” with the control button, then press z to start the clock.
To cancel setting the date and time
Select “CANCEL” with the control button, then press z.
5 Select the desired display of the date with the control button, then
press z.
Y/M/D (year/month/day)
M/D/Y (month/day/year)
D/M/Y (day/month/year)
6 Select the date and time with the control button, then press z.
The item to be changed is indicated with v/V. Select the number by
pressing the control button, then press z to execute.
When “D/M/Y” is selected, set the time on a 24-hour cycle.
4 Select “CLOCK SET” with the control button, then press z.
: E-mail mode file
: Protected image file
: Image with sound file
: Image with print mark
: Moving image file
Playing back moving images
1 Select the desired moving image with the control button.
2 Select N on the LCD screen with the control button, then press z.
The moving image and sound start.
X : To pause.
VOL. +: To turn the volume up.
VOL. –: To turn the volume down.
1 Press the POWER switch to turn on the power.
The power lamp lights up and the last recorded image is
played back.
Playing back images
Insert a Memory Stick with recorded images.
Playing back still images
2 Select the desired image with the control button.
: To display the preceding image.
Nx : To play back the slide show.
: To display the next image.
During playback moving images (MOVIE)
Playback image
Volume indicator
The indicators during playback
During playback still images (STILL)
4 Enter each item with the control button, then press z.
INTERVAL: 3 seconds, 10 seconds, one minute, 15 minutes or one day.
REPEAT ON: Plays back images in a continuous loop until “CANCEL” is selected.
OFF: After all images are played back, the slide show ends.
5 Select “START” with the control button, then press z.
Slide show starts.
To turn off the indicators on the LCD screen, press V of the control button or DISPLAY.
To cancel the setting
Select “CANCEL” with the control button in the step 5, then press z.
To operate the slide show
Pause: Select “X” with the control button, then press z.
Start: Select “N” with the control button, then press z.
Search: Select “ / ”on the LCD screen with the control button, then press b or B.
About the time of INTERVAL
The time of interval is approximately estimated.
To return to the normal playback screen (Single screen)
Select the desired image or select “RETURN” with the control button, then press z.
Setting the slide show
Playing back all still images one after another automatically.
1 Press v of the control button.
The menu bar appears on the LCD screen.
2 Select “FILE” with the control button, then press z.
3 Select “SLIDE SHOW” with the control button, then press z.
In INDEX screen
1 Press v of the control button.
The menu bar appears on the LCD screen.
2 Select “INDEX” with the control button, then press z.
Six images are displayed at a time.
Shows the position of the
displayed image in the
Memory Stick.
Menu Item Mode Setting Meaning
Return to the SINGLE screen.
Delete all images.
Delete the selected images.
Format a Memory Stick.
Cancel formatting a Memory Stick.
Choose OFF to remove all the print marks.
Choose ON/OFF to write/remove the print mark on a
selected image.
Cancel writing the print mark.
Choose ON/OFF to protect/unprotect all images.
Choose ON/OFF to protect/unprotect selected images.
Cancel protecting the image.
——
FORMAT
PRINT MARK
PROTECT
RETURN
DELETE
FILE
ALL
SELECT
OK
•
CANCEL
ALL
SELECT
•
CANCEL
ALL
SELECT
•
CANCEL
INDEX mode
Menu Item Mode Setting Meaning
Select this item to display six recorded images at a
time.
Delete displayed image.
Cancel deleting image.
Format a Memory Stick.
Cancel formatting a Memory Stick.
Select this item to rotate images.
Select this item to play back images in a continuous loop.
Cancel setting the slide show.
To write the print mark on the image.
Remove the print mark.
Protect displayed image.
Release protection of the image.
Select the language of the display on the LCD screen.
Set the date and time.
Normally set to ON.
Turn off the beep sound.
——
FORMAT
ROTATE (90°)
SLIDE SHOW
PRINT MARK
PROTECT
/LANGUAGE*
CLOCK SET*
BEEP*
INDEX
DELETE
FILE
SETUP
OK
•
CANCEL
OK
•
CANCEL
INTERVAL
REPEAT
START
•
CANCEL
ON
OFF
ON
OFF
ON
OFF
Setting the mode of each item
•
is set at the factory
SINGLE mode
2 Select the desired item with the control
button, then press z.
The color of the item changes from blue to yellow.
Changing the menu setting
1 Press v of the control button.
The menu bar appears on the LCD screen.
SINGLE mode INDEX mode
“SETUP” menu is the same as SINGLE mode.
3 Select the desired item with the control button, then press z.
Return to the menu bar in the step 1 after setting ends.
To cancel the menu setting
Press V of the control button repeatedly until the menu bar disappears.
File name
Volume button
Play bar
To display the other six images
Select “v/V” in the lower left corner of the LCD screen with the control button, then press v or V of the control button.
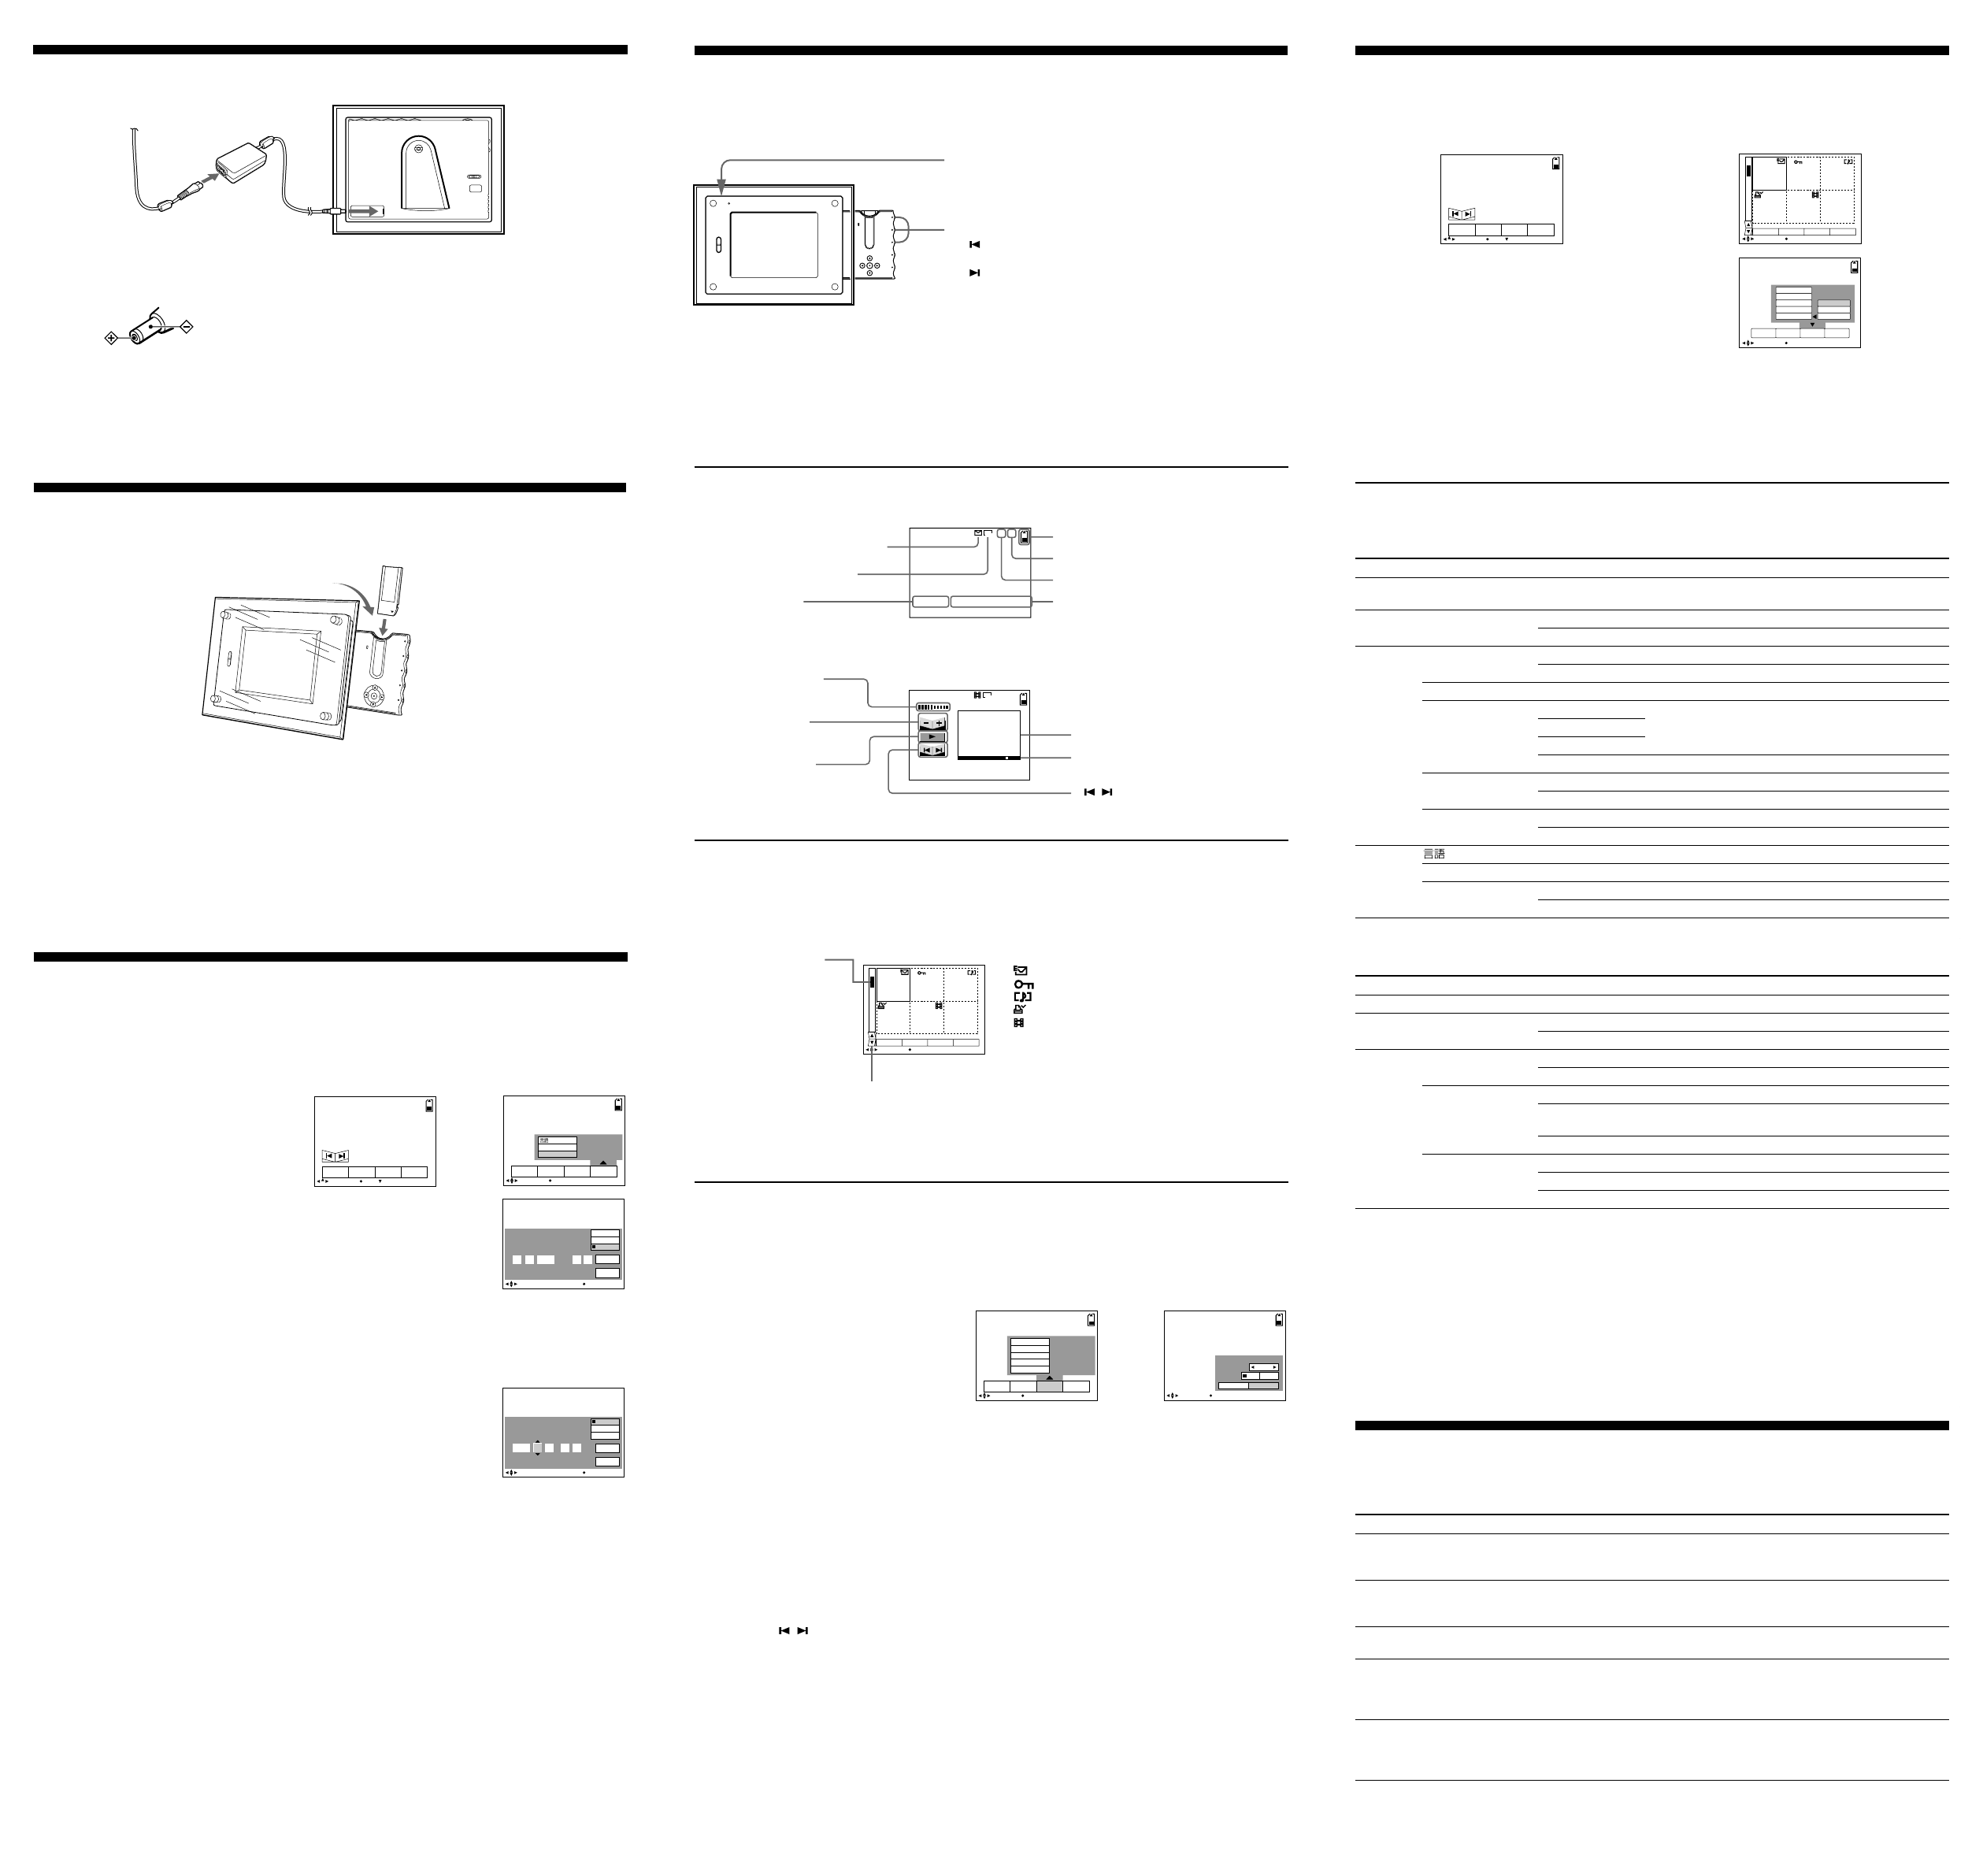
Prepare the Memory Stick
Open the control panel and insert a Memory Stick with recorded images with the V mark facing front.
Note on the AC power adaptor
Use only the AC-power adaptor supplied. Do not use any other AC power adaptor.
Prepare the power source
Polarity of the plug
Recording mode indicator
Remaining Memory Stick capacity indicator
Recording date of the playback image
Image number
Number of stored images in the Memory Stick
Symptom Cause and/or Solution
•No Memory Stick has been installed.
•No image has been recorded on the Memory Stick.
t Install a Memory Stick with recorded images.
•The digital photo frame is placed near a TV or other equipment that uses strong
magnets.
t Place the digital photo frame away from the TV, etc.
•You are shooting a subject with the light source behind the subject.
t Adjust brightness of the LCD screen.
•The write protect tab on the Memory Stick is set to LOCK.
t Set it to the recording position.
•The image is protected.
t Cancel the protection of the image.
•The sleep switch is set to 30 MIN. or 60 MIN..
t Turn off the sleep switch.
•A single image has constantly played back for more than 12 hours.
t Perform any operation to automatically turn the screen back on.
You cannot play back
the images.
The picture is noisy.
The picture is too
dark.
You cannot rotate or
delete an image.
The LCD screen turns
off automatically.
Troubleshooting
Should any problem persist after you have made those checks, consult your nearest Sony
dealer.
You can use the buttons on the edge of the control panel when the panel is closed.
* These settings are held in memory even when the AC power adaptor is removed.
“ / ” button
Displays a preceding or a following image.
Image size indicator
“N/X” switch
Starts or pauses playback of
moving images.
Either N or X is displayed on
the LCD screen.
INDEX FILEDELETE SETUP
SELECT MENU BAR OFF
OK
BEEP
/
LANGUAGE
CLOCK SET
INDEX FILEDELETE SETUP
SELECT OK
23:591/ 1/1999
ENTER
CANCEL
D/M/Y
M/D/Y
Y/M/D
CLOCK SET
SELECT/ADJUST OK
11:59PM1999/ 1/ 1
ENTER
CANCEL
D/M/Y
M/D/Y
Y/M/D
CLOCK SET
SELECT/ADJUST OK
FILEDELETE SETUP
1999 12 12DSC00100
RETURN
SELECT SINGLE DISPLAY
INDEX FILEDELETE SETUP
PROTECT
PRINT MARK
SLIDE SHOW
ROTATE(90˚)
FORMAT
SELECT OK
CANCELSTART
OFFON
SLIDE SHOW
3sec
REPEAT
INTERVAL
SELECT OK
INDEX FILEDELETE SETUP
SELECT MENU BAR OFF
OK
FILEDELETE SETUP
1999 12 12DSC00100
RETURN
SELECT SINGLE DISPLAY
INDEX DELETE FILE SETUP
FORMAT
ROTATE(90˚)
SLIDE SHOW
PRINT MARK
PROTECT
ALL
SELECT
CANCEL
SELECT OK
,
,
to a wall outlet


