


4
5
Basic Operation (continued)
Basic Operation
Step 1 - Installing the Hard Disk Drive (Skip this step if your DVR comes with a
hard disk drive already installed)
CAUTION:
Do not open the cover when DVR is running!
Make sure the HDD is set to MASTER.
1. Remove the screws on the bottom of the DVR.
2. Slide the cover off carefully.
3. Connect the power cord and data cable to the hard disk carefully. Ensure the
jumper/s on the hard disk is set to MASTER.
4. Use screws to fix the hard disk onto the rack.
5. Then replace the cover on the case and fix it to the case.
Make sure your monitor is on the appropriate AV input channel. If you have an AV
TV with RCA sockets, you will need to switch the TV to the AV channel on the TV
to view the DVR.
This channel may be activated by a button on your remote control which is marked
with this symbol , or L1, L2 or possibly AV, AV1 or AV2.
Step 2 - Connecting your cameras
Step 3 - Connecting your DVR to your monitor
* To extend the operating distance from your TV or VCR you will need to purchase an A/V
extension cable (sold separately) which are available at most electronics stores.
Note: We do not recommend extending the camera cable length past 330 Feet/100 metres
with a single cable run to avoid loss of signal.
Multiple cable sections connected to make up one cable length can drastically reduce the
video signal run distance.
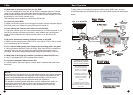
Step 4 - Powering your DVR & Cameras
Connect the DC plug (8) at the end of the DVR Power Adaptor (9) into the DC
input socket (10) in the back of the DVR.
Plug the DVR Power Adaptor (9) into the mains power point in your wall.
Connect the DC plug at the end of the Camera Power Adaptor (11) in to DC 5
Connect your cameras (1) to the Video Extension Cable (2), connect the DC
5Way Splitter (3) to the other end of Video Extension Cable (2) using its DC
plug, and connect BNC plug on the Video Extension Cable (2) to the Video Input
(4) sockets (CH1 - CH4) on the rear panel of the DVR unit.
Connect Video-Out Signal Cable (5) to the Video Output connector (6) on the
back of the DVR, then connect the other end of the Video-Out signal cable (5) to
your TV or Security Monitor’s Video Input socket (7).
Step 1 - Installing the Hard Disk Drive (Skip this step if your DVR comes with a
hard disk drive already installed)
CAUTION:
Do not open the cover when DVR is running!
Make sure the HDD is set to MASTER.
Step 2 - Connecting your cameras
Step 3 - Connecting your DVR to your monitor
Step 4 - Powering your DVR & Cameras
Basic Operation (continued)Basic Operation (continued)
Way Splitter (3), then plug the Camera Power Adaptor (11) into the mains power
point in your wall.
Step 5 - DVR boot up
As the DVR boots up, it should detect the HDD installed. If your hard disk is not
detected, please redo step 1.
Step 6 - Accessing the Menu
Press the “ Menu” button to enter the setup menu.
Use the “ Up” and “ Down” buttons to select an item.
Press the “ Select” button to the modify settings.
Press the “ Menu” button again to save your settings & exit.
Step 7 - Setting up the Time & Date
Enter the menu system and select the “Sub Menu” option.
Highlight the “Time Setup” option and press the “ Select” button to the modify
settings.
Use the “ Up” and “ Down” buttons to select a time or date to change.
Press the “ Select” button to modify.
Press the “ Menu” button again to save your settings & exit.
Step 8 - Start & Stop Recording
Press the “ Record” button to start recording.
Press the ” Stop” button to stop recording. With the password option enabled,
you must correctly enter the password to stop recording.
Step 9 - Playback Recording
Press the “ Play” button to play the last recording (which has not been
previously viewed).
During playback, press the “ Menu” button to initiate the Time Search feature
and display a list of all recorded video clips on the HDD.
Use the “ Up” and “ Down” buttons to select a time or date to change.
Press the “ Select” button to edit time line values and press the “ Play”
button to play the video clip.
Step 5 - DVR boot up
Step 6 - Accessing the Menu
Step 7 - Setting up the Time & Date
Step 8 - Start & Stop Recording
Step 9 - Playback Recording