


HOW TO VIEW YOUR MAX IP CAM VIA THE INTERNET
NOTE: If you are installing the Max IP Cam in a business network, you must get the
assistance of your network administrator.
We recommend you test the camera inside your Local Area Network (LAN) first
before trying to access it from outside of your LAN.
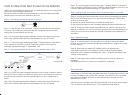
Step 1.2A: Once you have configured the Max IP cam to work in network, use the
blue RJ-45 “Patch” cable to connect one end to the RJ-45 socket on the back of
the camera and the other end into a spare LAN port on your network hub or
switch.
Step 1.2B: Using the supplied power adaptor, connect the power plug into the
back of the camera and insert the power adaptor into your AC socket.
Step 1.1 Connecting the Max IP Camera to your pc.
Step 1.2 Connecting the Max IP Camera to your network router or hub.
Step 1.1A: Use the red RJ-45 “Crossover” cable to connect the camera directly
to your pc. This connection method is used for configuring the camera and
viewing the camera directly from the pc.
Step 1.1B: Using the supplied power adaptor, connect the power plug into the
back of the camera and insert the power adaptor into your AC socket.
Step 1.1C: Now thoroughly read through page 7 “Getting Started” of the Max IP
Cam manual for instructions on how to view the camera. If you have any
difficulties, please read page 27 “Appendix B. FAQ”.
Step 1.2C: Now thoroughly read through page 7 “Getting Started” of the Max IP
Cam manual for instructions on how to view the camera inside of your LAN. If you
have any difficulties, please read page 27 “Appendix B. FAQ”.
Step 2A: Log into your router and make sure you are port forwarding the default
Max IP Cam HTTP Server port of “80”. Also
By default, all routers should have port 80 set to always open.
To get more information on port forwarding, please visit www.portforward.com.
Step 2B: Once you have correctly forwarded the port, check to see what your
external IP address is. You can check this by going to http://www.whatismyip.com
(note: you must do this on the server machine to find the correct external IP of
the router.)
Step 3A: To view the MaxIP Cam remotely, you must open Microsoft Internet
Explorer and configure your security settings as described on page 8 of the Max
IP Cam manual.
Step 3B: Now enter your external IP address (which you retrieved from
www.whatismyip.com) in the address bar of your Internet Explorer window.
Make sure your IP address is preceded with “http://”, otherwise the System Login
window will not appear.
Step 3C: Now log into the camera by entering your Account ID name and
password.
The default Account ID is “admin” and password is “password”.
Please Note: If you have been assigned a dynamic IP address by your ISP, you will
find the IP address of the camera can change. To combat this, you can either
get a Dynamic Network Service from www.dyndns.org or acquire a static IP
address from your ISP.
Users who want to configure the NTP Server (Network Time Protocol) on the Max IP
Cam must firstly make sure that port “123” is opened on their firewall.
Step 2. Setting up the your router to view the camera outside of your LAN.
Step 3. Remote Viewing.
Extra Information.
port forward UDP port 1500 to allow
audio from the camera.