ATTACHING AND REMOVING THE LENS
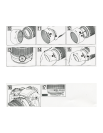
How to mount the lens
Remove the rear cap of the lens. Align the lens attachment mark (15) on the lens bar-
rel with its counterpart on the camera mount and insert the lens. Rotate the lens
clockwise until it click-locks. For Nikon and Pentax models, align the lens attachment
mark on the camera and the lens attachment mark (15) on the lens to attach the lens.
For Nikon models, align the lens attachment mark with the dot on the camera and
rotate the lens counter-clockwise until it click-locks.
How to detach the lens
Pressing the lens release button on the camera down, turn the lens counter-clockwise
(in case of Nikon lens, clockwise), and lift the lens off the camera's lens mount.
The image circles of Di-II lenses are designed to match the digital SLR cameras using the
image sensors equivalent to APS-C (approx. 15.5 x 23.2mm). Do not use Di-II lenses with cameras
using image sensors larger than APS-C. Using Di-II lenses with such cameras may cause vignetting
on the image.
Some Canon digital SLR cameras have index marks for attaching both EF lenses (red) and
EF-S lenses (white) on the bayonet mount. To attach Tamron Di-II lenses, align the lens attachment
mark on the lens (15) with the index mark for EF lenses (red). Do not forcibly align the indicator on
the kens (15) with the index mark for EF-S lens (white). Doing so could result in damage to the lens
and/or camera.
For further details, please read the instruction manual of your camera.
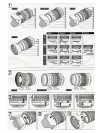
FOCUSING (Autofocus) (Ref. Figs 1 & 2)
Switch the focusing mode switch of the camera to Auto focusing mode (AF) in case of
Nikon, Sony, or Pentax. In case of Canon camera, switch the AF/MF switch (14) on
the lens to AF. (Fig. 5). Press the shutter button lightly while viewing through the cam-
era's viewfinder, the lens focuses automatically. An in-focus mark will light when the
lens focuses on the main subject sharply. Press the shutter button further to photo-
graph.
When set on AF mode, interfering with focusing ring (8) may cause serious damage to the
lens mechanism.
For further details, please read the instruction manual of your camera.
ZOOMING (Ref. Fig. 2)
Rotate zooming ring (9) of the lens while viewing through the camera's viewfinder and
compose your image at the chosen focal length.


