


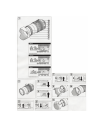
ATTACHING LENS TO CAMERA
• How to mount the lens
Removing the rear cap of the lens, align the lens attachment mark on the lens barrel
with its counterpart on the lens mount of the camera and insert the lens mount into the
camera’s mount opening. Rotate the lens clockwise until it click-locks. For Nikon
models, align the lens attachment mark with the dot on the camera and rotate the lens
counter-clockwise until it click-locks.
• How to detach the lens
Pressing the lens release button of the camera down, turn the lens counter-clockwise
(clockwise in case on Nikon), and lift the lens off the camera’s lens mount.
* For further details, please read the instruction manual of your camera.
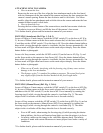
FOCUSING (Autofocus) (Ref. Figs. 1, 2 & 5)
In case of Nikon or Canon camera, switch the AF/MF switch (13) on the lens to AF (Fig.
5). In case of Nikon camera with the focus mode selector dial, set the focus mode to S or
C, and then set the AF/MF switch (13) on the lens to AF. Press the shutter button halfway
down while viewing through the camera’s viewfinder, the lens focuses automatically. An
in-focus mark will light when lens focuses on the main subject sharply. Press the shutter
button further to photograph.
In case of a Sony camera, switch the AF/MF switch (13) on the lens to AF (Fig. 5), and
set the focus mode on the camera to Auto Focus (AF). Press the shutter button halfway
down while viewing through the camera’s viewfinder, the lens focuses automatically. An
in-focus mark will light when lens focuses on the main subject sharply. Press the shutter
button further to photograph.
• When set on AF mode, interfering with the focusing ring (6) may cause serious
damage to the lens mechanism.
• The distance scale (7) is marked for guidance purposes. The actual focal point
may slightly differ from the distance marked on the focal length index.
* For further details, please read the instruction manual of your camera.
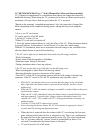
FOCUSING (Manual Focus) (Ref. Fig. 1, 2 & 6)
In case of Nikon or Canon camera, switch the AF/MF switch (13) on the lens to MF (Fig.
6). In case of Nikon camera with the focus mode selector dial, set the focus mode to M,
and then set the AF/MF switch (13) on the lens to MF. Focus manually by rotating the
focusing ring (6) while viewing through the camera’s viewfinder (Fig. 2). The main
subject in the viewfinder will be sharp when the lens is focused correctly.
In case of Sony camera, switch the AF/MF switch (13) on the lens to MF (Fig. 6), and set
the focus mode on the camera to Manual focus (MF). Focus manually by rotating the
focusing ring (6) while viewing through the camera’s viewfinder (Fig. 2). The main
subject in the viewfinder will be sharp when the lens is focused correctly.
• Even in MF mode, when turning the focusing ring (6) while pressing the shutter
button halfway, the focus aid function lamp lights up when the picture is in focus.
• At infinity, make sure the image in the viewfinder appears sharp. The infinity
position is made with certain allowances to insure proper focus under a variety of
conditions.
* For further details, please read the instruction manual of your camera.