


121212
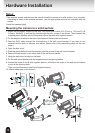
Hardware Installation
Notes:
l The attached screws and anchors are used to install the camera to a solid surface. (e.g. concrete)
If installing to loose or thin material surfaces , use the appropriate anchors (not included) with the
screws.
l Install the camera tightly.
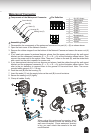
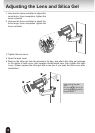
Mounting the camera to a solid surface
1. Attach the alignment sticker to the wall. Drill three pilot holes (Φ 0.37inch x 1.57inch(D) (Φ
9.5mm x 40mm(D) )) and one big hole through the four circles on the sticker. Then hammer the
supplied plastic anchors into the holes and secure the plate with supplied screws.
2. Fix the supplied bracket to the side of the Network Camera with two screws.
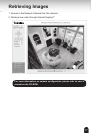
3. Feed the RJ45 cable through the front opening of the wall mount bracket. (If you want to use
external devices such as sensors and alarms, please refer to the assembling steps on the next
page.)
4. Open the lens cover.
5. Push the spring bolt and hook the bracket onto the groove of the wall mount bracket.
6. Secure the two screws on the other side of the wall mount bracket.
7. Hang the wall mount bracket on the plate.
8. Fix the wall mount bracket with the supplied screw and spring washer.
9. Loosen the screw A and B with supplied wrench, and adjust the angle of the wall mount bracket
to aim at the shooting area.
Then, secure the screw A and B with supplied wrench.
10. Attach rubber pad on the screw A
.
1
2
4
3
5
6
7
8
9
B
A