


141414
Notes:
l
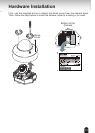
The included screws and anchors are used to install the
camera to a solid surface. (e.g. concrete) If installing on loose
or thin material surfaces , use the appropriate anchors (not
included) with the screws.
l
Generally the camera turns a built-in microphone in the
direction of object.
l
Install the camera securely.
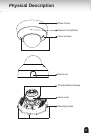
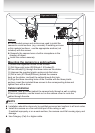
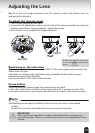
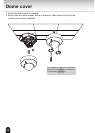
Mounting the camera to a solid surface
(1) Attach the Alignment Sticker to the surface.
(2) Drill three pilot holes (Ø0.28inch×1.57inches(D)
(Ø7mm×40mm(D))) through the three circles on the sticker.
(3) Hammer the supplied plastic anchors into the holes.
(4) Drill a hole (Ø1.0inch(Ø25mm)) behind the camera
body on the sticker, and lead the cables through this hole.
(5) Align the three mounting holes of the Camera with the three plastic
anchors; insert the included three screws to the corresponding holes and
tighten them with a driver.
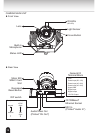
Cable installation
If possible, lead all cables behind the camera body through a wall or ceiling.
If this is not possible, use the knock out on the camera cover to route the
cables through the side.
NOTE
l
Installation should be done only by qualied personnel and conform to all local codes.
l
Install this camera on a rm and solid part of the ceiling or wall.
If installed improperly or on a weak surface, the camera could fall causing injury and
damage.
l
Use Category (Cat) 5 or higher cable.
Alignment sticker
Alignment sticker