


ZENIT-TTL User manual, 1965 year
– 4 –
Reference table of film speed units
GOST
16
22
32
45
65
90
130
180
250
350
500
ASA
16
20
25
32
40
50
64
80
100
125
160
200
250
320
400
500
DIN
13
.
.
16
.
.
19
.
.
22
.
.
25
.
.
28
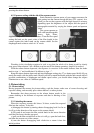
4.2. Shutter speed setting
Turn the shutter speed dial round its axis until a selected shutter
speed figure sets against the index mark. In so doing the dial will be
found in locked position. Figures on the shutter speed dial denote
corresponding fractions of a second and “B” indicates a hand-controlled
shutter speed. Shutter speeds can be set both with cocked and released
shutter. With the shutter speed dial set at “B” the shutter stays open as
long as the release button is kept depressed. To obtain a long exposure
turn the release button to the left as far as it will go. The exposure over,
return the button to its normal position by turning it as far as it will go in
the reverse direction. For long exposures and hand-controlled shutter
speeds one is recommended to use a cable release which can be screwed into the release button thread.
In so doing the camera should be mounted on a tripod.
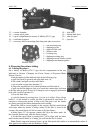
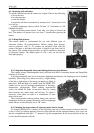
4.3. Diaphragm setting
Set a selected diaphragm value against the index mark by turning
diaphragm setting ring 27.
The diaphragm is capable of operating in two modes:
— in automatic one (the selector switch in “A” position) turning of
diaphragm setting ring 27 does not result in lens diaphragming but
sets preliminarily the aperture value to which the diaphragm will close
down at the moment the release button is pressed;
— in manual one (the selector switch in “M” position) the lens
diaphragm is set manually by turning ring 27.
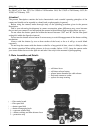
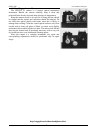
4.4. Focusing
In the camera viewfinder there is Fresnel lens 30 with microraster
centre spot 31 surrounded with ground glass circle 32. Watching the
subject being photographed turn focusing ring 26 to obtain the sharpest
image in the microraster or the ground glass circle. For this purpose
perform focusing with the diaphragm fully open. The best sharpness
can be obtained when the image appears distinct and without ripples
within the microraster.
The ground glass circle is mainly used for micro- and macrophotography as well as for taking
pictures with small apertures when microraster loses its sensitivity.
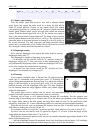
Focusing can be done as well without looking through the viewfinder. For this purpose turn
focusing ring 26 and making use of distance scale 25 set the value corresponding to the distance from
the subject being taken to the film against the large index mark of scale 24 (the small index mark
denoted by Latin letter “R” is used when taking pictures on some infra-red photographic material).
With the lens focused, one can determine the distance from the film to the near and far depth-of-
field limits by making use of scales 24 and 25.
For example, the lens is focused for 3 m and the aperture value, which is to be used, is that of “8”.
In such a case one can read by scale 25 against two figures “8” of scale 24 that the image will be
sharp within the distance limits from 2,3 m to 4,5 m.
With the lens focused and aperture value set one can visually determine approximate depth-of-field
limits in the following way:
— with the diaphragm operated in automatic mode, one should press release button 3 till a definite
stop and estimate the image sharpness within the ground glass circle in the viewfinder;