20 © Titan Tool Inc. All rights reserved.
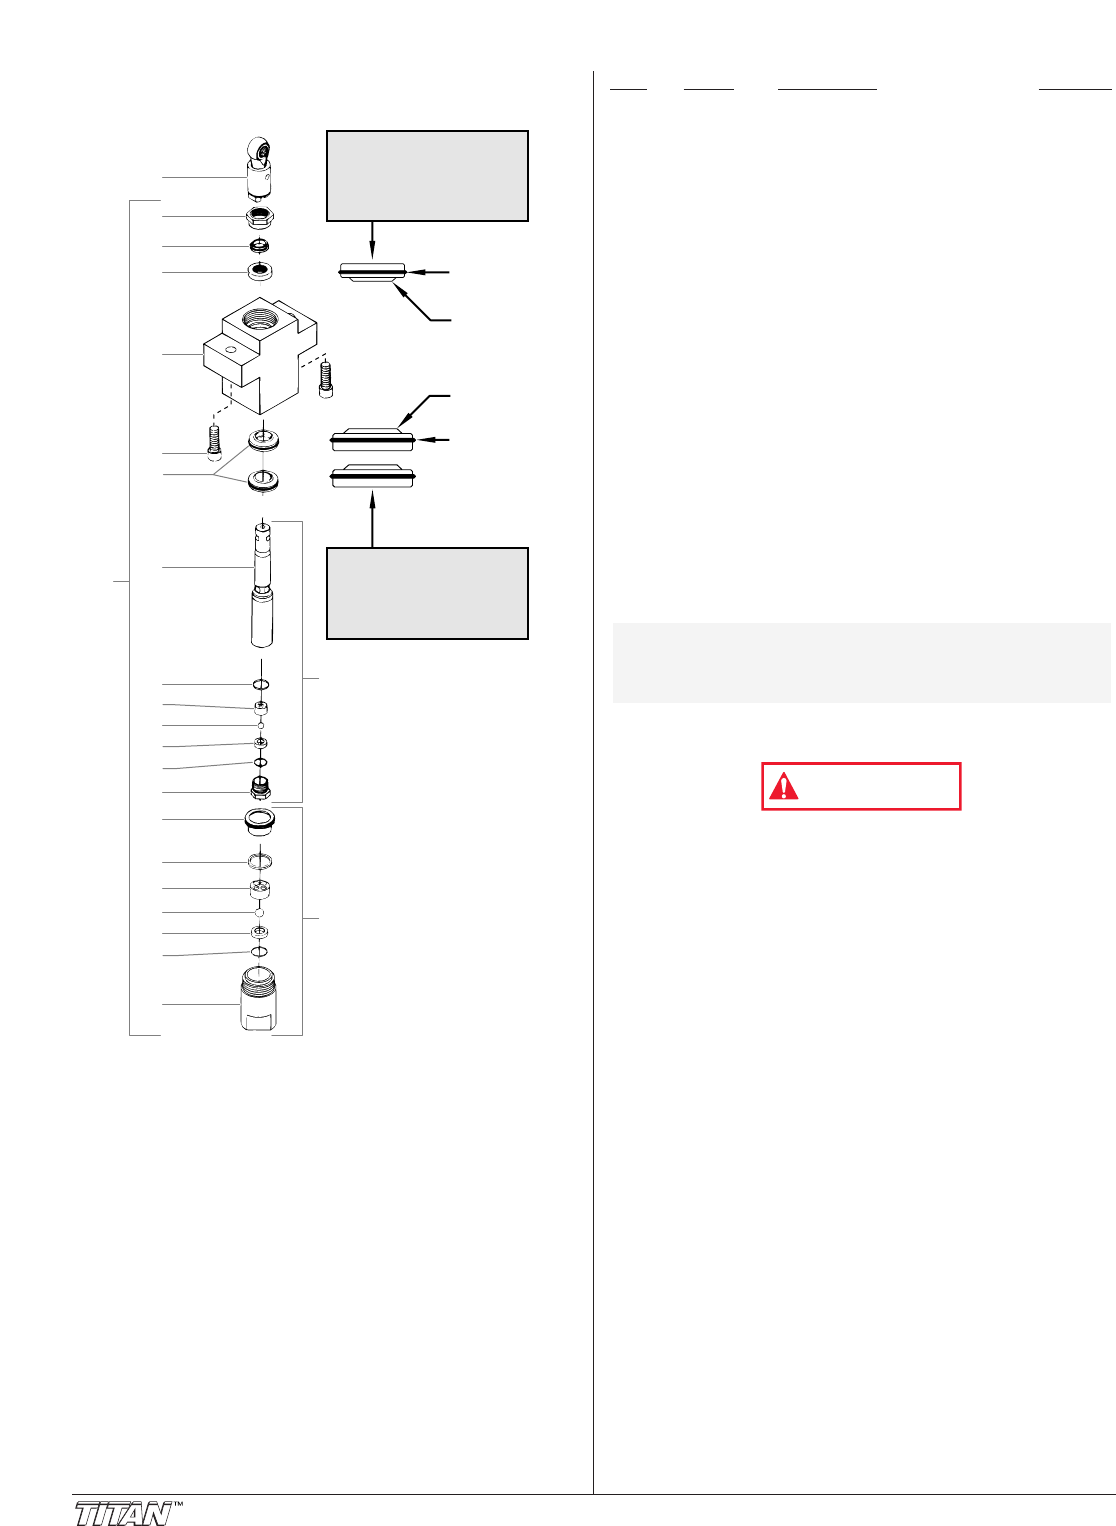
Fluid Section Assembly
O-Ring
Raised Lip
O-Ring
Raised Lip
6
2
1
3
4
8
24
9
10
11
12
13
14
15
16
17
18
19
20
21
5
7
Install each of the two
lower packings with the
raised lip and the o-ring
facing up.
Install the upper
packing with the raised
lip and the o-ring facing
down.
22
23
Item
Part # Description Quantity
1 700-735 Crank and slide connecting rod assy......1
2 730-508 Retainer...................................................1
3 700-587 Upper guide ............................................1
4 700-603 Upper packings.......................................1
5 730-505 Pump housing.........................................1
6 700-678 Head cap screw ......................................2
7 700-601 Lower packings ......................................2
8 704-089 Piston rod................................................1
9 762-111 Seal.........................................................1
10 762-135 Upper cage .............................................1
11 762-144 Outlet valve ball ......................................1
12 762-134 Seat ........................................................1
13 762-057 O-ring ......................................................1
14 762-073 Outlet valve housing ...............................1
15 730-509 Bushing ...................................................1
16 700-821 Seal.........................................................1
17 730-510 Cage........................................................1
18 762-145 Ball ..........................................................1
19 762-137 Inlet valve seat........................................1
20 762-058 O-ring ......................................................1
21 704-054 Foot valve housing...................................1
22 704-090 Piston assembly......................................1
23 730-560 Foot valve assembly ...............................1
24 730-535 Fluid section complete
(includes items 2, 3, 4, 5 ,and 7–21) ......1
25 762-202 Packing tool (not shown) ........................1
Servicing/Repairing the Fluid Section
Before proceeding, follow the “Pressure Relief
Procedure” in the Operation section of this manual.
Additionally, follow all other warnings to reduce the risk
of an injection injury, injury from moving parts or electric
shock. Always unplug the sprayer before servicing!
1. Remove the safety plate (see the “Gear Box Assembly”
parts list).
2. Stop the sprayer at the top of its stroke so that the piston
is in its highest position. Turn off and/or unplug the
sprayer.
3. Remove the return tube with a wrench (see the “Siphon
Assembly” parts list).
4. Squeeze the retaining clip together (see the “Siphon
Assembly” parts list) and pull it down and out of the foot
valve (21).
5. Remove the siphon assembly by pulling it down and out
of the foot valve (21).
4. Tilt the pump back for easy access to the fluid section.
NOTE: Repacking Kit P/N 730-401 includes items 3, 4,
7, 9, 11, 13, 16, 18, 20, (packing grease P/N 700-
203 and piston guide tool P/N 700-793 are also
included).
