8 © Titan Tool Inc. All rights reserved.
English
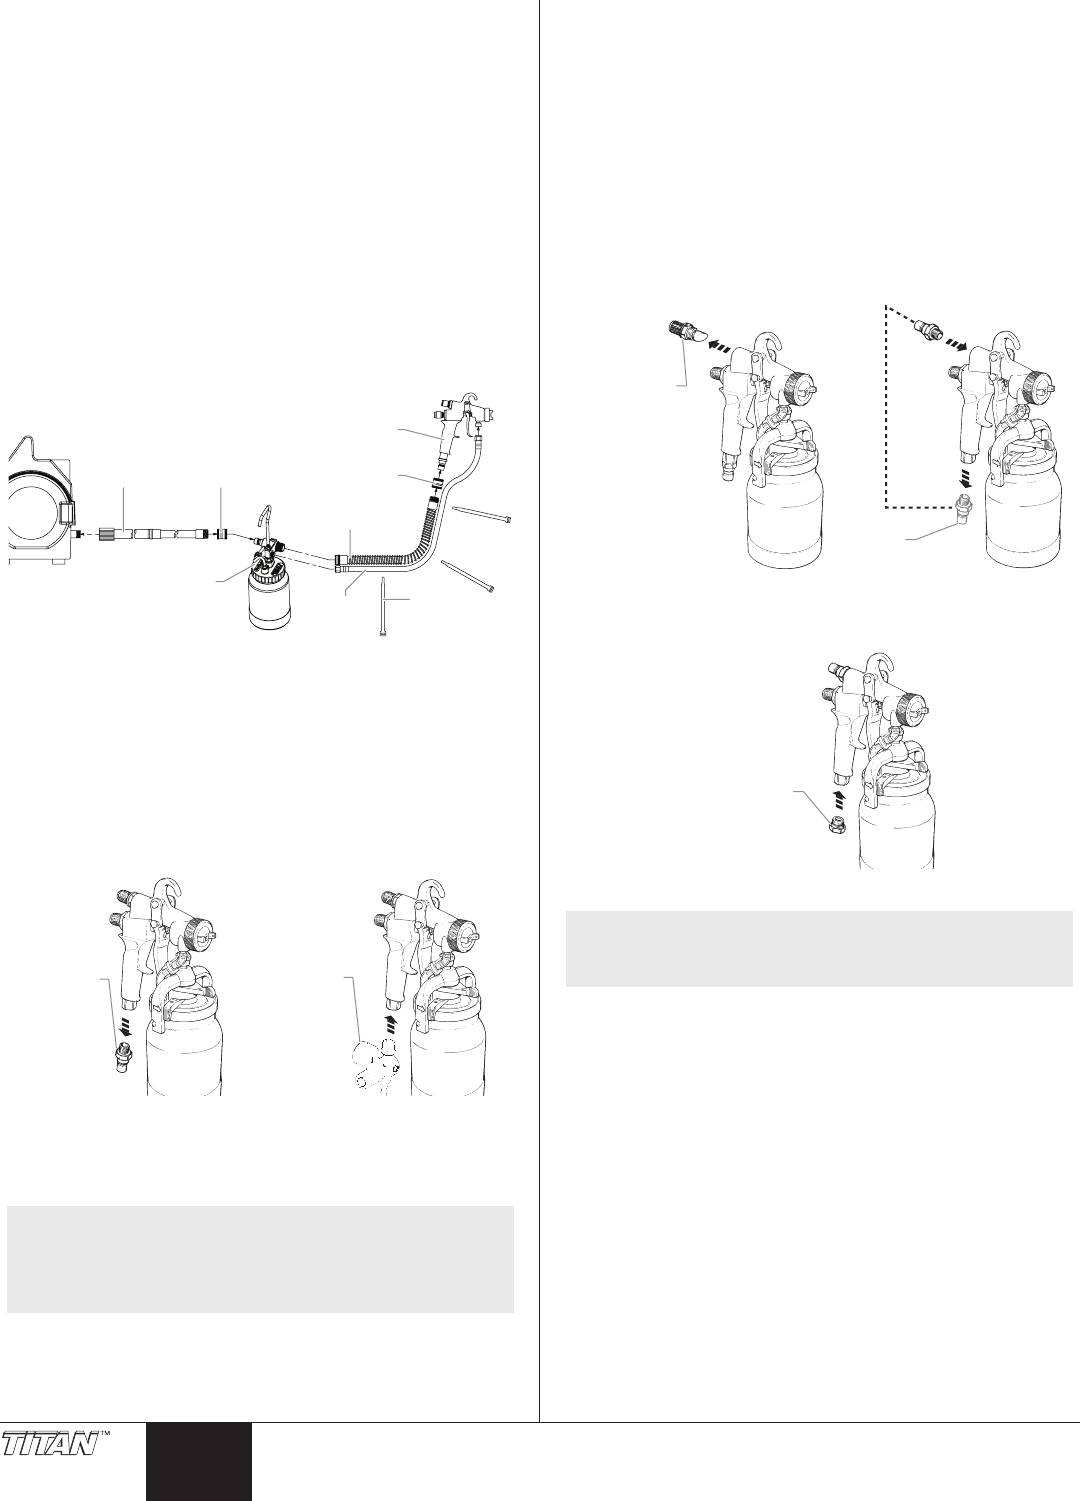
Connecting to a 2-Quart Remote Pressure Pot
1. Convert the gun to pressure feed.
2. Connect hoses:
a. Make sure turbine is turned OFF and unplugged.
b. Attach remote pressure pot to the turbine via the hose
conguration shown below.
c. Tighten the air hose connections by hand.
b. Tighten the uid hose connections with an adjustable
wrench.
1) Turbine
2) 7.5m air hose
3) Female quick-disconnect coupling
4) 2-quart pressure tank assembly
5) 1.5m air whip hose
6) 1.5m uid whip hose
7) Hose straps
8) Female quick-disconnect coupling
9) Spray gun
Converting the Gun to a Regulator Gun
Your HVLP spray gun can be converted to connect directly to
existing high pressure air systems with the addition of a regulator
assembly.
1. Remove the air inlet tting at the bottom of the gun handle
using a wrench.
2. Thread the tting on the regulator assembly into the air
inlet at the bottom of the gun handle and tighten.
Regulator
Assembly
Air Inlet
Fitting
3. Attach the air hose from the existing high pressure air
system to the regulator assembly.
4. Set the pressure gauge on the regulator assembly to the
appropriate setting for the coating being sprayed.
NOTE: Standard air caps require an air ow of 15 –
25 SCFM. Low air ow air caps are available
for the regulator gun to use with smaller air
compressors. See “Optional Accessories” for
the part numbers.
Converting the gun from Non-Bleeder to
Bleeder
Your HVLP spray gun can be converted from a non-bleeder to a
bleeder setup. Bleeder setup provides more atomizing power for
higher viscosity materials, such as latex and enamels. Bleeder
setup can make it easier to spray in conned spaces, such as inside
cabinets, because the air hose is moved to the back of the gun.
To convert a spray gun to bleeder setup:
1. Remove the air ow adjustment knob from the rear of the
gun using a wrench.
2. Remove the air inlet tting from the bottom of the gun
handle using a wrench.
3. Thread the air inlet tting into the air ow adjustment knob
location at the rear of the gun. Secure the tting in place.
Air Flow
Adjustment
Knob
Air Inlet
Fitting
4. Thread the air inlet plug (shipped loose with the gun
literature pack) into the air inlet at the bottom of the gun
handle. Secure the plug in place.
5. Attach the air hose to the relocated air inlet tting.
NOTE: In bleeder setup, the removal of the air ow
adjustment knob causes the air supply to be on at
all times when the air hose is attached to the gun.
