©Titan Tool Inc. All rights reserved. 17
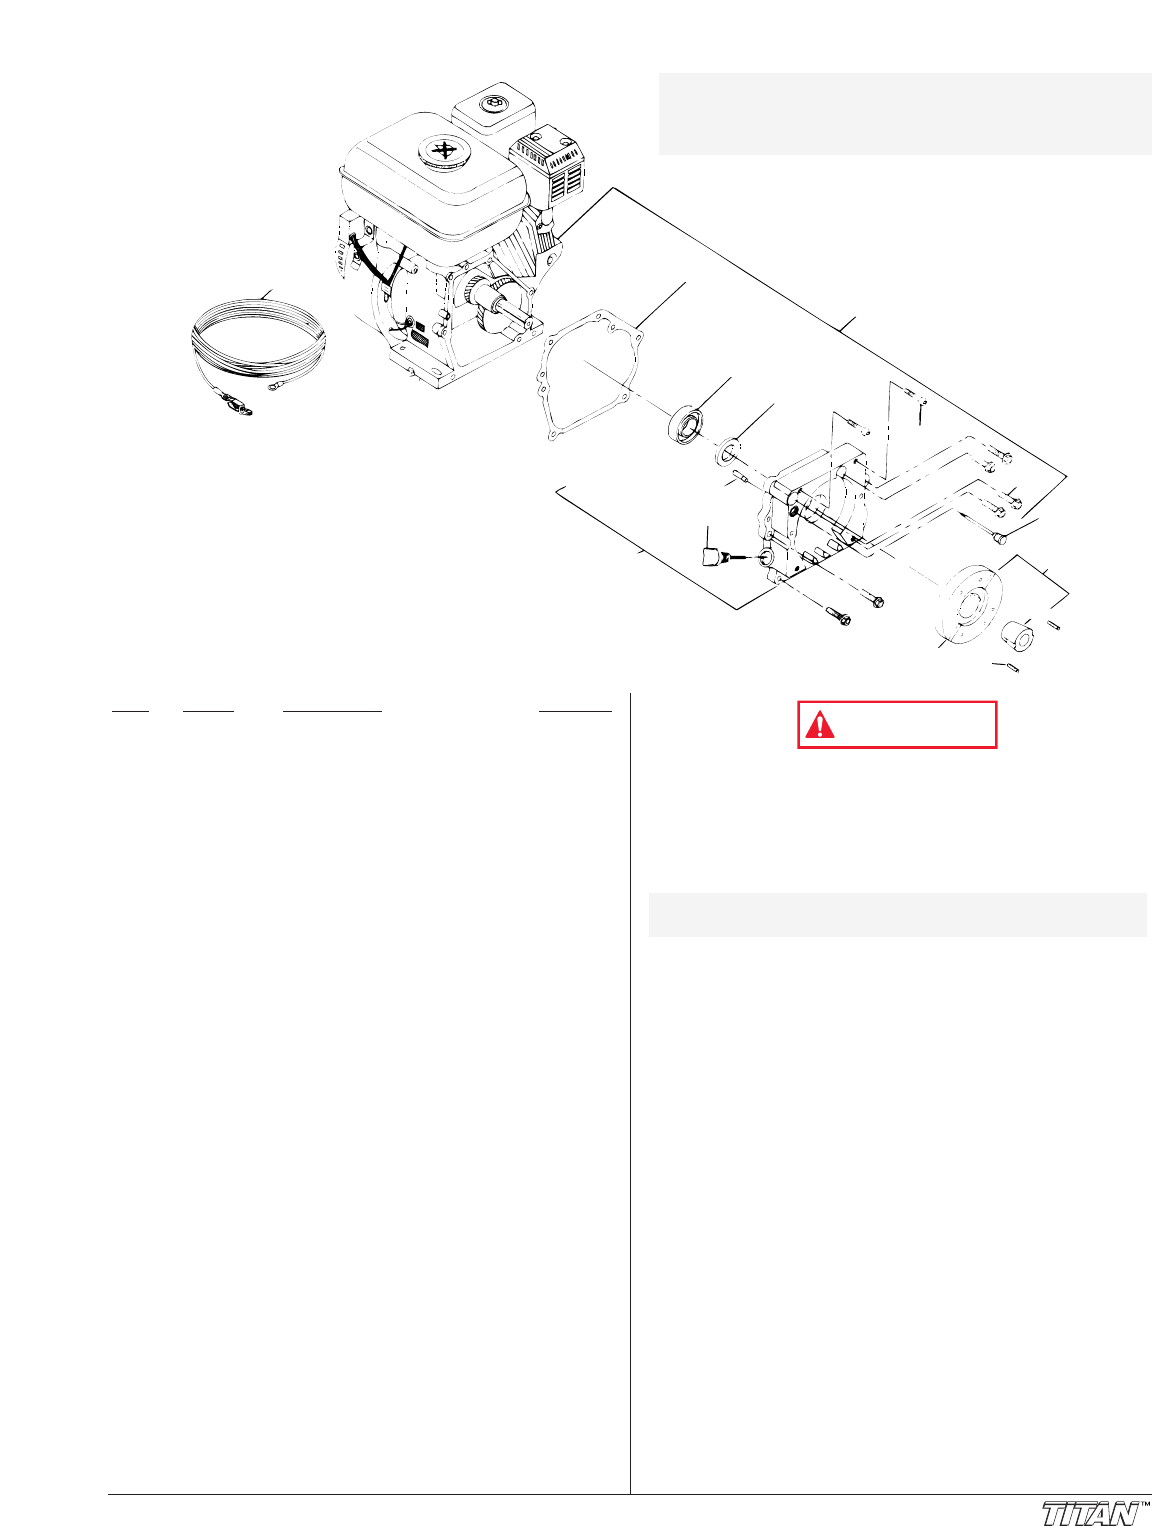
Engine Assembly
1
7
5
2
3
4
9
13
6
8
17
11
12
14
16
Item Part # Description Quantity
1 730-165 Ground Wire...........................................1
2 750-042 Gasket....................................................1
3 750-044 Engine Bearing.......................................1
4 750-043 Engine Seal............................................1
5 730-158 Dip Stick.................................................1
6 750-051 Screw .....................................................6
7 750-086 Engine Mount (includes items 3 and 4)....1
8 730-184 Electrical Connector...............................1
9 755-117 Engine Assembly....................................1
(includes items 2–8, 13 and 16)
11 763-550 Bushing ..................................................1
12 763-566 Screw .....................................................2
13 750-018 Screw .....................................................2
14 755-209 Clutch Plate ...........................................1
16 700-722 Terminal .................................................1
17 755-150 Clutch Assembly ...................................1
(includes items 11, 12, and 14)..............1
Important Facts Concerning this Gas Unit
This unit contains a clutch that engages when the unit is
pumping. The pump’s pressure control device engages and
disengages the clutch to control pressure. To prevent
unnecessary wear to the clutch it is advisable to adjust your
engine speed and pressure setting so as to limit the amount of
times the clutch engages and disengages. This can be
accomplished as follows:
Example:
Operating one gun with .019 tip. To reduce clutch wear
reduce engine speed by adjusting the throttle to a low or
medium setting and increase pressure only until heavy ends of
spray pattern have been eliminated.
Example:
Operating one gun with .023 tip. Increase engine speed to a
high setting and increase pressure until heavy ends of spray
pattern have been eliminated.
Example:
Spraying light-bodied materials at low pressure. To reduce
surging at the gun and to decrease clutch wear, reduce engine
speed to idle and reduce pressure until desired spray pattern
is achieved.
Before proceeding, follow the “Pressure Relief
Procedure” in the Operation section of this manual.
Additionally, follow all other warnings to reduce the risk
of an injection injury, injury from moving parts or electric
shock.
Routine Engine Maintenance
Daily: Check and fill the gas tank. After the first 20 hours of
operation: Drain the oil and refill with clean oil. Check the
engine oil level and fill as necessary.
Weekly: Remove the cover of the air filter and clean the
element. Replace the element if necessary. If operating in an
unusually dusty environment, check the filter daily and replace
if necessary. (Replacement elements can be purchased from
your local TITAN Dealer.)
After each 50 hours of operation: Change the engine oil.
Spark Plug: Use only a (NKG) BP6ES plug. Gap the plug to
0.025 - 0.030 in. (0.7 - 0.8 mm). Be sure to use a spark plug
wrench when installing and removing the plug.
Servicing/Replacing the Clutch Assembly
1. Remove the four screws (item 54 in Gear Box parts list)
that secure the engine assembly.
2. Inspect the clutch plate (14) for wear.
3. If worn, remove the two screws (12) and pull the clutch
from the engine shaft.
4. To reinstall new clutch, slide the clutch plate (14) onto
engine shaft.
5. Install the clutch gap tool (P/N 755-221) behind the clutch
plate (14) and push the clutch against the tool until the
tool touches the engine mount (7).
6. Tighten the screws (12) that secure the clutch plate (14).
7. Secure the engine assembly (9) to the pump using the
four screws (item 54 in Gear Box parts list).
NOTE: For detailed maintenance and specifications,
refer to the separate engine manual supplied.
NOTE: All service work on the Engine must be done
by a Honda Authorized Service Center. To
locate one in your area, call Titan Customer
Service at 1-800-526-5362.
