


AXIS 206/206M Quick Installation Guide Page 5
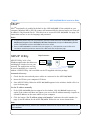
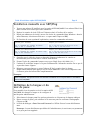
One-click Installation
Requirements:
The AXIS Internet Dynamic DNS Service
Follow these instructions:
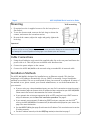
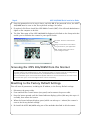
1. Once the network and power cables have been connected, wait for the Status indicator to
show a steady green.
2. Now press the Control button on the rear of the camera once
. The Status indicator on the
front of the camera will blink green while it connects to the AXIS Internet Dynamic DNS
Service.
3. Wait for the Status indicator to go back to showing a steady green.
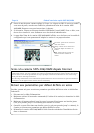
4. To complete the installation, now visit www.axiscam.net from an Internet connected PC.
This must be done within 60 minutes of pressing the Control button.
5. Follow the on-screen instructions provided by the AXIS Internet Dynamic DNS Service.
6. Please see page 7 for instructions on how to set the language and the password.
Notes:
7.
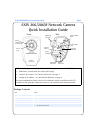
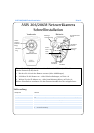
• You will need the camera’s serial number (S/N) to perform the installation. This is found on the label on
the rear panel. See page 3.
• If this installation was unsuccessful, try one of the other methods described on the following pages.
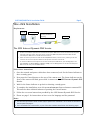
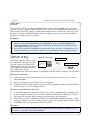
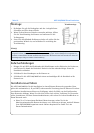
Broadband router/modem
providing automatic IP
addressing
Internet
Computer
on a LAN
AXIS 206/206M
• The One-click installation procedure uses the AXIS Internet Dynamic DNS Service. This free service allows you to quickly
and simply install your camera, which then receives a static name (DNS name). More information about the AXIS
Internet Dynamic DNS Service is available at www.axiscam.net
• Please note that this procedure will send the AXIS 206/206M’s IP address, firmware version, product type and serial
number to the Axis Internet Dynamic DNS Service. No personal information is transferred.
• To remove the DNS name and unregister from the Axis Internet Dynamic DNS Service, open the Setup pages in the
AXIS 206/206M, click System Options > Network > TCP/IP, click the Settings button for the AXIS Internet Dynamic
DNS Service and finally, click the Remove button.