


AXIS 209FD/FD-R/FD-R M12/MFD/MFD-R/MFD-R M12 Installation Guide Page 5
ENGLISH
ENGLISH
Install the hardware
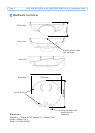
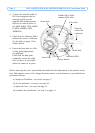
Mount the camera
The AXIS 209FD/FD-R/FD-R M12/MFD/MFD-R/MFD-R M12 can be mounted with the cable
routed through the ceiling or from the side.
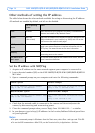
The AXIS 209FD/AXIS 209MFD is
supplied with a standard RJ-45 female
network connector, on a 2 meter cable.
The AXIS 209FD-R/AXIS 209MFD-R is
supplied with a 29mm female RJ-45
network connector on a 0.5 meter cable.
To protect the cabling against moisture
this connecter must be connected to a
suitable 29mm male connector.
The AXIS 209FD-R M12/AXIS 209MFD-
R M12 is supplied with a 21mm male
M12 D-code network connector on a 0.5
meter cable. To protect the cabling
against moisture this connecter must be
connected to a suitable 21mm female
connector.
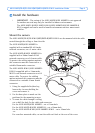
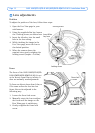
1. Using the supplied allen/hex key,
loosen the 4 screws holding the
cover and remove it.
2. Use the base plate to mark out the
positions for the mounting screws.
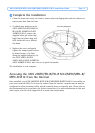
3. To route the cable through a ceiling,
cut or drill the hole for the cable and connector.
For the AXIS 209FD/AXIS 209MFD - cut a 17mm hole.
For the AXIS 209FD-R/AXIS 209MFD-R - cut a 30mm hole.
For the AXIS 209FD-R M12/AXIS 209MFD-R M12 - cut a 22mm hole.
-or-
For a surface mounted cable, cut out the cable exit hole at the rear of the cover
!
IMPORTANT! - The casing of the AXIS 209FD/AXIS 209MFD is not approved
for outdoor use and may only be installed in indoor environments.
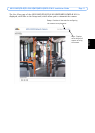
The AXIS 209FD-R/AXIS 209FD-R M12/AXIS 209MFD-R/AXIS 209MFD-R
M12 is rugged and can be used in humid environments such as mass transit
vehicles.