


Page 8 AXIS M31-VE Network Camera Series Installation Guide
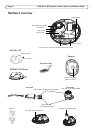
Install the hardware
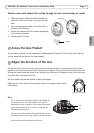
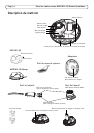
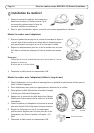
1. Remove the top cover from the camera unit by
loosening the 2 screws. Then insert the top
cover tool into the slit in the bottom cover and
lift.
2. Depending on the kind of installation required, follow the appropriate instructions below.
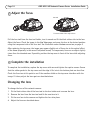
Mount the camera without adaptor
1. Adjust the drill template on the mounting surface so the camera’s
lens faces the right direction, and drill four holes for the screws,
and one hole for the cable.
2. Align the screw slots in the camera with the screw holes in the
mounting surface, and attach the camera with 4 screws.
Note:
It is recommended that each screw head with the washer does not exceed
5mm in height and 7mm in diameter.
Do not use a countersunk screw head.
3. Attach the network cable to the PoE switch.
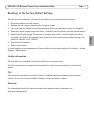
Mount camera with adaptor (cabling along the wall)
1. Place the adaptor on the mounting surface (wall or ceiling) and position the slot for the cable
where appropriate.
2. Fasten the adaptor with four screws appropriate to the surface material.
3. Draw the camera’s Ethernet cable along the cable slot
in the adaptor.
4. Press the cable lid appropriate for side cabling, into
the slot in the side of the adaptor.
5. Place the camera on the adaptor, and turn the camera
so the lens faces the correct direction.
6. Adjust so the screw slots on the camera are aligned
with the screw holes in the adaptor, and attach the 4
screws (torque < 2.5 Nm).
7. Attach the network cable to the PoE switch.
Cable lid
Cable lid
Cable slot