


AXIS P3364-VE Network Camera
Events
• System
- System Initializing – Trigger the rule when the product is being started. This can for example be used to send a
notication when the product restarts.
• Time
- Recurrence – Trigger the rule periodically. See Recurrences, on page 40. This can for example be used to
upload an image every 5 minutes.
- Use Schedule – Trigger the rule according to the selected schedule. See Schedules, on page 39.
Available actions include:
• Day/Night Vision Mode – Set day mode (IR cut lter on) or night mode (IR cut lter off).
• Output Port – Activate an I/O port to control an external device.
• Play Audio Clip – See Audio Clips, on page 26.
• PTZ Control
- Preset Position – Go to a preset position.
- Guard Tour – Start a guard tour. See Guard Tour, on page 30.
• Record Video – Record video to a selected storage.
• Send Images – Send images to a recipient.
• Send Notications – Send a notication message to a recipient.
• Status LED – Flash the LED indicator. This can for example be used to validate triggers such as motion detection during
product installation and conguration.
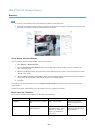
Setting Up an Action Rule
An action rule denes the conditions that must be met for the product to perform an action, for example record video or send an
email notication. If multiple conditions are dened, all of them must be met to trigger the action.
The following example describes how to set up an action rule to record video to a network share if there is movement in the
camera’s eld of view.
Set up motion detection and add a network share:
1. Go to Detectors > Motion Detection and congure a motion detection window. See page 33
2. Go to System Options > Storage and set up the network share. See page 50.
Set up the action rule:
1. Go to Events > Action Rules and click Add.
2. Select Enable rule and enter a descriptive name for the rule.
3. Select Detectors from the Trigger drop-down list.
4. Select Motion Detection from the drop-down list. Select the motion detection window to use.
5. Optionally, select a Schedule and Additional conditions. See below.
6. Under Actions, select Record Video from the Type drop-down list.
7. Select a Stream prole and congure the Duration settings as described below.
38