


AXIS Q1932–E PT Mount Thermal Network Camera
Video
To select a default stream prole for the Live View page, go to Setup > Live View Cong.
Camera Settings
The Video > Camera Settings page provides access to advanced image settings for the Axis product.
Image Appearance
The image Brightness can be adjusted in the range 0–100, where a higher value produces a brighter image.
Increasing the Sharpness can increase bandwidth usage. A sharper image might increase image noise especially in low dynamic
conditions. A lower setting reduces image noise, but the whole image will appear less sharp.
The Contrast changes the relative difference in thermal radiation. It can be adjusted using the slidebar.
Exposure Settings
Congure the exposure settings to suit the image quality requirements in relation to temperature variations in the scene.
Automatic gain control - This setting is used to automatically adjust the gain to an appropriate range, the weaker the image signal,
the stronger the gain. Select the Linear or Equalization automatic gain control method. The latter uses a histogram equalization
method, which adjusts the gain dynamically by distributing the most frequent intensity values.
Exposure zones - This settings determines which part of the image is used to calculate the exposure. For most situations, the Auto
setting can be used. For particular requirement, select Dened and then click Edit and select one of the predened areas.
Gain - This setting controls the maximum gain. Lowering the gain reduces the contrast in the thermal image.
Overlay
Overlays are used to provide extra information, for example for forensic video analysis or during product installation and
conguration. Overlays are superimposed over the video stream.
An overlay text can display the current date and time, or a text string. When using a text string, modiers can be used to display
information such as the current bit rate or the current frame rate. For information about available modiers, see File Naming &
Date/Time Formats in the online help
.
It is also possible to display text when an action rule is triggered, see Use Overlay Text in an Action Rule.
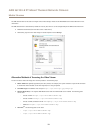
To enable overlays:
1. Go to Video > Video Stream and select the Image tab.
2. To include an overlay image, select Include overlay image at the coordinates. The overlay image must rst be uploaded to
the Axis product, see Overlay Image.
3. To include date and time, select Include date and Include time.
4. To include a text string, select Include text and enter the text in the eld. Modiers can be used, see File Naming &
Date/Time Formats in the online help
.
5. Dene text overlay characteristics in the relevant elds.
6. Click Save.
To modify the date and time format, go to System Options > Date & Time. See Date & Time on page 38.
17