


AXIS 2110 Installation Guide - English Page 1 of 5
Installing Your Camera on a Network
Follow the guide below to quickly install your AXIS 2110 on an Ethernet network:
Important!
Note the Serial number on the underside of the unit. You need to know this to set the IP address:
Using an appropriate method for your operating system, assign your product with a unique IP
Address from a computer on your network, as follows:
Note: In some Unix systems, the arp command can be located in a directory that is not on the
command path; e.g: /usr/sbin/arp
You wil l now see ‘Request timed out ...’ messages repeatedly returned within the DOS
window.
For details on installing the AXIS 2110 to a modem, see page 2.
Serial number same as
00408c100086 =
Ethernet number; e.g.
00-40-8c-10-00-86
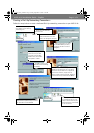
Windows 95, 98, NT and 2000 only - Start a DOS window and type
these commands:
Syntax:
arp -s <Server IP address> <Ethernet address> <my PC IP address>
ping -t <Server IP address>
Example:
arp -s 172.21.1.200 00-40-8c-10-00-86 172.21.1.193
ping -t 172.21.1.200
UNIX only - Type these commands in your command
line:
Syntax:
arp -s <IP address> <Ethernet address> temp
ping <IP address>
Example:
arp -s 172.21.1.200 00:40:8c:10:00:86 temp
ping 172.21.1.200
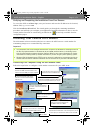
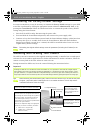
Connect an Ethernet cable to your AXIS
2110 and attach it to the network.
Connect the external Power Supply to the
unit and connect it to your main power supply.
RJ-45 connector
Network connector
Network Indicator
Power Indicator
Power Supply
Connector
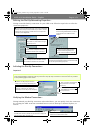
Exit Ping. The installation is now complete, and you are ready
to access the AXIS 2110 from your Web browser, as described in
the next section.
Approximately 10-15 seconds after connecting the power supply, the
message ‘Reply from 172.21.1.200...’ - or similar, is returned within the
DOS window. Ensure that the Power Indicator is permanently lit and that
the Network Indicator flashes intermittently.
2110ig_master_smaller.fm Page 1 Friday, September 14, 2001 12:54 PM