


3
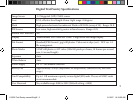
QUICK GUIDE: BUSHNELL TRAIL SENTRY 119303
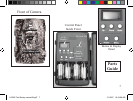
1. Open the camera by releasing the latches on the right side of the camera. Install 4 “D” cell batteries (at base of all batteries
contacting springs), and insert an SD card (not included, use any capacity from 16MB to 1GB) in the slot to the right of the 5 buttons
(upside down, brand name facing you). Press the card down until you hear it click into place.
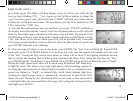
2. Press and release the Power switch. The display will show four “dashes”, then change to “HHHH” with a blinking key icon
below it. This is a prompt to enter your password, which can be changed in the setup menu. The rst time the camera is turned on,
the password is the default, “0000”. Press the Enter button four times to enter four zeros, then press it again to conrm-the display
indicates “PASS” and the camera is ready to operate. If the wrong password is entered, the display will ash “ERRO” and the camera
will not work.
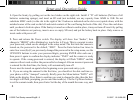
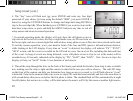
3. If you are using the camera for the rst time, you should set the date and time so your photos will be “stamped” correctly. Briey
press the Menu button-”DATE” will blink on the display. Press Enter to conrm you want to change the date, then the rst two digits
will ash, prompting you to enter the month. Use the Up/Down buttons to set the current month, then press Enter, and repeat to set the
day of the month and press Enter again. The display will then change to let you set the year, with only the last two digits ashing (“20_
_”). Again use the Up/Down buttons to change the year if necessary, press enter, and set the time (“TIME” will ash, press enter and
use Up/Down to set the hour and minute. The time display uses the 24 hr standard, so 2:00 PM is indicated as “1400”, etc).
4. After the date and time have been set, and Enter is pressed, “EVENT” will blink on the display. Press Enter and the “camera” icons
for still photos and movie clips will both blink. This allows you to choose which type of le will be recorded every 30 seconds for as
long as motion and heat events are detected. Press Enter again, and only the still photo icon will blink. Pressing the UP and DOWN
buttons will now let you alternate between blinking movie camera and still photo icons. Select the photo mode you prefer and press
ENTER while that icon is blinking.
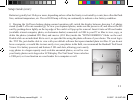
5. After selecting still photo or movie clip mode, press ENTER. The “Sun” icon will blink (f). Press ENTER again and use the UP
or DOWN buttons to set the hour-this is the time the camera will consider to be the start of the “Day”. During the Day, normal color
photos/videos will be taken. If the day becomes cloudy, the regular ash will re. Next, press ENTER and the “Star&Moon” icon will
blink. Press ENTER and set the hour for the start of “Night”. During the Night, photos and videos will be taken using the invisible
infrared LED lamp array to light the scene. This allows you to take night photos without startling animals. Next, press ENTER.
119303 Trail Sentry manual-Engli3 3 2/13/07 12:19:03 AM